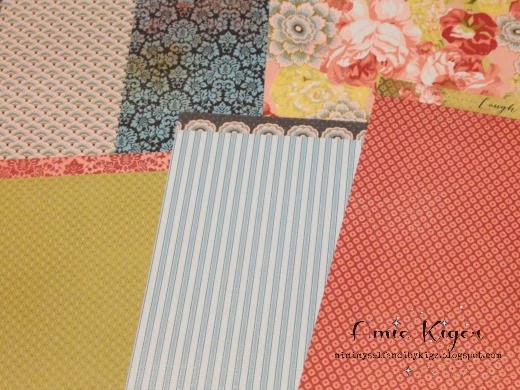
Hi everyone! I am soooooooo excited to be guest designing for the amazing ladies over at the Color My Heart Color Dare this week! I haven't had much time to jump in on any challenges lately, so this one really got my juices flowing. This week, the challenge is to use the beautifully coordinated colors in the Ariana Paper Packet from Close to My Heart.
I think this might just be my favorite paper pack right now. (Have I said that before?) ;)
Anyway, I was super excited to use this paper packet to make the adorable 8 x 3.5 inch Love Mini-Album on pages 48 and 49 of the Cricut Artbooking Cartridge.
My oldest daughter graduates from high school next month, so I made this album using all the "yearly" photos I have left over from other albums so far. I will be displaying it at her graduation party for everyone to see her transformation into the beautiful young lady who starts college in the fall. (Take a peek while I run for the tissues!)
I don't think I will ever run out of tears over this! Just when I think I am good, they flow again. Sigh. Focus on the paper, Amie...FOCUS...focus....
One of the reasons I adore Ariana is that it has a wonderful pack of coordinating Chipboard Complements available to adorn the pages of your scrapbooks. I added some Bitty Sparkles to the flowers here and backed the banner cut from Artbooking with my Tan Glitter Paper.
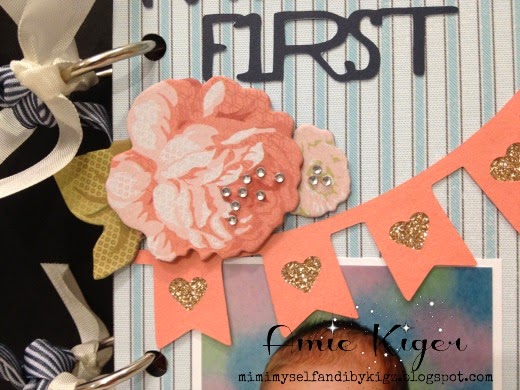
Artbooking is truly a scrapbooker's dream come true! I simply set the dial at 8" and chose the papers to cut each shape. You don't have to figure out any other sizes unless you want to! Otherwise, they each fit perfectly on the mini album pictured above when cut at 8" with Relative Dial Size. (Real Dial Size turned OFF)
The "My First" and "Little One" sentiments are found on p.50 and 51 of the handbook and I cut them just the size I wanted with Real Dial Size in Outdoor Denim CS.
The album is simply bound with these jump rings, with pieces of Outdoor Denim Chevron Ribbon and Retired Color Ready Seam Binding Ribbon tied to them for a softer feel.
This is only the cover page of my album, there are many pages left to be seen! Tune in next week to see more of them! :)
I have had a FABULOUS time Guest Designing for the challenge this week! Thanks so very much for asking me! :)
Please come play along with us over at the Color Dare by creating something with the colors of Ariana!
Need some Ariana? Check it out on my website, mimimyselfandi.ctmh.com!
Never let ANYONE dull your sparkle! Self admitted Cricut fanatic and Shimmer Trim addict. ;)
Showing posts with label Color Ready Seam Binding Ribbon. Show all posts
Thursday, April 24, 2014
Friday, January 17, 2014
I {heart} Cricut Artbooking for Valentines!
TGIF! Yes! The weekend is almost here!!!
I have a super-quick Valentine's Day card to show you today! WHY is it so fast you ask?
Let me show you!
Part of the reason this came together lickety-split was because I used this leftover cut from the Close to My Heart Cricut Artbooking Collection. Did you know this was my FIRST ever cut from the cartridge over six months ago? You can see my very first project with it HERE that uses the positive cut from the hears image. I kept the negative in a drawer of unused and cuts...and just pulled it out! I trimmed it up to fit this polaroid style mat for my card.
I used my Scallop Border Punch to quickly detail the end of the little tag. LOVE it! The little Pink Glitter Gem went on faster than you can say, "sparkle!" ;)
My heart and "love you" sentiment are from the Lifting Spirits My Acrylix. I used a super-fast and easy masking technique to use the words and letters I wanted while leaving the rest out. I love using these old markers to color my stamps. :)
Finally, I used our Alcohol Ink Markers to turn this soon to be retired (cry) Color Ready Seam Binding Ribbon into a shade of Ruby to match the Cardstock. The ink dries super-fast, so I was finished with my card in NO time! :)
Thanks for popping in to my blog today and leaving a little sparkle! :)
I have a super-quick Valentine's Day card to show you today! WHY is it so fast you ask?
Let me show you!
Part of the reason this came together lickety-split was because I used this leftover cut from the Close to My Heart Cricut Artbooking Collection. Did you know this was my FIRST ever cut from the cartridge over six months ago? You can see my very first project with it HERE that uses the positive cut from the hears image. I kept the negative in a drawer of unused and cuts...and just pulled it out! I trimmed it up to fit this polaroid style mat for my card.
I used my Scallop Border Punch to quickly detail the end of the little tag. LOVE it! The little Pink Glitter Gem went on faster than you can say, "sparkle!" ;)
My heart and "love you" sentiment are from the Lifting Spirits My Acrylix. I used a super-fast and easy masking technique to use the words and letters I wanted while leaving the rest out. I love using these old markers to color my stamps. :)
Finally, I used our Alcohol Ink Markers to turn this soon to be retired (cry) Color Ready Seam Binding Ribbon into a shade of Ruby to match the Cardstock. The ink dries super-fast, so I was finished with my card in NO time! :)
Thanks for popping in to my blog today and leaving a little sparkle! :)
Friday, September 13, 2013
Color Dare 62: A Taste of Sarita
Oooops! This is Color Dare #60! How in the world did I get to 62 already? Sigh...the hazards of scheduling out your blog posts! ;)
Welcome to a Latin flavored Color Dare! Today we invite you to soak up the beautiful colors of Sarita: Goldrush, Gypsy, Lagoon, and Outdoor Denim (Cotton Candy is optional.)
I didn't have to think very long about this one, because that textile fabric from the Fabric Necklace Kit wascalling screaming my name from the bottom drawer! ;) I had been wanting to bling up one of Close to My Heart's new Base and Bling Hair Clips ever since I got my inky paws on them...it was finally time!
My finished clip measures about 2 inches across, and I love to wear pins like this on my Close to My Heart apron for my workshops. These Hair Clips work PERFECTLY! Guess what, ladies? My clips won't be falling off anymore! ;)
I colored my Color Ready Seam Binding Ribbon with my Goldrush Alcohol ink marker to make the ribbon to match. I attached a super-sticky circle of adhesive (also included in the kit) to the hair clip base and laid the little cuts of ribbon around the perimeter.
Then I started to make the fabric flower (instructions are included with the kit) by tracing a 1.25 inch circle on my fabric with my Chalk Marker so I could easily see the lines. I did this on the reverse side of the fabric and cut along the inside edge of the line.
Next, you simply fold the circle of fabric in half, and add a little strip of the handy super-tacky adhesive that comes with the kit. Fold it in half again to complete one quarter of the fabric flower.
I love the little dimension it gives this super-simple flower! You can do it with paper too, right Shelly? ;)
I added the rest of the bling on top of the flower to complete my new clip! The Gypsy and Cotton Candy Sparkles I used are retired, but you can color the clear sparkles now with the Alcohol markers to make the same ones! :)
Guess what time it is? YEP! YOUR TURN!!!! VAMONOS! Go grab your own crafty supplies in these amazing Close to My Heart Colors (or similar ones if you don't have them) and GET YOUR CRAFT ON! You can add any neutral colors to your project that you like...mine were black and silver. If you like this trendy Latin color combo, then check out our Sarita Paper Packet and Textiles!
We cannot wait to see what you come up with when you link up with us over at Color My Heart the Color Dare!
Welcome to a Latin flavored Color Dare! Today we invite you to soak up the beautiful colors of Sarita: Goldrush, Gypsy, Lagoon, and Outdoor Denim (Cotton Candy is optional.)
I didn't have to think very long about this one, because that textile fabric from the Fabric Necklace Kit was
My finished clip measures about 2 inches across, and I love to wear pins like this on my Close to My Heart apron for my workshops. These Hair Clips work PERFECTLY! Guess what, ladies? My clips won't be falling off anymore! ;)
I colored my Color Ready Seam Binding Ribbon with my Goldrush Alcohol ink marker to make the ribbon to match. I attached a super-sticky circle of adhesive (also included in the kit) to the hair clip base and laid the little cuts of ribbon around the perimeter.
Then I started to make the fabric flower (instructions are included with the kit) by tracing a 1.25 inch circle on my fabric with my Chalk Marker so I could easily see the lines. I did this on the reverse side of the fabric and cut along the inside edge of the line.
Next, you simply fold the circle of fabric in half, and add a little strip of the handy super-tacky adhesive that comes with the kit. Fold it in half again to complete one quarter of the fabric flower.
I love the little dimension it gives this super-simple flower! You can do it with paper too, right Shelly? ;)
I added the rest of the bling on top of the flower to complete my new clip! The Gypsy and Cotton Candy Sparkles I used are retired, but you can color the clear sparkles now with the Alcohol markers to make the same ones! :)
Guess what time it is? YEP! YOUR TURN!!!! VAMONOS! Go grab your own crafty supplies in these amazing Close to My Heart Colors (or similar ones if you don't have them) and GET YOUR CRAFT ON! You can add any neutral colors to your project that you like...mine were black and silver. If you like this trendy Latin color combo, then check out our Sarita Paper Packet and Textiles!
We cannot wait to see what you come up with when you link up with us over at Color My Heart the Color Dare!
Monday, September 2, 2013
Heart 2 Heart Color Dare!!! Huh?
Happy Labor Day from Team Sunset!
I had a bit of an identity crisis going on last week when making my project for the new Heart 2 Heart Challenge today. You see, I am a member of both the Color My Heart Color Dare Design Team AND the Heart 2 Heart Challenges Design Team. The first challenge this month at Heart 2 Heart is a Color Dare! Are you still with me? ;) I kept asking myself, "wait, what challenge am I working on?"
It all finally worked out in the end, and this post is taking all my concentration to get it linked up just right, lol. The colors for the first challenge of September over at Heart 2 Heart Challenges are Sunset, Barn Red, Gypsy, and Cashmere. (Take a deep breath, it will be OK!)
My gut reaction to the color combination was "Fall." but that bit of Gypsy pulled me over to "Halloween." Here is the card I was able to make the color combo work with...
I even have a lesson for you! Bonus! See the web at the top right? You can see it looks a bit "foggy" in the inside in the picture below because I used my powder pouch on the paper before I stamped the ink. Powder pouches are great for keeping embossing powder contained and not spreading due to static. However, I changed plans midstream (yeah, it happens) and decided to sprinkle Prisma Glitter on the pigment inked webs instead of embossing them white. That led to a little problem...I couldn't safely clear the powder residue from the black paper! It would have been easy to wipe it off if the webs were solid, embossed lines, but in this case, it would have just taken the glitter right off. Lesson learned!
I easily colored the CTMH Color Ready Seam Binding Ribbon with my Sunset Alcohol Ink Marker to match the colors...
The background pattern is created with all four challenge colors and my favorite chevron stamp on the In the Background My Acrylix from Close to My Heart. This large stamp is soooo easy to line up using our clear blocks!
Here is another awesome, yet amazingly easy trick I learned...using a black sharpie to change the wood color on this round badge from the Babycakes Assortment! The wood color just didn't fit with my color theme, so I made it black! :)
The inside of the card was super-easy to accent with the spider web stamp from the retired Spellbound Workshop on the Go from Close to My Heart. I am sorry to say I used this set for all the Halloween themed images on this card...
I hope you have a chance to play along with us this month over at Heart 2 Heart Challenges with this challenging color combination. You have ALL month to play with us!
Don't link up to the Color Dare with this one, lol! If you want to play with us over at the Color My Heart Color Dare, then check out the colors for this week HERE! ;)
I had a bit of an identity crisis going on last week when making my project for the new Heart 2 Heart Challenge today. You see, I am a member of both the Color My Heart Color Dare Design Team AND the Heart 2 Heart Challenges Design Team. The first challenge this month at Heart 2 Heart is a Color Dare! Are you still with me? ;) I kept asking myself, "wait, what challenge am I working on?"
It all finally worked out in the end, and this post is taking all my concentration to get it linked up just right, lol. The colors for the first challenge of September over at Heart 2 Heart Challenges are Sunset, Barn Red, Gypsy, and Cashmere. (Take a deep breath, it will be OK!)
My gut reaction to the color combination was "Fall." but that bit of Gypsy pulled me over to "Halloween." Here is the card I was able to make the color combo work with...
I even have a lesson for you! Bonus! See the web at the top right? You can see it looks a bit "foggy" in the inside in the picture below because I used my powder pouch on the paper before I stamped the ink. Powder pouches are great for keeping embossing powder contained and not spreading due to static. However, I changed plans midstream (yeah, it happens) and decided to sprinkle Prisma Glitter on the pigment inked webs instead of embossing them white. That led to a little problem...I couldn't safely clear the powder residue from the black paper! It would have been easy to wipe it off if the webs were solid, embossed lines, but in this case, it would have just taken the glitter right off. Lesson learned!
I easily colored the CTMH Color Ready Seam Binding Ribbon with my Sunset Alcohol Ink Marker to match the colors...
The background pattern is created with all four challenge colors and my favorite chevron stamp on the In the Background My Acrylix from Close to My Heart. This large stamp is soooo easy to line up using our clear blocks!
Here is another awesome, yet amazingly easy trick I learned...using a black sharpie to change the wood color on this round badge from the Babycakes Assortment! The wood color just didn't fit with my color theme, so I made it black! :)
The inside of the card was super-easy to accent with the spider web stamp from the retired Spellbound Workshop on the Go from Close to My Heart. I am sorry to say I used this set for all the Halloween themed images on this card...
I hope you have a chance to play along with us this month over at Heart 2 Heart Challenges with this challenging color combination. You have ALL month to play with us!
Don't link up to the Color Dare with this one, lol! If you want to play with us over at the Color My Heart Color Dare, then check out the colors for this week HERE! ;)
Saturday, August 24, 2013
Freshly Frosted Sketches #100 ;)
I have been loving the new challenges that I found lately, and realize there must be so many more out there! Freshly Made Sketches is on their 100th challenge sketch already and I just found them, lol!
Here is my creation for their latest challenge that I made with the Close to My Heart Frosted Paper Packet!
This is the sweet sketch (which is also their first!)
I have seen many creations with this paper packet, most of them with a wintery theme since some of the patterns feature snowflakes. I wanted to see if I could use it for something else. I love the beautiful blues in this paper, Frosted Grey and Frosted Turquoise.
I used a brand new Fall stamp set called Happy Autumn to make this lovely flower. I stamped each part using two colors--the lighter color on the entire image, and the darker color rolling ink only on the edges. I really like the effect. The stem is stamped in Sweet Leaf and then Olive, and the flower petals are inked in Blush followed by Hollyhock. I used Close to My Heart's fantastic Micro-Tip Scissors to hand cut each one. If you don't think you could ever pull this off, you are not alone! I didn't think I possessed any scissor skills and had NO intentions of ever paper-piecing until I tried a pair of these! I am a believer now! :)
The sentiment is from one of my favorite new Close to My Heart My Acrylix, Look to the Light. It features several comforting bible verses that I will certainly get a lot of use from. I stamped this beautiful image of Psalm 46:1 in Champagne Ink.
I decided to use the Color Ready Seam Binding Ribbon without altering the color for a more clean, crisp feel. I'm not sure if it shows really well, but the strip of Kraft CS behind it is embossed with the Quaterfoil Folder from the Paper Studio. I added a strip of Bronze Shimmer Trim and Tan Glitter Paper to the bottom for some needed sparkle. I am absolutely loving the new Scallop Border Punch, I have to tell you! Now, I just have to add a little aside here about the CTMH Glitter Paper. I have only purchased one pack of each color in the past year since it was introduced...and still have sooooo much left! If you follow my blog, then you know how I like to add glitter, so believe me when I say this stuff goes a long way! :)
A little bit of bling from the Sparkles Assortment Brown and Tan to round out the sketch...
Thanks so much for popping in to see what I had to share today! Click on any of the links to learn more about these super Close to My Heart products I used on my website! :)
Here is my creation for their latest challenge that I made with the Close to My Heart Frosted Paper Packet!
This is the sweet sketch (which is also their first!)
I have seen many creations with this paper packet, most of them with a wintery theme since some of the patterns feature snowflakes. I wanted to see if I could use it for something else. I love the beautiful blues in this paper, Frosted Grey and Frosted Turquoise.
I used a brand new Fall stamp set called Happy Autumn to make this lovely flower. I stamped each part using two colors--the lighter color on the entire image, and the darker color rolling ink only on the edges. I really like the effect. The stem is stamped in Sweet Leaf and then Olive, and the flower petals are inked in Blush followed by Hollyhock. I used Close to My Heart's fantastic Micro-Tip Scissors to hand cut each one. If you don't think you could ever pull this off, you are not alone! I didn't think I possessed any scissor skills and had NO intentions of ever paper-piecing until I tried a pair of these! I am a believer now! :)
The sentiment is from one of my favorite new Close to My Heart My Acrylix, Look to the Light. It features several comforting bible verses that I will certainly get a lot of use from. I stamped this beautiful image of Psalm 46:1 in Champagne Ink.
I decided to use the Color Ready Seam Binding Ribbon without altering the color for a more clean, crisp feel. I'm not sure if it shows really well, but the strip of Kraft CS behind it is embossed with the Quaterfoil Folder from the Paper Studio. I added a strip of Bronze Shimmer Trim and Tan Glitter Paper to the bottom for some needed sparkle. I am absolutely loving the new Scallop Border Punch, I have to tell you! Now, I just have to add a little aside here about the CTMH Glitter Paper. I have only purchased one pack of each color in the past year since it was introduced...and still have sooooo much left! If you follow my blog, then you know how I like to add glitter, so believe me when I say this stuff goes a long way! :)
A little bit of bling from the Sparkles Assortment Brown and Tan to round out the sketch...
Thanks so much for popping in to see what I had to share today! Click on any of the links to learn more about these super Close to My Heart products I used on my website! :)
Friday, August 16, 2013
Color Dare #56 An Analogus Lesson
Happy Color Dare! It is Friday finally, and you know what that means around here--a new challenge over at the Color My Heart Color Dare!!! This week we have an analogous color challenge using the Close to My Heart Colors Buttercup, Pear, and Lagoon.
According to Wikipedia, "Analogous colors are groups of colors that are adjacent to each other on the color wheel." These colors tend to be pleasing to the eye when grouped together.
For my sample project on the Color My Heart Design Team, I decided to make a little gift box that I haven't been able to try yet from the Close to My Heart Cricut Artiste Cartridge.
You can find the nesting sides of this little box on page 74 of the Artiste Handbook, on the Mother's Day Key. I cut it out at 1 inch on a B&T Pattern from the Chantilly Paper Packet with my Cricut Expression 2 cutting machine. There is a perfectly adorable shape to use for the top and bottom of the box, but I decided to use a different one that is found on page 53 of the Art Philosophy Cartridge instead. I cut it out of White Daisy CS at 3 inches. See how versatile this little box can be? So many possibilities! :)
The sentiment is one of our brand new size M My Acrylix stamps called Heartfelt Birthday Wish. I stamped in Pear Pigment Mini from the Adventure Pigment Inks Mini Tower. Then I dusted it with Clear embossing powder and gave it a shot of my heating tool to turn it into a shiny, raised outline. It was perfect for coloring in with my Pear Alcohol Ink Marker now! I just used layers of strokes to create an ombre effect in no time! :) A tiny little Lagoon colored Aqua Dot finishes off the "i" nicely.
Embellishing the side of this box was super-fun! First, I colored my Color-Ready Seam Binding Ribbon with the Buttercup Alcohol Ink Marker. After tying that on, I added fishtail banners of the Green Glitter Paper and one that I made with White Daisy Cardstock and my Lagoon Houndstooth Washi! The twisty Slate Striped Twist Ties add JUST the perfect amount of fun! LOVE it!
If you want to put one of these little boxes together, it is super-easy. I used glue dots to attach the top and bottom like this...see how the top and bottom nest? It is a great little box for a jewelry gift!
I showed you mine...now YOU show us YOURS! We want to see your creations with the Close to My Heart colors Pear, Lagoon, and Buttercup. You can add any neutrals that you like, just not other colors. If you don't have CTMH products, feel free to substitute the colors for some that are similar. Just link up with us at Color My Heart for your chance to win one of the coveted Color Dare gem badges. Did you know we have FOUR now? :)
Can't wait to see what you make! :)
According to Wikipedia, "Analogous colors are groups of colors that are adjacent to each other on the color wheel." These colors tend to be pleasing to the eye when grouped together.
For my sample project on the Color My Heart Design Team, I decided to make a little gift box that I haven't been able to try yet from the Close to My Heart Cricut Artiste Cartridge.
You can find the nesting sides of this little box on page 74 of the Artiste Handbook, on the Mother's Day Key. I cut it out at 1 inch on a B&T Pattern from the Chantilly Paper Packet with my Cricut Expression 2 cutting machine. There is a perfectly adorable shape to use for the top and bottom of the box, but I decided to use a different one that is found on page 53 of the Art Philosophy Cartridge instead. I cut it out of White Daisy CS at 3 inches. See how versatile this little box can be? So many possibilities! :)
The sentiment is one of our brand new size M My Acrylix stamps called Heartfelt Birthday Wish. I stamped in Pear Pigment Mini from the Adventure Pigment Inks Mini Tower. Then I dusted it with Clear embossing powder and gave it a shot of my heating tool to turn it into a shiny, raised outline. It was perfect for coloring in with my Pear Alcohol Ink Marker now! I just used layers of strokes to create an ombre effect in no time! :) A tiny little Lagoon colored Aqua Dot finishes off the "i" nicely.
Embellishing the side of this box was super-fun! First, I colored my Color-Ready Seam Binding Ribbon with the Buttercup Alcohol Ink Marker. After tying that on, I added fishtail banners of the Green Glitter Paper and one that I made with White Daisy Cardstock and my Lagoon Houndstooth Washi! The twisty Slate Striped Twist Ties add JUST the perfect amount of fun! LOVE it!
If you want to put one of these little boxes together, it is super-easy. I used glue dots to attach the top and bottom like this...see how the top and bottom nest? It is a great little box for a jewelry gift!
I showed you mine...now YOU show us YOURS! We want to see your creations with the Close to My Heart colors Pear, Lagoon, and Buttercup. You can add any neutrals that you like, just not other colors. If you don't have CTMH products, feel free to substitute the colors for some that are similar. Just link up with us at Color My Heart for your chance to win one of the coveted Color Dare gem badges. Did you know we have FOUR now? :)
Can't wait to see what you make! :)
Saturday, July 20, 2013
Impromptu Workshop with the Kids Part Two!
Hi everyone! I showed you the cards my kids made the other week HERE. Now for one of the few I was able to squeak out while I was helping them! ;)
I used one of my Verve stamps for this sentiment--Psalm 46:1. It is stamped in CTMH Chocolate Ink Onto White Daisy CS matted in Desert Sand and Chocolate CS. I distressed the edges of this unknown PP for the background in Chocolate Ink as well.
Close to My Heart Color Ready Seam Binding Ribbon is so easy to work with--you can use it as is or ink it up to match anything! I like to ink it up with my CTMH Alcohol Ink markers to match my CS, but for this one, I left it alone. I added a green button and some White Hemp.
You can barely see it, but I also used one of my new MFT doily dies behind the bow.
I know just who to send this one to! :) I bet you know someone that could use a little bit of sparkle in their day too...why not make them a card?
I used one of my Verve stamps for this sentiment--Psalm 46:1. It is stamped in CTMH Chocolate Ink Onto White Daisy CS matted in Desert Sand and Chocolate CS. I distressed the edges of this unknown PP for the background in Chocolate Ink as well.
Close to My Heart Color Ready Seam Binding Ribbon is so easy to work with--you can use it as is or ink it up to match anything! I like to ink it up with my CTMH Alcohol Ink markers to match my CS, but for this one, I left it alone. I added a green button and some White Hemp.
You can barely see it, but I also used one of my new MFT doily dies behind the bow.
I know just who to send this one to! :) I bet you know someone that could use a little bit of sparkle in their day too...why not make them a card?
Wednesday, July 17, 2013
Wrap It Up With Ribbon this Time!
Wow, I almost confused my self right out of entering a contest! I didn't realize until I was making my project that there were TWO current Wrap It Up contests going on!
On Monday I posted a simple, yet awesome pillowbox gift card holder. Today, I made another box that has a "thanks" rather than a birthday theme for the Peachy Keen Wrap It With Ribbon Challenge. This one also pays tribute to one of my favorite summertime treats--ICE CREAM! Heart 2 Heart has posted their third July challenge, I Scream, You Scream, We All Scream for ICE CREAM, so I am linking up there too! :)
Guess what!? Another challenge to play! Thanks to L.B. for pointing me to the Die Cuttin Divas Challenge Blog where they are having an Ice Cream Challenge too! :)
I used two retired Close to My Heart My Acrylix sets for this project, Fanfare and Thank You. The colors are super-yummy together in Cotton Candy and Pear! I had to make the little guy with the face into a chip mint scoop, my kiddos' favorite!!! His adorable face is from the Peachy Keen January 2013 Kit. I used my black stickles for the little chocolate chips. The cone is stamped in Cashmere Ink to keep things light and refreshing.
The White Daisy base of my box is stamped with first and second generation images of Cotton Candy Ink. One ink pad=two or more different shades of that color, did you know? I added that adorable little strip of Lagoon Houndstooth washi just like I did on the box I posted Monday.
Don't you think a great way to say thank you is with a gift card for your favorite ice cream shoppe? I do! :D
You have the rest of July to play along over at H2H for their Ice Cream challenge, so go ahead and use your CTMH products to join in on the fun!
Now, all this talk about ice cream makes me want to go EAT some ice cream! What is your favorite flavor? Mine is either cherry amaretto at Culver's or Cake Batter at Cold Stone! YUMMO!!!
On Monday I posted a simple, yet awesome pillowbox gift card holder. Today, I made another box that has a "thanks" rather than a birthday theme for the Peachy Keen Wrap It With Ribbon Challenge. This one also pays tribute to one of my favorite summertime treats--ICE CREAM! Heart 2 Heart has posted their third July challenge, I Scream, You Scream, We All Scream for ICE CREAM, so I am linking up there too! :)
Guess what!? Another challenge to play! Thanks to L.B. for pointing me to the Die Cuttin Divas Challenge Blog where they are having an Ice Cream Challenge too! :)
I used two retired Close to My Heart My Acrylix sets for this project, Fanfare and Thank You. The colors are super-yummy together in Cotton Candy and Pear! I had to make the little guy with the face into a chip mint scoop, my kiddos' favorite!!! His adorable face is from the Peachy Keen January 2013 Kit. I used my black stickles for the little chocolate chips. The cone is stamped in Cashmere Ink to keep things light and refreshing.
The White Daisy base of my box is stamped with first and second generation images of Cotton Candy Ink. One ink pad=two or more different shades of that color, did you know? I added that adorable little strip of Lagoon Houndstooth washi just like I did on the box I posted Monday.
Don't you think a great way to say thank you is with a gift card for your favorite ice cream shoppe? I do! :D
You have the rest of July to play along over at H2H for their Ice Cream challenge, so go ahead and use your CTMH products to join in on the fun!
Now, all this talk about ice cream makes me want to go EAT some ice cream! What is your favorite flavor? Mine is either cherry amaretto at Culver's or Cake Batter at Cold Stone! YUMMO!!!
Monday, July 15, 2013
Wrap It Up!
Hi everyone!
I stumbled upon a new blog challenge, well new to me anyway, when browsing some entries in other challenges. It gets to be a lot to keep track of, so I try to knock it out right away if I can get to it, and I am really choosy about the challenges I participate in now. This one is over at My Craft Spot. There is a Monday Challenge, and this one is called Wrap It UP! We are to create a project that holds a gift...super fun!
My next workshop will include making two gift card holders, so I knew what I would make right away! This pillowbox cut from the Cricut Art Philosophy Cartridge is the perfect size for a giftcard...and super cute to boot! (Dr. Seuss would be so proud of me right now!) ;) Would you believe the only paper I used is some White Daisy CS? You bet!
Alright! Can you believe I used mostly one stamp set for this one??? Yep! I got out the Close to My Heart My Acrylix B1417 Perfect Fit Birthday set. I stamped the "happy birthday" sentiment using first and second generation stamping on the pillowbox itself in Pear Ink. That just means I inked the stamp, stamped it once(first generation), moved it, stamped it again(second generation), and then re-inked to repeat the process.
I used my 2 inch scallop punch as well as the 1 1/4 inch circle punch to make the little tag. A tiny loop of silver shimmer trim secures the tag to the ribbon. It is attached underneath the circle that is popped up with foam squares. That little circle design stamped in Cotton Candy Ink is found on the Artiste Collection Kudos stamp set. Bitty sparkles bling up the sentiment, of course.
Here is the back view. You can see the gorgeous ribbon matches the stamped words. I used my Pear Alcohol Ink Marker to color Close to My Heart's Color Ready Seam Binding Ribbon so they would be a perfect match!
See that little strip of washi? SURPRISE!!!! You can get your hands on it starting August 1st on my website! It is one of the brand new products in the Close to My Heart Autumn/Winter Idea Book! :) I couldn't resist using a piece to hold the pillowbox closed at one end.
Well, I hope you see how easy it can be to stamp up a beautiful homemade gift package for that special someone. The lasting impression on the recipient is worth more than money can buy! :)
Here is a pic with all the super CTMH products, besides the Cricut Cartridges and adhesives, that are available on my website to make this project.
You can find them all in the links in my post! Now go out and get your craft on! :)
REMEMBER!!! If you want to PRE-ORDER the new Close to My Heart Cricut Artbooking Collection from me with FREE shipping and be entered to win $25 in products, only available with this offer from ME, GO HERE!!!
I stumbled upon a new blog challenge, well new to me anyway, when browsing some entries in other challenges. It gets to be a lot to keep track of, so I try to knock it out right away if I can get to it, and I am really choosy about the challenges I participate in now. This one is over at My Craft Spot. There is a Monday Challenge, and this one is called Wrap It UP! We are to create a project that holds a gift...super fun!
My next workshop will include making two gift card holders, so I knew what I would make right away! This pillowbox cut from the Cricut Art Philosophy Cartridge is the perfect size for a giftcard...and super cute to boot! (Dr. Seuss would be so proud of me right now!) ;) Would you believe the only paper I used is some White Daisy CS? You bet!
Alright! Can you believe I used mostly one stamp set for this one??? Yep! I got out the Close to My Heart My Acrylix B1417 Perfect Fit Birthday set. I stamped the "happy birthday" sentiment using first and second generation stamping on the pillowbox itself in Pear Ink. That just means I inked the stamp, stamped it once(first generation), moved it, stamped it again(second generation), and then re-inked to repeat the process.
I used my 2 inch scallop punch as well as the 1 1/4 inch circle punch to make the little tag. A tiny loop of silver shimmer trim secures the tag to the ribbon. It is attached underneath the circle that is popped up with foam squares. That little circle design stamped in Cotton Candy Ink is found on the Artiste Collection Kudos stamp set. Bitty sparkles bling up the sentiment, of course.
Here is the back view. You can see the gorgeous ribbon matches the stamped words. I used my Pear Alcohol Ink Marker to color Close to My Heart's Color Ready Seam Binding Ribbon so they would be a perfect match!
See that little strip of washi? SURPRISE!!!! You can get your hands on it starting August 1st on my website! It is one of the brand new products in the Close to My Heart Autumn/Winter Idea Book! :) I couldn't resist using a piece to hold the pillowbox closed at one end.
Well, I hope you see how easy it can be to stamp up a beautiful homemade gift package for that special someone. The lasting impression on the recipient is worth more than money can buy! :)
Here is a pic with all the super CTMH products, besides the Cricut Cartridges and adhesives, that are available on my website to make this project.
You can find them all in the links in my post! Now go out and get your craft on! :)
REMEMBER!!! If you want to PRE-ORDER the new Close to My Heart Cricut Artbooking Collection from me with FREE shipping and be entered to win $25 in products, only available with this offer from ME, GO HERE!!!
Thursday, May 30, 2013
Creature Feature and a Sketch
Hi everyone! The pics keep piling up on my hard drive, so I best get posting, lol.
I made this card intending to enter it into two different contests. The first is Heart 2 Heart's Creature Feature Challenge for May. The second was Atlantic Hearts Sketch Challenge #4, but I missed it over the weekend with all our business, oh well! So many deadlines, so little time! I still like the sketch. :)
I used Close to My Heart's April Stamp of the Month to make the little "creature" to sit atop my sentiment. I am really loving the whole puddle-pad craze. I made this one way back when I was stamping those hot air balloons from the same stamp set and the pinwheels from this month's! You can reminisce HERE for details.
A bit of Stardust Glitter Glitz Gel on the wing gave him just a touch of sparkle. :) The Color Ready Seam Binding Ribbon adds a touch of softness to the hard angles in this card. Do you like the way I matted this one? Instead of using an entire piece of Lagoon CS, I used strips of it to line the edges of the Kraft paper! Awesome use of scraps! ;)
Another touch of softness that I added is this swirly frame I stamped in Lagoon from My Acrylix D1546 Frame Flair. I ended up popping the sentiment out a bit from the framed image...
...because I didn't like how it looked all squished on the original sized space. I cut out a tiny bit bigger rectangle for the sentiment from C1525 Words of Comfort and now I love it!
Have you ever worked around a space issue like this? What did you do? I would love to hear your solutions!
I made this card intending to enter it into two different contests. The first is Heart 2 Heart's Creature Feature Challenge for May. The second was Atlantic Hearts Sketch Challenge #4, but I missed it over the weekend with all our business, oh well! So many deadlines, so little time! I still like the sketch. :)
I used Close to My Heart's April Stamp of the Month to make the little "creature" to sit atop my sentiment. I am really loving the whole puddle-pad craze. I made this one way back when I was stamping those hot air balloons from the same stamp set and the pinwheels from this month's! You can reminisce HERE for details.
A bit of Stardust Glitter Glitz Gel on the wing gave him just a touch of sparkle. :) The Color Ready Seam Binding Ribbon adds a touch of softness to the hard angles in this card. Do you like the way I matted this one? Instead of using an entire piece of Lagoon CS, I used strips of it to line the edges of the Kraft paper! Awesome use of scraps! ;)
Another touch of softness that I added is this swirly frame I stamped in Lagoon from My Acrylix D1546 Frame Flair. I ended up popping the sentiment out a bit from the framed image...
...because I didn't like how it looked all squished on the original sized space. I cut out a tiny bit bigger rectangle for the sentiment from C1525 Words of Comfort and now I love it!
Have you ever worked around a space issue like this? What did you do? I would love to hear your solutions!
Thursday, March 7, 2013
Color Dare #33 + Easter = FUN!
You are going to LOVE this dare! It is totally different than any other we have done...this time we want you to use two different paper packs to come up with a lovely combination of whatever colors they happen to be! The Close to My Heart Papers can be current or retired. I chose one of each: Dotty for You and Chantilly.
Now, I am definitely NOT a math whiz by any means. I am famous for measuring and cutting my paper only to find out that I should have cut it a different size. I do know that this was a super-fun, low-key project for me though with practically no measuring involved! I let my Cricut Expression 2 do all of the cutting along with my Close to My Heart Artiste cartridge!
I made this adorable Easter time treat. It is actually a clever sucker sleeve (try saying that three times fast!)
I used the Smoothie Dotty for You paper for the juicy strawberry, and the Pear B&T Chantilly Paper as the leaf. The easy-peasy tag is one of the square remnants from the Irresistibles Frames that I inked with Buttercup Exclusive Ink. Have I ever mentioned how much I LOVE using leftovers? Not the food kind so much, but the paper type, YES!
A simple banner with the sentiment is popped up with a few layers of cardstock for dimension. This is a fantastic trick that I just learned from Katy Tayor, one of the DT at the Heart 2 Heart Challenges Blog. Here is her post about this clever technique. I continued the "dots" theme with some of our new Washi tape. It was really easy to punch a hole in one corner of my tag to tie it to the stem, I mean stick, of the sucker. ;)
This pretty green ribbon is actually our Color Ready Seam Binding Ribbon that I colored with our amazing Alcohol Ink markers! I love this method of quickly coloring the ribbon because it dries so fast! Patience is not one of my strong points. Sparkle, yes--patience, no. ;) Here is a look at the backside of the berry.
To make these strawberry suckers (minus the tag,) you need the following items:
I just love how Rachel Loesch at the Cricut With Heart Blog shows her projects with the cuts and sizes on her versamat, so decided to try it here. GREAT idea, Rachel--it really helps explain the how-to of the design.
The 3D strawberry cut is on page 72 of the Cricut Artiste handbook. I cut it at 3.5 inches relative dial size, but cut the leaf at 3 inches so it would not get in the way of the tag. If you aren't adding a tag, then feel free to cut it larger to match the berry. I cut the leaf out twice, flipping the paper over for the second cut. This way I can glue the two together and have the green side show on both sides. :)
I first tied the bakers twine to the stick and then wove it in and out of the flaps for the strawberry. I wove three flaps through one side of the tie and the next three through the other, ending around the stick again with a knot.
Next, I inked up the edges of the leaf, and gently widened the hole in the middle with my Crop-o-dile just enough to fit snugly over the stick.
Finally, I added the ribbon to keep it all together. This is also where I added my tag, but you certainly don't have to! This was a pretty easy project for making to add to Easter baskets or for treat bags. I hope you get a chance to try them!
Now it's your turn to take the Color My Heart Color Dare! Pick any two Close to My Heart Paper Packs and combine them for a whole new look! Be sure to link up with us to share your project. I can't wait to see what you make! :)
Now, I am definitely NOT a math whiz by any means. I am famous for measuring and cutting my paper only to find out that I should have cut it a different size. I do know that this was a super-fun, low-key project for me though with practically no measuring involved! I let my Cricut Expression 2 do all of the cutting along with my Close to My Heart Artiste cartridge!
I made this adorable Easter time treat. It is actually a clever sucker sleeve (try saying that three times fast!)
I used the Smoothie Dotty for You paper for the juicy strawberry, and the Pear B&T Chantilly Paper as the leaf. The easy-peasy tag is one of the square remnants from the Irresistibles Frames that I inked with Buttercup Exclusive Ink. Have I ever mentioned how much I LOVE using leftovers? Not the food kind so much, but the paper type, YES!
A simple banner with the sentiment is popped up with a few layers of cardstock for dimension. This is a fantastic trick that I just learned from Katy Tayor, one of the DT at the Heart 2 Heart Challenges Blog. Here is her post about this clever technique. I continued the "dots" theme with some of our new Washi tape. It was really easy to punch a hole in one corner of my tag to tie it to the stem, I mean stick, of the sucker. ;)
This pretty green ribbon is actually our Color Ready Seam Binding Ribbon that I colored with our amazing Alcohol Ink markers! I love this method of quickly coloring the ribbon because it dries so fast! Patience is not one of my strong points. Sparkle, yes--patience, no. ;) Here is a look at the backside of the berry.
I just love how Rachel Loesch at the Cricut With Heart Blog shows her projects with the cuts and sizes on her versamat, so decided to try it here. GREAT idea, Rachel--it really helps explain the how-to of the design.
The 3D strawberry cut is on page 72 of the Cricut Artiste handbook. I cut it at 3.5 inches relative dial size, but cut the leaf at 3 inches so it would not get in the way of the tag. If you aren't adding a tag, then feel free to cut it larger to match the berry. I cut the leaf out twice, flipping the paper over for the second cut. This way I can glue the two together and have the green side show on both sides. :)
I first tied the bakers twine to the stick and then wove it in and out of the flaps for the strawberry. I wove three flaps through one side of the tie and the next three through the other, ending around the stick again with a knot.
Next, I inked up the edges of the leaf, and gently widened the hole in the middle with my Crop-o-dile just enough to fit snugly over the stick.
Now it's your turn to take the Color My Heart Color Dare! Pick any two Close to My Heart Paper Packs and combine them for a whole new look! Be sure to link up with us to share your project. I can't wait to see what you make! :)
Subscribe to:
Posts (Atom)