Hey everyone! Thanks for joining me on another Washi Wednesday adventure! :)
I got a few more pages finished in my Close to My Heart Crush Book dedicated to the my horde of concert ticket stubs--mostly from the good old days of college. Now that I have reached the point where I have some pics to go along with them, the process is even more fun!
Below is my first encounter with Matthew Sweet circa 1993. No concert--just a public appearance and my FIRST AUTOGRAPH!!!!
The little embellishments that come in the Crush Assortments have an endless amount of possibilities to use on your pages. This little camera and the "Life is Sweet" phrase could NOT have fit better!
How cute it this little crossword paper?! Super-versatile!
This one cracks me up. I still can't believe we went! YOLO was absolutely the right way to caption the experience. These alpha/numeric stickers come in the Besties Assortment.
Another one of Close to My Heart's products that coordinates nicely with this style of scrapbooking is the washi tape. I used the Slate Polka-Dot Washi here...
Below, I added the Lagoon Houndstooth Washi to accent the color scheme of the Assortment pieces. There are several color schemes to choose from in each pack.
It was perfect for closing this little envelope!
I hope you are enjoying taking a peek at my Crush album so far, and I will share more with you as I get it completed! Thanks for stopping in! :)
Never let ANYONE dull your sparkle! Self admitted Cricut fanatic and Shimmer Trim addict. ;)
Showing posts with label Lagoon Houndstooth Washi. Show all posts
Wednesday, February 5, 2014
Wednesday, January 29, 2014
Close to My Heart Washi Wednesday!
Welcome back to my blog! I hope you are well rested and ready to meet all the amazing washi choices we have at Close to My Heart with the release of the New Spring and Summer Idea Book on February 1st! I wanted to show them off, and show you a cute little easy way to use them, so I made up a quick video...take a peek! :)
Here is that little envelope from the video--tell me this isn't the EASIEST way to pretty up your cards and letters! :)
Remember, there is ONE more new washi coming out on February 1st, but I just didn't have it in my hands when I recorded my video...here is a peek...and a sneak peak at my creation for Tag (You're It!) Tuesday next week! ;) This one is striped in Smoothie! Yum!
Thanks for popping in to see my post today! :)
Hold on for just one minute!!! I have a ginormous goal to reach with Close to My Heart this year, and to make it happen, I'm going to need a few good peeps on my team! I am looking for team members who I can help to build their dream job like I am doing right now. If you have a heart for crafting or scrapbooking or cardmaking, then you can make your dreams come true as well! It is never too late, really, it isn't! I never thought I would be able to do something like this, but guess what? I had never tried! Once I did, I realized that my dream wasn't impossible, and that it CAN happen little by little. BUT, that is the key--you HAVE to TRY! I guarantee you that if you just sit back and wait for your dreams to come true, they won't. Not ever. Consider this quote that is often attributed to Mark Twain even though he didn't say the whole thing...
Yep, the picture is mine. :) And so is the little create sentiment!
I have a dream to reach my goal this year and it isn't going to be easy...but I believe it will happen with a lot of hard work...and maybe just a bit of pixie dust. ;) I am just one team member shy of becoming a manager, and even though I still have quite a few business cards that say, "Supervisor" on them, I would be OK with getting more, lol! But to me right now, it is so much more than that. I have seen my team members blossom and grow personally AND in their business through the process of mentoring and guiding them along in their goals. Are you going to meet every goal you set for yourself the first try? NO! But how are you going to meet ANY goals by not trying? If you never fail, it means you are not trying new things. It is a safe road to travel, but it just goes in circles. It is time to take a new road!
The very next person who signs up with me to try and make their dreams come true will get to choose one of the brand new Spring and Summer Workshops on the Go absolutely free from me. Let me show you how to make your creative dreams come true! :)
Click HERE to find out more about joining my team, or feel free to contact me at mimimyselfandi@outlook.com. It's time to throw off the bowlines and dance YOUR dance! :)
Here is that little envelope from the video--tell me this isn't the EASIEST way to pretty up your cards and letters! :)
Remember, there is ONE more new washi coming out on February 1st, but I just didn't have it in my hands when I recorded my video...here is a peek...and a sneak peak at my creation for Tag (You're It!) Tuesday next week! ;) This one is striped in Smoothie! Yum!
Thanks for popping in to see my post today! :)
Hold on for just one minute!!! I have a ginormous goal to reach with Close to My Heart this year, and to make it happen, I'm going to need a few good peeps on my team! I am looking for team members who I can help to build their dream job like I am doing right now. If you have a heart for crafting or scrapbooking or cardmaking, then you can make your dreams come true as well! It is never too late, really, it isn't! I never thought I would be able to do something like this, but guess what? I had never tried! Once I did, I realized that my dream wasn't impossible, and that it CAN happen little by little. BUT, that is the key--you HAVE to TRY! I guarantee you that if you just sit back and wait for your dreams to come true, they won't. Not ever. Consider this quote that is often attributed to Mark Twain even though he didn't say the whole thing...
Yep, the picture is mine. :) And so is the little create sentiment!
I have a dream to reach my goal this year and it isn't going to be easy...but I believe it will happen with a lot of hard work...and maybe just a bit of pixie dust. ;) I am just one team member shy of becoming a manager, and even though I still have quite a few business cards that say, "Supervisor" on them, I would be OK with getting more, lol! But to me right now, it is so much more than that. I have seen my team members blossom and grow personally AND in their business through the process of mentoring and guiding them along in their goals. Are you going to meet every goal you set for yourself the first try? NO! But how are you going to meet ANY goals by not trying? If you never fail, it means you are not trying new things. It is a safe road to travel, but it just goes in circles. It is time to take a new road!
The very next person who signs up with me to try and make their dreams come true will get to choose one of the brand new Spring and Summer Workshops on the Go absolutely free from me. Let me show you how to make your creative dreams come true! :)
Click HERE to find out more about joining my team, or feel free to contact me at mimimyselfandi@outlook.com. It's time to throw off the bowlines and dance YOUR dance! :)
Monday, October 14, 2013
Heart 2 Heart Shaped Card Challenge!
Here we go! It is already time for the next Heart 2 Heart Challenge for October. This month, we want you to show us your amazing shaped card creations! No squares or rectangles, but something else, something different for a change!
What better thing to celebrate with a fun shaped card than an October birthday!? My youngest just turned 10 last week, so I put on my thinking cap and went to work. I decided on a party hat design with her favorite color from the Babycakes Paper Packet!
There is quite a bit going on here, so I will hit the high points, lol. My favorite parts are the Striped Slate Twist Ties and the free printable download of a chevron flag/banner! You can get them free on my Close to My Heart website until the end of October right HERE! I just printed them out on white CS, cut it out, and folded it around this stick pin from the For Always Assortment. Easy as cake! ;)
I added a glittered up #10 from the Glamor Glitter Alphabet that I easily trimmed the middle out of to fit the flag. ;)
The pom-pom atop the hat is made by cutting two of the little burst shape from the Artiste Cartridge, one in Lagoon and one in Pear. Then I layered over top those with pieces of twine tied in the middle. It is topped off with another piece from the For Always Assortment.
The wonderful sentiment is stamped with my clear acrylic Joyful Birthday stamp. I just can't get enough of this font!
Some Lagoon Houndstooth Washi, Aqua Dots, and Black Sequins dot the corners, and a strip of green glitter paper is all it took to ground the bottom of the hat.
I lined the inside with two smaller White Daisy CS triangles than I used to make the card in the Cricut Craft Room.
Have you played in CCR yet? It is amazing what you can do in there! You can make a shaped card, for instance! I chose the pennant banner shape on the Cricut Art Philosophy Cartridge to start and sized it to fit in a standard size A2 envelope.
Then I copied that triangle, and flipped it using the little clicky below...
After lining it up the triangles, just slightly overlap them so that you can choose to WELD them together! SO easy!
Now that you know how to make a shaped card--it's YOUR turn! Link your creation up with us to play along over at the H2H Challenge Blog! :)
What better thing to celebrate with a fun shaped card than an October birthday!? My youngest just turned 10 last week, so I put on my thinking cap and went to work. I decided on a party hat design with her favorite color from the Babycakes Paper Packet!
There is quite a bit going on here, so I will hit the high points, lol. My favorite parts are the Striped Slate Twist Ties and the free printable download of a chevron flag/banner! You can get them free on my Close to My Heart website until the end of October right HERE! I just printed them out on white CS, cut it out, and folded it around this stick pin from the For Always Assortment. Easy as cake! ;)
I added a glittered up #10 from the Glamor Glitter Alphabet that I easily trimmed the middle out of to fit the flag. ;)
The pom-pom atop the hat is made by cutting two of the little burst shape from the Artiste Cartridge, one in Lagoon and one in Pear. Then I layered over top those with pieces of twine tied in the middle. It is topped off with another piece from the For Always Assortment.
The wonderful sentiment is stamped with my clear acrylic Joyful Birthday stamp. I just can't get enough of this font!
Some Lagoon Houndstooth Washi, Aqua Dots, and Black Sequins dot the corners, and a strip of green glitter paper is all it took to ground the bottom of the hat.
I lined the inside with two smaller White Daisy CS triangles than I used to make the card in the Cricut Craft Room.
Have you played in CCR yet? It is amazing what you can do in there! You can make a shaped card, for instance! I chose the pennant banner shape on the Cricut Art Philosophy Cartridge to start and sized it to fit in a standard size A2 envelope.
Then I copied that triangle, and flipped it using the little clicky below...
After lining it up the triangles, just slightly overlap them so that you can choose to WELD them together! SO easy!
Now that you know how to make a shaped card--it's YOUR turn! Link your creation up with us to play along over at the H2H Challenge Blog! :)
Tuesday, September 3, 2013
Month-long Cardmaking Challenge! Who's In?
Hi there! My upline, Mandy Leahy, is hosting a fantastic little challenge this month to create a card-a-day. You can find it HERE. She even gave us a different theme or guideline for each day! I finished the first one just in time...but posting is another matter all together, lol. Here is day #1 Use a Banner!
This card is dedicated to my two friends who I was having a washi discussion with yesterday. I was determined to use it as more than an afterthought...and for this one, it was actually the FIRST part of the card I make! Girls, I love this banner even more than capris! ;)
This adorable sentiment is found on Close to My Heart's Joyful Birthday My Acrylix stamp set.
I even used washi on the inside of the card to easily add a bit of interest!
Any other washi lovers out there? Check out these two that I used on my website!
Slate Polk-a-dot Washi Tape
Lagoon Houndstooth Washi Tape
Guess what!? Very soon there will be MORE washi to choose from!!!! I will let you know when they are available, but let me leave you with a few hints of what is to come...spots, chevrons, and woodgrain and MORE....is anyone else drooling??? :)
Mooooooving on to day 2, we had a challenge with embossing! Sweet! I desperately need more little thank you cards to send with my Etsy orders, so I came up with an idea using 3x3 card bases made of Kraft paper, our Mini Pigment Inks, and clear embossing powder...
You can see the shiny detail in the stamp a bit better in this one...the stamp is cut out of White Daisy CS on my E2 from the Close to My Heart Art Philosophy cartridge...
I used the retired June Stamp of the Month, A Flowering Bunch, to make a row of flowers to go along with the thank you...and added sparkles to match on a few of the blooms! I was even able to color the clear Sparkles with my Alcohol Ink Markers to match the ink on the stamp! :)
Two days down and 28 to go! :)
This card is dedicated to my two friends who I was having a washi discussion with yesterday. I was determined to use it as more than an afterthought...and for this one, it was actually the FIRST part of the card I make! Girls, I love this banner even more than capris! ;)
This adorable sentiment is found on Close to My Heart's Joyful Birthday My Acrylix stamp set.
I even used washi on the inside of the card to easily add a bit of interest!
Any other washi lovers out there? Check out these two that I used on my website!
Slate Polk-a-dot Washi Tape
Lagoon Houndstooth Washi Tape
Guess what!? Very soon there will be MORE washi to choose from!!!! I will let you know when they are available, but let me leave you with a few hints of what is to come...spots, chevrons, and woodgrain and MORE....is anyone else drooling??? :)
Mooooooving on to day 2, we had a challenge with embossing! Sweet! I desperately need more little thank you cards to send with my Etsy orders, so I came up with an idea using 3x3 card bases made of Kraft paper, our Mini Pigment Inks, and clear embossing powder...
You can see the shiny detail in the stamp a bit better in this one...the stamp is cut out of White Daisy CS on my E2 from the Close to My Heart Art Philosophy cartridge...
I used the retired June Stamp of the Month, A Flowering Bunch, to make a row of flowers to go along with the thank you...and added sparkles to match on a few of the blooms! I was even able to color the clear Sparkles with my Alcohol Ink Markers to match the ink on the stamp! :)
Two days down and 28 to go! :)
Friday, August 16, 2013
Color Dare #56 An Analogus Lesson
Happy Color Dare! It is Friday finally, and you know what that means around here--a new challenge over at the Color My Heart Color Dare!!! This week we have an analogous color challenge using the Close to My Heart Colors Buttercup, Pear, and Lagoon.
According to Wikipedia, "Analogous colors are groups of colors that are adjacent to each other on the color wheel." These colors tend to be pleasing to the eye when grouped together.
For my sample project on the Color My Heart Design Team, I decided to make a little gift box that I haven't been able to try yet from the Close to My Heart Cricut Artiste Cartridge.
You can find the nesting sides of this little box on page 74 of the Artiste Handbook, on the Mother's Day Key. I cut it out at 1 inch on a B&T Pattern from the Chantilly Paper Packet with my Cricut Expression 2 cutting machine. There is a perfectly adorable shape to use for the top and bottom of the box, but I decided to use a different one that is found on page 53 of the Art Philosophy Cartridge instead. I cut it out of White Daisy CS at 3 inches. See how versatile this little box can be? So many possibilities! :)
The sentiment is one of our brand new size M My Acrylix stamps called Heartfelt Birthday Wish. I stamped in Pear Pigment Mini from the Adventure Pigment Inks Mini Tower. Then I dusted it with Clear embossing powder and gave it a shot of my heating tool to turn it into a shiny, raised outline. It was perfect for coloring in with my Pear Alcohol Ink Marker now! I just used layers of strokes to create an ombre effect in no time! :) A tiny little Lagoon colored Aqua Dot finishes off the "i" nicely.
Embellishing the side of this box was super-fun! First, I colored my Color-Ready Seam Binding Ribbon with the Buttercup Alcohol Ink Marker. After tying that on, I added fishtail banners of the Green Glitter Paper and one that I made with White Daisy Cardstock and my Lagoon Houndstooth Washi! The twisty Slate Striped Twist Ties add JUST the perfect amount of fun! LOVE it!
If you want to put one of these little boxes together, it is super-easy. I used glue dots to attach the top and bottom like this...see how the top and bottom nest? It is a great little box for a jewelry gift!
I showed you mine...now YOU show us YOURS! We want to see your creations with the Close to My Heart colors Pear, Lagoon, and Buttercup. You can add any neutrals that you like, just not other colors. If you don't have CTMH products, feel free to substitute the colors for some that are similar. Just link up with us at Color My Heart for your chance to win one of the coveted Color Dare gem badges. Did you know we have FOUR now? :)
Can't wait to see what you make! :)
According to Wikipedia, "Analogous colors are groups of colors that are adjacent to each other on the color wheel." These colors tend to be pleasing to the eye when grouped together.
For my sample project on the Color My Heart Design Team, I decided to make a little gift box that I haven't been able to try yet from the Close to My Heart Cricut Artiste Cartridge.
You can find the nesting sides of this little box on page 74 of the Artiste Handbook, on the Mother's Day Key. I cut it out at 1 inch on a B&T Pattern from the Chantilly Paper Packet with my Cricut Expression 2 cutting machine. There is a perfectly adorable shape to use for the top and bottom of the box, but I decided to use a different one that is found on page 53 of the Art Philosophy Cartridge instead. I cut it out of White Daisy CS at 3 inches. See how versatile this little box can be? So many possibilities! :)
The sentiment is one of our brand new size M My Acrylix stamps called Heartfelt Birthday Wish. I stamped in Pear Pigment Mini from the Adventure Pigment Inks Mini Tower. Then I dusted it with Clear embossing powder and gave it a shot of my heating tool to turn it into a shiny, raised outline. It was perfect for coloring in with my Pear Alcohol Ink Marker now! I just used layers of strokes to create an ombre effect in no time! :) A tiny little Lagoon colored Aqua Dot finishes off the "i" nicely.
Embellishing the side of this box was super-fun! First, I colored my Color-Ready Seam Binding Ribbon with the Buttercup Alcohol Ink Marker. After tying that on, I added fishtail banners of the Green Glitter Paper and one that I made with White Daisy Cardstock and my Lagoon Houndstooth Washi! The twisty Slate Striped Twist Ties add JUST the perfect amount of fun! LOVE it!
If you want to put one of these little boxes together, it is super-easy. I used glue dots to attach the top and bottom like this...see how the top and bottom nest? It is a great little box for a jewelry gift!
I showed you mine...now YOU show us YOURS! We want to see your creations with the Close to My Heart colors Pear, Lagoon, and Buttercup. You can add any neutrals that you like, just not other colors. If you don't have CTMH products, feel free to substitute the colors for some that are similar. Just link up with us at Color My Heart for your chance to win one of the coveted Color Dare gem badges. Did you know we have FOUR now? :)
Can't wait to see what you make! :)
Wednesday, July 17, 2013
Wrap It Up With Ribbon this Time!
Wow, I almost confused my self right out of entering a contest! I didn't realize until I was making my project that there were TWO current Wrap It Up contests going on!
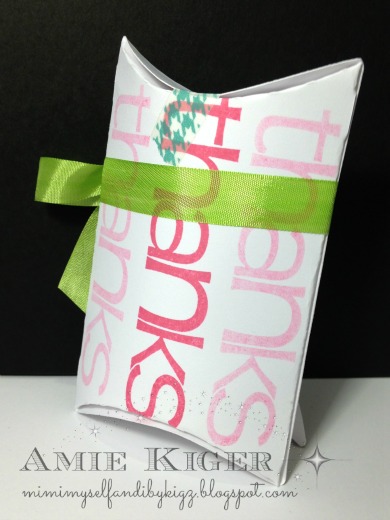
On Monday I posted a simple, yet awesome pillowbox gift card holder. Today, I made another box that has a "thanks" rather than a birthday theme for the Peachy Keen Wrap It With Ribbon Challenge. This one also pays tribute to one of my favorite summertime treats--ICE CREAM! Heart 2 Heart has posted their third July challenge, I Scream, You Scream, We All Scream for ICE CREAM, so I am linking up there too! :)
Guess what!? Another challenge to play! Thanks to L.B. for pointing me to the Die Cuttin Divas Challenge Blog where they are having an Ice Cream Challenge too! :)
I used two retired Close to My Heart My Acrylix sets for this project, Fanfare and Thank You. The colors are super-yummy together in Cotton Candy and Pear! I had to make the little guy with the face into a chip mint scoop, my kiddos' favorite!!! His adorable face is from the Peachy Keen January 2013 Kit. I used my black stickles for the little chocolate chips. The cone is stamped in Cashmere Ink to keep things light and refreshing.
The White Daisy base of my box is stamped with first and second generation images of Cotton Candy Ink. One ink pad=two or more different shades of that color, did you know? I added that adorable little strip of Lagoon Houndstooth washi just like I did on the box I posted Monday.
Don't you think a great way to say thank you is with a gift card for your favorite ice cream shoppe? I do! :D
You have the rest of July to play along over at H2H for their Ice Cream challenge, so go ahead and use your CTMH products to join in on the fun!
Now, all this talk about ice cream makes me want to go EAT some ice cream! What is your favorite flavor? Mine is either cherry amaretto at Culver's or Cake Batter at Cold Stone! YUMMO!!!
On Monday I posted a simple, yet awesome pillowbox gift card holder. Today, I made another box that has a "thanks" rather than a birthday theme for the Peachy Keen Wrap It With Ribbon Challenge. This one also pays tribute to one of my favorite summertime treats--ICE CREAM! Heart 2 Heart has posted their third July challenge, I Scream, You Scream, We All Scream for ICE CREAM, so I am linking up there too! :)
Guess what!? Another challenge to play! Thanks to L.B. for pointing me to the Die Cuttin Divas Challenge Blog where they are having an Ice Cream Challenge too! :)
I used two retired Close to My Heart My Acrylix sets for this project, Fanfare and Thank You. The colors are super-yummy together in Cotton Candy and Pear! I had to make the little guy with the face into a chip mint scoop, my kiddos' favorite!!! His adorable face is from the Peachy Keen January 2013 Kit. I used my black stickles for the little chocolate chips. The cone is stamped in Cashmere Ink to keep things light and refreshing.
The White Daisy base of my box is stamped with first and second generation images of Cotton Candy Ink. One ink pad=two or more different shades of that color, did you know? I added that adorable little strip of Lagoon Houndstooth washi just like I did on the box I posted Monday.
Don't you think a great way to say thank you is with a gift card for your favorite ice cream shoppe? I do! :D
You have the rest of July to play along over at H2H for their Ice Cream challenge, so go ahead and use your CTMH products to join in on the fun!
Now, all this talk about ice cream makes me want to go EAT some ice cream! What is your favorite flavor? Mine is either cherry amaretto at Culver's or Cake Batter at Cold Stone! YUMMO!!!
Monday, July 15, 2013
Wrap It Up!
Hi everyone!
I stumbled upon a new blog challenge, well new to me anyway, when browsing some entries in other challenges. It gets to be a lot to keep track of, so I try to knock it out right away if I can get to it, and I am really choosy about the challenges I participate in now. This one is over at My Craft Spot. There is a Monday Challenge, and this one is called Wrap It UP! We are to create a project that holds a gift...super fun!
My next workshop will include making two gift card holders, so I knew what I would make right away! This pillowbox cut from the Cricut Art Philosophy Cartridge is the perfect size for a giftcard...and super cute to boot! (Dr. Seuss would be so proud of me right now!) ;) Would you believe the only paper I used is some White Daisy CS? You bet!
Alright! Can you believe I used mostly one stamp set for this one??? Yep! I got out the Close to My Heart My Acrylix B1417 Perfect Fit Birthday set. I stamped the "happy birthday" sentiment using first and second generation stamping on the pillowbox itself in Pear Ink. That just means I inked the stamp, stamped it once(first generation), moved it, stamped it again(second generation), and then re-inked to repeat the process.
I used my 2 inch scallop punch as well as the 1 1/4 inch circle punch to make the little tag. A tiny loop of silver shimmer trim secures the tag to the ribbon. It is attached underneath the circle that is popped up with foam squares. That little circle design stamped in Cotton Candy Ink is found on the Artiste Collection Kudos stamp set. Bitty sparkles bling up the sentiment, of course.
Here is the back view. You can see the gorgeous ribbon matches the stamped words. I used my Pear Alcohol Ink Marker to color Close to My Heart's Color Ready Seam Binding Ribbon so they would be a perfect match!
See that little strip of washi? SURPRISE!!!! You can get your hands on it starting August 1st on my website! It is one of the brand new products in the Close to My Heart Autumn/Winter Idea Book! :) I couldn't resist using a piece to hold the pillowbox closed at one end.
Well, I hope you see how easy it can be to stamp up a beautiful homemade gift package for that special someone. The lasting impression on the recipient is worth more than money can buy! :)
Here is a pic with all the super CTMH products, besides the Cricut Cartridges and adhesives, that are available on my website to make this project.
You can find them all in the links in my post! Now go out and get your craft on! :)
REMEMBER!!! If you want to PRE-ORDER the new Close to My Heart Cricut Artbooking Collection from me with FREE shipping and be entered to win $25 in products, only available with this offer from ME, GO HERE!!!
I stumbled upon a new blog challenge, well new to me anyway, when browsing some entries in other challenges. It gets to be a lot to keep track of, so I try to knock it out right away if I can get to it, and I am really choosy about the challenges I participate in now. This one is over at My Craft Spot. There is a Monday Challenge, and this one is called Wrap It UP! We are to create a project that holds a gift...super fun!
My next workshop will include making two gift card holders, so I knew what I would make right away! This pillowbox cut from the Cricut Art Philosophy Cartridge is the perfect size for a giftcard...and super cute to boot! (Dr. Seuss would be so proud of me right now!) ;) Would you believe the only paper I used is some White Daisy CS? You bet!
Alright! Can you believe I used mostly one stamp set for this one??? Yep! I got out the Close to My Heart My Acrylix B1417 Perfect Fit Birthday set. I stamped the "happy birthday" sentiment using first and second generation stamping on the pillowbox itself in Pear Ink. That just means I inked the stamp, stamped it once(first generation), moved it, stamped it again(second generation), and then re-inked to repeat the process.
I used my 2 inch scallop punch as well as the 1 1/4 inch circle punch to make the little tag. A tiny loop of silver shimmer trim secures the tag to the ribbon. It is attached underneath the circle that is popped up with foam squares. That little circle design stamped in Cotton Candy Ink is found on the Artiste Collection Kudos stamp set. Bitty sparkles bling up the sentiment, of course.
Here is the back view. You can see the gorgeous ribbon matches the stamped words. I used my Pear Alcohol Ink Marker to color Close to My Heart's Color Ready Seam Binding Ribbon so they would be a perfect match!
See that little strip of washi? SURPRISE!!!! You can get your hands on it starting August 1st on my website! It is one of the brand new products in the Close to My Heart Autumn/Winter Idea Book! :) I couldn't resist using a piece to hold the pillowbox closed at one end.
Well, I hope you see how easy it can be to stamp up a beautiful homemade gift package for that special someone. The lasting impression on the recipient is worth more than money can buy! :)
Here is a pic with all the super CTMH products, besides the Cricut Cartridges and adhesives, that are available on my website to make this project.
You can find them all in the links in my post! Now go out and get your craft on! :)
REMEMBER!!! If you want to PRE-ORDER the new Close to My Heart Cricut Artbooking Collection from me with FREE shipping and be entered to win $25 in products, only available with this offer from ME, GO HERE!!!
Subscribe to:
Posts (Atom)