Monday, December 31, 2012

Happy 2013!!!

Hey, it's 2013 somewhere anyway, right?  ;)  Soooooo the big question today is are you making any New Year's resolutions?  What are they and why?

CAUTION:  LOTS of words ahead!  ;)

Personally, I have made so many resolutions that didn't survive even one month that I am done with those.  THIS year I am going to try something a bit different.  I am not ready to take on more commitments, so haven't looked into the whole Project Life thing quite yet.  I have heard tidbits about something on Big Picture Classes called Just One Word, but again, haven't put much time into researching it yet.  This year, I chose a phrase to try my best to live by~nothing remarkably lofty or thought provoking~but something life changing nonetheless.  I saw this little sign while scrolling through Facebook posts the other day and it truly said something to me.  I ran with the inspiration and crafted a sign to hang up in my craft room...


I have NO idea at all who to credit with this adorable phrase, but how perfect is this?!  My readers probably recognize my obsession with the Close to My Heart shimmer trim, and would only expect me to be crazy over the new glitter papers we are getting in the new Spring and Summer Idea Book, so are you shocked?  ;)  But it is way more than just that kind of sparkle that I am after.  I am going for the gold, lol, so to speak.  I want to be ME with all the trimmings without fearing someone else might think what I love is ridiculous.  I want to reach for things without hesitating for a split second to wonder if certain people will approve or not if I am convinced that it is the right thing to do.  I want to sparkle without limits and spread a little glitter on someone's day!  For me personally it is a challenge to not always try to squish myself into the box of other people's opinions and expectations, although sometimes those are a good guide.  But I don't want it to ruin my day when someone tailgates me all the way home because I am a cautious driver.  I don't want to change my mind on an idea just because one other person pooh-poohs it!   I don't want to loose MY sparkle because of other people's mud flinging.  In the reverse, I don't want to stomp out any other person's sparkle either!  I literally  JUST came across this prayer from Sharon Jaynes of Girlfriends in God and it went straight to my heart.  Sometimes you don't even need to be still to hear what God is saying!


So I'm gonna need all the help I can get!  Who's ready to SPARKLE in 2013? I AM!!!


On a side note....

I always talk about CCR on my blog, but for those who might not be familiar with it, here is a screen shot of what it looks like while designing with the Cricut online Craft Room software.  You can alter images from cricut cartridges and see exactly how things line up before you cut them.  It is totally free, and all you need to use it with your Cricut is a printer cable.  Super duper easy!  I highly recommend it!   You can find the place to download it by going to cricut.com and clicking on Craft Room at the top.  You can find videos, and all sorts of useful info there too.  Shoot me a message if you ever have questions!  I would be happy to try to help.  :)


Saturday, December 29, 2012

Merry Birthday! Aaaaachoooo!

Huh?  What day is it?  Ugh...I was bitten hard by the flu bug and am finding it a tad bit hard to think straight right now.  I am not at all used to being incapacitated, and after being in bed for three days, I need a do-over for Christmas!  Oh well, my kids had a good time opening presents and I promptly went back to bed...so not much to be done about it but thank God that I am up and healthy again.

Now that I am vertical, (baby steps), I wanted to share a card I made for my niece's birthday.  I used Close to My Heart's last promo set, It's Your Day along with the amazingly cute new promo set, Whooo's Your Valentine.  You can get this adorable stamp set and all the fabulous goodies that come with it for just $10 with any $35 order on my website to celebrate National Papercrafting Month in January!  Now, here's the card...


 I had to take pics right away because we were leaving soon, so the marker still had to dry on the "best DAY ever" sentiment.  That is why it looks a little blotchy.  ;)  I used the Perfect Fit Frames to perfectly match the shape from this card on the Cricut Artiste Cartridge.  Can you spot the new glitter paper I used?  OF COURSE you can, that stuff is blindingly sparlky!  I LOVE it sooooo much that I used it for the body of the butterfly as well!  Now, I didn't want my shimmer trim to feel left out, so I added a good long strip off to the left.  Whew!


Now, here is the inside of the card when you open it up!  Isn't it fabulous?  There are NINE different versions of this card on the cartridge!  NINE!  Each one has a different shape on the front.


The word bubble here is also cut from the Artiste Cartridge.


My sister gave me a paper crimper for Christmas that I used to make the tree trunk...score!


This was a super-fun card to make, and I sure hope my Niece loved it since I was sleeping the day away in bed with the flu on her birthday Thursday!  Sigh...oh well.

Here's a glimpse of the entire Whooo's Your Valentine kit before you go!


Tuesday, December 25, 2012

On the Twelfth Day of Christmas I Say, "MERRY CHRISTmas!!!"

I wish each of my readers a very Merry CHRISTmas!  I appreciate you all being interested in what I have to make and say.  :)  Enjoy the day doing whatever you do to celebrate!  Here is my Christmas card to share with you this year.


I used a few different stamp sets (and altered two of the stamps!):
D1492 Christmas Love
D1483 Glory to God
D1440 Everlasting Life
D1522 Giggle Lowercase Alphabets

Can you guess which two I altered?  ;)


Monday, December 24, 2012

On the Eleventh Day of Christmas...

...my crafty hands made me, gift tags for under the tree.

Yep, it is almost here!!!  Christmas is right around the corner, so put out those cookies and carrots tonight and sit back and relax.  Um, wait a minute....I mean get your tail in gear and move, move, move!!!  Are you a last-minute wrapper?  I try not to be, but with posting daily for the last twelve (or thirteen, oops!) days, it was inevitable, lol!!!  Welcome to life at Christmas with a craft blog!  ;)

There are several different versions of this tag floating around, but this is mine.  :)  I love the shape of this tag, just wondering why I chose such a trim waistline for the jolly old elf!  ;)  Actually, I had some scraps of shimmer trim left over from another project, and this was the perfect way to use them up!  Belt buckles!  


I have really become fond of the mix of blues and browns for Christmas themed paper crafts this year.  These tags are just one implication of my taste.  I am a huge fan of the Wonderland papers that I used and really hope they bring it back someday!   I also used a stamp from December 25th.  I have really used this stamp quite a bit.


My Gelly Roll Stardust pen wanted in on the action today, so I added a bit of shimmer on the snowflakes.  Hope you can see it.


Good luck tonight, and God Bless!!! 

Sunday, December 23, 2012

On the Tenth Day of Christmas...

...my crafty hands made me, invites to the party!

Really!  One of my girlies celebrated her special day yesterday, and these are the cutie-pie purse invites we came up with.


I welded two purse shapes from the Ultimate Creative Sampler Cartridge together in the Cricut Craft Room so that the bottoms lined up to be the fold of the card.  Have you tried CCR out yet?  If you own a Cricut cutting machine, you simply MUST!  You can so many things that you just can't do with just your machine.  It is FREE, so you must try it.

I blinged up the front of the purse with a bit of shimmer trim.  My daughter begged to have it on there, really she did! 


We typed up all the party info on Word, printed it out, and attached it to the inside of the card.  I used a hole punch to add some twine as a closure.  She was ecstatic and I was happy to have it checked off my list!  :)  Win-win!

Saturday, December 22, 2012

On the Ninth Day of Christmas (cont...)

...my crafty hands made me, a fleet of snowmen!

I found this fabuloso idea on Pinterest, of course!


I cut the scalloped circle at 1.75 inches on my Cricut with the Art Philosophy Cartridge.  I cut the white snowman parts at 1.5.  I have a retired stamp set called All Decked Out that has all kinds of snowman parts that I used to stamp the face and buttons.  A little bit of coloring for the carrot nose was all that was left to get ready for assembly.  I used glue dots to attach the scalloped circles to the individually wrapped mint patties.  You have to buy the generic brand, because the York mints are wrapped in a square now.  No worries, though, because my studies show them to be just as delicious!  ;)


So cute!  Won't melt in your hands either!  ;)


ALSO....
Today is a very special day when my family remembers one of our most special Christmas presents of all...

Happy, happy birthday to my beautiful dolphin lover!

Here is the card I made for her.


I think I also have warm weather on the brain, lol.  I could not resist putting a cute little santa hat on the dolphin.  I cut it by hand and used my new friend, Liquid Applique, to puff out the white parts.  The tree, dolphin, and wave cuts are all from the Life's A Beach Cricut Cartridge.


The layers on this card are accentuated by inking the edges of the paper piecings.


I tore the island to add some texture.  Here you can see the waves popped up with some foam tape.


This sentiment is from Close to My Heart's Card Chatter Birthdays My Acrylix set. 
The inside of the card says...


 I loved having a chance to create with some of my other Cricut cartridges for a change!  :)

See you back here again tomorrow!

Friday, December 21, 2012

On the Ninth Day of Christmas...

...my crafty hands made me, gift tags for classroom treats!

Remember these guys?


I made lots of them for classroom gift bags this week!  Twenty-seven to be exact, lol!  At least they are fun to make!  You can see my original post about how to make these adorable Rudolf Tags with Close to My Heart Treat Cups, including the link to get the CCR file to make them HERE.

I can't believe there are only four more days until Christmas!!!

Thursday, December 20, 2012

On the Eighth Day of Christmas...

...my crafty hands made me, teacher gifts wrapped with glee!

On a recent blog hop, I saw the idea to use regular lunch sacks decorated with pretty papers in place of store bought gift bags.  I had all the supplies already, so I certainly went for it!  I used papers from the Reflections Warm Wishes Kraft Pad and some assorted twine.


These tags were actually on one of the patterned papers!  Just had to trim them out.  Super, duper easy-peasy!  :)


Wednesday, December 19, 2012

On the Seventh Day of Christmas...

...my crafty hands RESTED!  ;)  See you tomorrow!

OK, but then they just HAD to make something, so I made some more Pinwheel Bows for presents.  I got this idea from Pinterest.  (I will link the inspiration as soon as I find it!  I definitely need to clean up my boards for next year.)

I cut these out from the Cricut Craft Room 3D Pinwheels digi image at 5.5 inches.  


The paper is from the Reflections Jolly and Bright Paper Stack.  Just one little problem...it was only a single sided paper.  What to do?  Run to the store?  Nope, everything is closed!  Guess what?  I solved the problem by running it through my Cricut Imagine and printing a holly berry pattern on the white side!  The pattern can be found on the Mr. Frosty Imagine Colors and Patterns Cartridge.  My Imagine is absolutely one of my favorite toys.  I will never be "stuck" without a double sided paper again!  :)


 I secured the centers with glue dots, and then added a cute button with twine tied through it in a bow.  Easy-peasy Pinwheel Bows!  :)  If you don't have the CCR cartridge with the pinwheel, just cut a square of paper, and trim in to the center from each corner.  Don't go all the way through though, just stay about an inch away from the center.  You really need to try it! 


Tuesday, December 18, 2012

On the Sixth Day of Christmas...

...my crafty hands made me, A Christmas Layout on Studio J!

I made this one a while back, and now is the perfect time to share it!  I love Studio J, and need to play with it a lot more to make a dent in scrapbooking my digital pictures!  These are from Christmas 2011.


Decorating our tree is something the girls and I look forward to each year, and there are so many memories wrapped up in each little ornament we hang.

I left some of the spaces blank in order to add "real" embellishments and stickers to it later on.  I think they will add a little pop to the pages. 

Have you tried Studio J yet?  It is totally free to play around with, so you should!  Here is a link to set up your account:  Studio J  Let me know what you think.  :)

Monday, December 17, 2012

On the Fifth Day of Christmas...

...my crafty hands made me, a gift for a new baby!

This is something I have been wanting to make for a while and finally got down to it.  :)  One of our cousins had a new baby boy, and the crafty person in me just HAD to bust a move.   It was kind of tricky to take a pic with the glass of the frame picking up the glare.


I printed the background on Close to My Heart White Daisy Cardstock on my Cricut Imagine Machine.  I don't get to play with this bad boy as much as I would like to, but the ink is still crisp and it worked like a charm when I fired him up. This adorable background scene is a special feature on the Nursery Tails Cartridge.  Then I started to add some 3D embellishments.  The Chevron Paper is from Echo Park's Hello Summer collection.  The letters in "Tyler" are from Close to My Heart--the Lots of Dots Irresistables.  I inked them with Pacifica Exclusive Ink.


Sunset orange baker's twine form the strings of the parachute.  The date hangs on one of the Chalkboard Shapes.  Pretty cool birth date, huh?  :)


I wanted to add a pinwheel to the scene, so I got on the Cricut Craft Room and used a cut from 3D pinwheels to make this cute little blue one.  A sucker stick is attached as the stem.


I was really hesitant to make a personalized boy shadowbox frame because I have all girls, lol, but I think it turned out fabulous--and I think Tyler's mommy loved it!  That's what it's all about!  This will be a new customizable addition to my Etsy shop in January! 

Sunday, December 16, 2012

On the Fourth Day of Christmas...

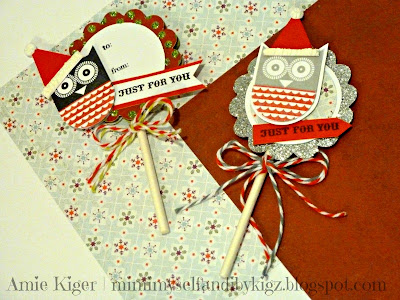
...my crafty hands made me, Lollipop Gift Taggies!  (I tried harder for the rhyme today!)


These papers are from the MME Christmas Wish 6x6 designer paper pad.  The white cardstock is my CTMH White Daisy and I added bits of Cranberry Cardstock too.  Notice anything new???  Our GLITTER PAPER!  I received a 12 x 12 sheet of Close to My Heart's brand new glitter paper with the Whooo's Your Valentine Kit and I am LOVING IT!  I used it here as a scalloped circle on the right.

I used Marvy White Liquid Applique on the furry parts of the Santa hat and used the heating tool on it to give it some 3D effects.  I LOVE this stuff, and you can get it from our Idea Book too! 

I stamped the owl twice each time to cut out the feathers and pop them up.  Here, I used Whisper and Cranberry Inks.


I added the 3" lollipop sticks between two layers of cardstock using 1/8" foam tape and liquid glass.  

For this little guy I used Back and Cranberry Inks.  He is super-easy to cut out with our Micro Trim Scissors.  I never knew I could do paper piecing so easily until I had a pair of these amazing scissors.  I stamped the sentiment, "Just For You," and the "to and from" from the December 25th My Acrylix stamp set.   Finally, I added some Green Glitz Glitter Gel to the polka dots on the scalloped paper.


I am really loving these Lollipop tags now...can't wait to make more!

Saturday, December 15, 2012

On the Third Day of Christmas...

...my crafty hands made me, a gift card holder for thee!


OK, yes, I have rediscovered dry embossing and sanding my papers...and I am LOVING it!!!  The Swiss Dots folder is super-versatile.  I used it in yesterday's card as a snowy background.  The card, ornament shape, and poinsettia are all cuts on the Cricut Artiste Cartridge available exclusively through Close to My Heart.  The card has a pocket inside that holds a gift card when cut at 5 inches (the finished height of the card.)


The sentiment, "A Gift For You" comes from the Christmas Joy My Acrylix Stamp Set C1520.  Some sparkly shimmer trim adorns the ornament, and I even colored some with my green Alcohol markers to make a leaf for the flower.  I just LOVE colored shimmer trim!  Give it a try on your cards or scrapbooks.

Friday, December 14, 2012

On the Second Day of Christmas...

...my crafty hands made me, A Treat Tube full of Christmas love!  (yeah, it's soooo not gonna rhyme every day!)  ;)


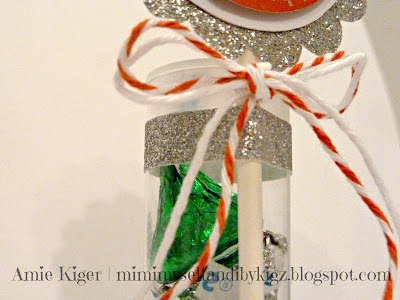
I used the Treat Tube (new product in Close to My Heart's 2013 Spring/Summer Idea Book) from the Whooo's Your Valentine Kit to make this great stocking stuffer or secret Santa gift!  I love the look of the Lollipop Tag.  My friend sent me a link to these little treasures for inspiration, and I finally had the time to make some.  Here is THE BLOG the idea came from.  You will see more of them on the Fourth Day of Christmas.  ;)


The sentiment is stamped in White Daisy Ink on Cranberry Cardstock.  The stamp is in set C1469 December 25th.  I attached the Lollipop Tag to my Treat Tube with Shimmer Trim!  It stays put nicely, and the weight of the Kisses keeps it upright too.  I bet I could even squeeze one more in there...


Hope I inspired you to treat someone this year!~Hugs!

Thursday, December 13, 2012

On the First Day of Christmas...

...my crafty hands made me, a light pole adorned with a wreath!


This is actually a re-make of a card I made for my Christmas Card Workshop.  I added a different wreath and changed the background to a dry embossed snowfall.  You can see the original card HERE.  http://mimimyselfandibykigz.blogspot.com/p/christmas-card-workshop.html


This wreath is not as large or skinny, and I really do like it more.  This stamped image is from the Avonlea Scrapbooking Workshop.  The shape can be cut out by using your Cricut machine and the Artiste cartridge.  Also, the change in background image makes it a much more easily mass produced card.  There is a new embossing folder that I need to get my hands on that will work even better, too.  Jayma Malme knows which one I am talking about!  ;)  This gorgeous card will be heading to my Etsy shop next year!  :)


This stamp set is included in the La Belle Vie Workshop on the Go and is only available for a limited time now...when they are gone, they are gone!  Contact me or go to my website to order!