Sunday, April 29, 2012

End of the school year countdown!

Yep...there is only one month of school left for my kiddos, and yours too I bet!  Have you thought about it yet?  How do you thank that special teacher in your child's life for a wonderful year of growing and learning and wiping oreo cookies up off the floor?  ;)  Here is an idea for you.  I made these adorable pillow boxes with the help of my trusty Cricut Expression 2 and the Close to My Heart Art Philosophy Cartridge.  They were sooooooo easy!
This one was a cinch with a little ribbon tied around it and a brad to attach the tag to the ribbon.  Cut the pillow boxes out at 5.5 inches if you would like to add a gift card inside.  My Senior Director, Mandy Leahy made a tutorial you can view HERE about how it is made.  You can see that there are an endless variety of ways to dress them up!

 For this one, I used some paper, hemp, and a button to give it an entirely different look!   What would you do to embellish a pillow box?  I will be hosting a gathering next month at my house to kick off my business, and you can try it there!  Soooo much fun!  More details to come!


Wednesday, April 25, 2012

Well, Caffeine Still Works!

Unfortunately for me, I found that out around midnight last night when I was still wide awake from my caramel mocha.  Ooooopsie!  On the plus side, I was able to be creative well into the wee hours of the night like never before.  I created a beautiful doorknob hanger for my daughter.

 This ended up being one of those projects that you don't know what you will end up with until it is finished.  I made the hanger using the Art Philosophy cartridge, cutting it out at the largest size available in Lagoon cardstock.  I believe it was 11.5 inches.  Next, I knew I wanted to use the Token Alphabet My Acrylix stamp set.  I just needed to figure out how, lol.  I had previously cut these flowers out for another project and when I saw them together it hit me!  I used the big stamp in the Hooray Bouquet My Acrylix to stamp the pattern on the flowers in Tulip, wanting to use the color scheme in the Stella papers.  To add some dimension, I pinched the petals after assembling each one.
 I really wanted to add a butterfly to the twigs.  I had to use this one from the AP cart because it has such an airy feeling.  I used the Sophie paper pack for it and adorned the body with three Bitty Sparkles.
 These 3D flowers on the Art Philosophy cartridge add so much impact to a project!  I cut them out of the same Sophie paper as the butterfly and twisted them opposite directions to get two different looks.  Liquid glass holds these really well, and when dry, I used antique copper brads to secure them to the hanger.
 Natural hemp was the perfect addition to hold the 2" chipboard dimensional banner at the bottom.  It is covered by Cocoa cardstock and inked with Cocoa along the edges.   I still wanted to add a bit more bling, and this button did just that! 
AWhat do you know, that caramel mocha ended up being a good idea after all!  :)

All of the products I used in this project can be ordered through my CTMH website.  Even better, right now with any $35 order, you can add the Dotty for You limited edition paper pack!  I have some other projects posted on my blog using this paper and let me tell you, I love that it is cardstock weight AND double sided.  The retail value of this pack is $19.95, but it is yours for only $5 with a $35 purchase on my website from the Spring and Summer Idea Book.  You can go to my website right HERE.

Sunday, April 22, 2012

First Commisioned Card! Woot!

Another short, but productive weekend is coming to an end.  It was my niece's birthday today and my parents came over for a nice visit.  I also had my first-ever team meeting with the Damask Divas online!  Learned a bunch about my CTMH business and cannot wait to get things up and running with my first gathering next month.  In the meantime, one of my BFF's became my first paying client yesterday!  Here is the darling little card I made for her:
 I tried adding a watermark in paint today, but not so sure if I like it.  I can't figure out how to make it see-through.  Ugh.


Here are my supplies that are all from CTMH:
Cricut E2
Art Philosophy Cartridge cuts:  <star 1> layer shift @ 1.25 and 1.5
                                                   <square 1> @ 4
                                                  <cupcake> @ 2.5
                                                  <circle 1> @ 1.25 (2 of these)
                                                  p. 29 envelope @ 5
                                                  p. 33 card @ 4.5
CTMH My Acrylix sets:  Tag the Occasion
                                          Art Philosophy Collection (cupcake)
                                          Cupcake Sprinkles
Paper/Cardstock:  Lagoon Dotty for You, Butterfly Dotty for You, Smoothie, Buttercup, Colonial White
Inks:  Lagoon, Sweet Leaf, Creme Brulee 
Embellies:  Smoothie Baker's Twine, Sparkles, and Bitty Sparkles

Speaking of the baker's twine, I made another card this week with the Lagoon twine as well.


This one is made with all papers from the new Dotty for You Limited Edition pack available now through the end of May to celebrate National Scrapbooking Month.  You can get yours for only $5 by placing a $35 order on my website from the Spring/Summer Idea Book!  Truly a steal for 24 double-sided sheets of cardstock wight paper! 

I simply cut a 4 x 12 inch length to fold in half for the card base.  I cut the same width of the grey dotted pattern and slowly tore it across about 4.25 inches down from the top.  The cloud is carefully cut from one of the patterns and I cut the sun out as a 1.25 inch circle.  The sun's rays were drawn free-hand after placing the cloud and sun on top of the orange dotty pattern so I could better determine where it should end.
  

I also used two of the 1-inch Dimensional Elements Heart shapes, sentiment from the My Acrylix Stamp set A Blossom, Grey Wool Ink for the sentiment and to define the edges of the sun and rays, and the Lagoon Baker's Twine from the new Paradise Assortment.  Here is a tip for keeping twine in place that I learned somewhere in my days of paper crafting.  Use a small hole-punch to notch the paper that your twine wraps around.  Notice the edge of my card where the twine rests in a small, barely noticeable half circle?  This will keep your twine from slipping down the card!  :)

Have a great week everyone!
                                                

Wednesday, April 18, 2012

Getting Ahead of Myself (and I) *wink*

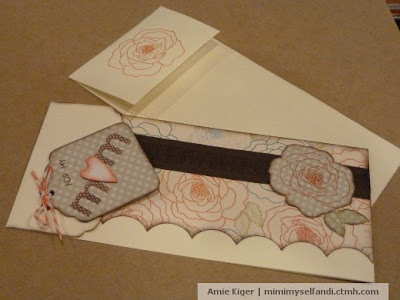
Hello!  Why an I ahead, you ask?  I have already made my mom her Mother's Day card!  I was so excited to use Dotty again, so went ahead and made one.
 I started off with the Colonial White Die Cut Card from CTMH.  Then I saw the scrap of floral paper from the Dotty pack that was left over from the Easter basket I made and realized it was PERFECT to be the background of the card front.  I inked the edges in Cocoa since I knew I would be using the wide Cocoa Ribbon from the Ribbon Rounds Collection.  Here is a little tip for you when you are using ribbon on a project.  After you cut the ends, use a thin line of Liquid Glass right on the cut.  This way, you prevent your ribbon from unraveling!  :)
 I used a 2 inch tag from the Dimensional Elements Tags, trimmed the grey dotty print to fit, and adhered it with a thin layer of liquid glass.  I used the Lots of Dots Irresistible letters again sponging them with the Cocoa Ink.  While I had the Cocoa ink out, I also stamped my sentiment from the Card  Word Puzzle Acrylix stamp set.  A 1" Dimensional heart inked with Smoothie and adhered with a glue dot completed the tag.  I punched two little holes through the card and tied it up with a length of Smoothie Baker's Twine.
I have simply fallen in love with this flower from Card Word Puzzle, and since it was already a part of the background, I used it to tie the grey paper in over here as well.  I used the Smoothie Ink and Sweet Leaf for the leaves, inking the edges again with Cocoa.  I love how the subtle colors in the Dotty paper come through in this project.  Hope you do too!

Remember, you can order your Dotty paper with a $35 purchase on my website now through May 31st only!!!

Saturday, April 14, 2012

Bunny Basket--Take Two

I had a special request from a BFF for a pink bunny basket.  I could not wait to see how it would look!  Here she is all decked out in CTMH Baby Pink Exclusive Ink and cardstock:
 What a fun project to do in a variety of colors!
 The end.  ;)
My inspiration for these bunnies is in my last post.

I made a few cards over the past few days as well.  These are all based on the same general layout.  It was pretty fast to put together, and I am very thankful for the tip I read somewhere to make more than one card at a time.  I used my loose paper stash and scraps for the following three, so I am sorry for the lack of product details.  The sentiments and grass cuts are from the Martha Stewart All Occasions Cricut Cartridge (digital edition,) and the pink flowers are Recollections.  Mr. Sun is printed and cut on my Imagine from the Imagine More Cartridge.  Studio18 gems highlight the flowers.


 Stickles in Crystal accent the sentiment on this one.


Wednesday, April 11, 2012

It's April WHAT???

So, my computer is telling me that it is April 11th.  Really?  I am in shock!  Where has the time gone?  Maybe what they say about time flying when you are having fun is true after all because I have been having a FANTABULOUSLY fun time using all my new Close to My Heart products!  Today I finished up my Pemberley Workshop On the Go layout.  I tweaked a few things to fit my pictures better and love the final product!  I hope you do too!

 I used a different background paper on this side so I would still have a sheet left.  I need to conserve it for another project.
 These Honey colored flowers are soooooo super-easy to make!  They look like I spent a fortune and hours on them, but nope!
 Sponging the papers is such a fantastic technique to use.  Did I mention how easy it is as well?
You can order the Pemberley Workshop on the Go Kit from my CTMH website here.  It is one of my favorites right now.  Also, starting on Tuesday, April 17th, you can order the Limited Edition DOTTY FOR YOU Paper pack for only $5 with a $35 order!  What a steal!  It comes with 24 double-sided cardstock weight papers.  Just look at the wonderful colors!  They each have a pattern on one side and the dotted pattern on the other. If these colors don't say, "spring," I don't know what does.  Thank you to my amazing director, Mandy Leahy, for the great pic!

Friday, April 6, 2012

A Tisket , A Tasket, I made a Couple Baskets! ;)

Sorry for the cheese, but I couldn't resist!  It doesn't feel right to say 'happy good Friday,' so I will say an early HAPPY EASTER WEEKEND!!!  Now, bring on the paper!

My fabulous CTMH Director, Mandy Leahy, posted a wonderful tutorial on how to make a super-easy Easter basket, so I decided to make them for my girlies and nieces.  I have to tell you they are unbelievably easy to make.  Here is a link to the video: 
http://youtu.be/EoBst0J2soc
 
 I used the double-sided papers that come in the new CTMH Dotty for You Paper pack that you can order for a limited time beginning April 16th.  It comes with 24 papers, and is only $5 with your $35 order!  What a deal!  Each design has the dotty pattern on the backside in a different color.  These two baskets are for my nieces.
 This one is for my in-laws.
 Itty-bitty goodies!
Next, I made the bunny basket that everyone on our team has been making their own take on.  The idea and instructions can be found here:  http://www.creatingwithchristine.com/2012/03/hippity-hoppity.html
 I used the Lagoon and White Daisy cardstock and my Art Philosophy Cartridge (of course!) 
 I sponged the Lagoon Exclusive Ink onto the white edges.  I really love that sponged look lately.  Her beady eyes are the largest size black Opaque Adhesive Gems.
 Then I used the Paradise Paper Blooms and Sparkle Brad to add her flowery bling.  After much debate, I drew the whiskers on with a quick motion to make them feel light.
 Here she is sitting on my shelf!

Wednesday, April 4, 2012

Lots of Projects!

I am so excited to share my latest creations!  First, here is the super-fun gift that I gave to one of my friends today for her 40th B-day:
My inspiration for this project came from here:  sistersstuff.blogspot.com 
Gotta love that Pintrest!

Ok, I also finished my first EVER layout using my new CTMH products.  I used the Stella Paper Pack for this one and the cover of the Spring and Summer Idea Book as my inspiration:
 I used a sponge to ink up the edges of the Colonial White letters with the beautiful Tulip Exclusive Ink Pad.
 More details that I added:

 I am absolutely loving the Just a Note Acrylic Stamp Set.
I made two cards yesterday for my friends as well.  One of them is also a gift certificate for CTMH products!
 Here is the inside of the gift certificate/birthday card:
 This is the second card.  I used the leftover paper from the first to frame the Happy Birthday stamp.  The paper is from the Stella Paper Pack and the stamp is from the Cricut Art Philosophy Collection.  I also used the Just A Note Acrylix Stamp Set, New Colonial White Die Cut Cards, and Cocoa ribbon.
 This cute corner stamp is from my CTMH Welcome Kit.  :)

My final project to share tonight is made with the all-new and limited edition Dotty for You Paper Pack from CTMH.  It will only be available from the middle of April through the end of May.  You can get it for only $5 with any $35 product purchase starting April 16th!  Contact me for details!
 All of the products I used are available in the current CTMH Idea Book.  I am patiently waiting for my twine to come so I can add it to them.  I think I meant IMpatiently!  ;)


Love all these colors and especially the dots on the back of each paper!  So much fun for spring!