Showing posts with label Art Philosophy Cartridge. Show all posts

Thursday, May 26, 2016

Close to My Heart Retiring Products

Well, it is THAT time of year again...the Close to My Heart retiring products list has been revealed and let me tell you there ARE some surprises.  Here are some of my favorites.  If you want any of these products, they are only available while supplies last...

Rolling Tote

Shadow Box Frame in both colors

Display Tray

Hinged Display Tray


Extra Thick Twine in all 4 colors


Pink, Teal, Blue, Purple, and Bronze Shimmer Trim (waaaaaah!)

Cricut Art Philosophy Collection

Cricut Artfully Sent Collection

Cricut Artiste Collection

Well, that was a difficult revelation...but it just makes room for MORE amazing products to create with in the future!  :)  As I said, these (and many other products) are only available while supplies last now so when they are gone, they are GONE!  If you would like a complete list of retiring products, just comment with your email address and I will send it to you.  I won't publish your information for all to see, no worries!

ALL the albums are retiring to make way for new!

FREE paper in May only!

Only available in May!

Friday, August 14, 2015

Fundamental Friday Gift Boxes!

Yep!  I did it again...using those amazing Paper Fundamentals papers is just too easy!  The pop of subtle shine on the embossed side is my absolute favorite look right now.

I used a cut file from My Scrap Chic to make these adorable nail polish boxes for my daughter's birthday present to her BFF...


I used Glacier and Hollyhock CS and Fundamentals Papers for the boxes with Black CS for the lids.  The butterfly image is from the NEW Cricut Artistry Cartridge...

I used the retired Heartstrings Paper Packet for the back layer.

These gorgeous flower layers are cut from the original Close to My Heart Cricut Art Philosophy Cartridge.  I inked the edges with Hollyhock Exclusive Ink and layered the flower with glue dots...

I again used another pattern from the retired Heartstrings Paper for the flower.
The boxes contain...what else?  Nail polish!  :)


These were a tiny bit tricky to put together, so I would practice first.  SO worth it!  :)


Get it HERE!

Get it HERE!


Tuesday, April 15, 2014

Tag (You're It!) Tuesday: It's For the Birds

Welcome back to my blog for another Tag (You're It!) creation!

This tag is dedicated to the birds who were forced to take a break from building their nests when it SNOWED yesterday, April 14th, in what is turning out to be THE LONGEST winter in the history of my life!  (That sentence probably is too!)  ;)

Alas, I have ZERO control over the weather here in the Midwest, but I am in FULL control over my creation today!  Take THAT, snow!

I am just head over heals for this one, and I hope you are too!


Wouldn't this be perfect for some candy eggs?  Chocolate, of course.  I ate mine already, so I just used another kind of candy...hmmm better get to the store before the weekend!  Ooops!  ;)  Anywhoooo, I am linking up with the Simon Says Happy Easter and/or Sweet Treats Challenge!


I used the following Close to My Heart products to make this little treat bag and tag:

Cricut Art Philosophy Collection (cartridge and dimensional elements tag)
Desert Sand CS
Pink Glitter Paper
Black and Grey Glitter Paper
Brown and Tan Glitter Paper
Burlap Ribbon
Skylark Textiles
Mini Medley Accents Wooden Collection (hemp baker's twine)

Let me show you how easy this was to make!  Did you notice there were no stamps used?  ;)

Start off by cutting a length of Burlap Ribbon that is just longer than your tag shape.  Then trim off each side that has the thicker cord...


 Now you can separate all the little fibers of burlap...


I used the Dimensional Elements Tag shape to have a sturdy base for the tag.  You can cut the same shape tag out of the Desert Sand CS and attach it to the chipboard tag with Bonding Memories Glue.

Squeeze out a nice layer of liquid glass onto the CS to apply the pieces of the nest...


You don't have to be neat about this part...just lay the longer threads of burlap fiber out to overlap the sides and hang off the edges of the tag a bit...


It ends up looking nice and irregular with some extra space between the fibers...so you can just go back and add some of the shorter pieces of burlap to fill in the gaps while adding little drops of liquid glass as you do...


Walla!


The egg shape I used is also found on the Cricut Art Philosophy Cartridge.

Did you hear you can get this cartridge for FREE this month?  Did you hear you can actually get over $425 worth of amazing CTMH products and business supplies for only $99???  It is all true!  There are no strings attached at all to join my Close to My Heart team this month!  Whether you are looking to build a business from home or just build a collection of amazing products for a great discount, you are welcome to take advantage of this limited time offer!  You can actually choose any of the three Close to My Heart exclusive Cricut cartridges for FREE when you purchase the New Consultant Kit pictured below for just $99 with $15 to ship it out.  THAT'S IT!  No commitment, no strings!  Of course, I would LOVE to help you get off the ground running with your very own business, but the choice is yours.  :)  Team Been There, Blinged That is growing and would love to have you!  I really don't want you to miss this opportunity, so if you are interested, follow this link HERE for way more details!  If you have already made up your mind, then click HERE to join me and choose your FREE Cricut Collection!  :)


Friday, April 26, 2013

This Color Dare is Dedicated to Mom :)

Welcome back to another Color My Heart Color Dare!  Every week we post a new color-related challenge for you to try with your Close to My Heart Color Pallet.  If you don't have the specific colors to participate, please feel free to substitute similar ones or you can see one of our fabulous CTMH consultants to get your hands on our amazing products for next time!  :)

This week, we have a second round of Buzz and Bumble colors:  Creme Brulee, Goldrush, and Sunset.  When I read the colors, I KNEW what I was going to make as an embellishment for whatever project I made, AND who it would be for!  I love instant inspiration like that!

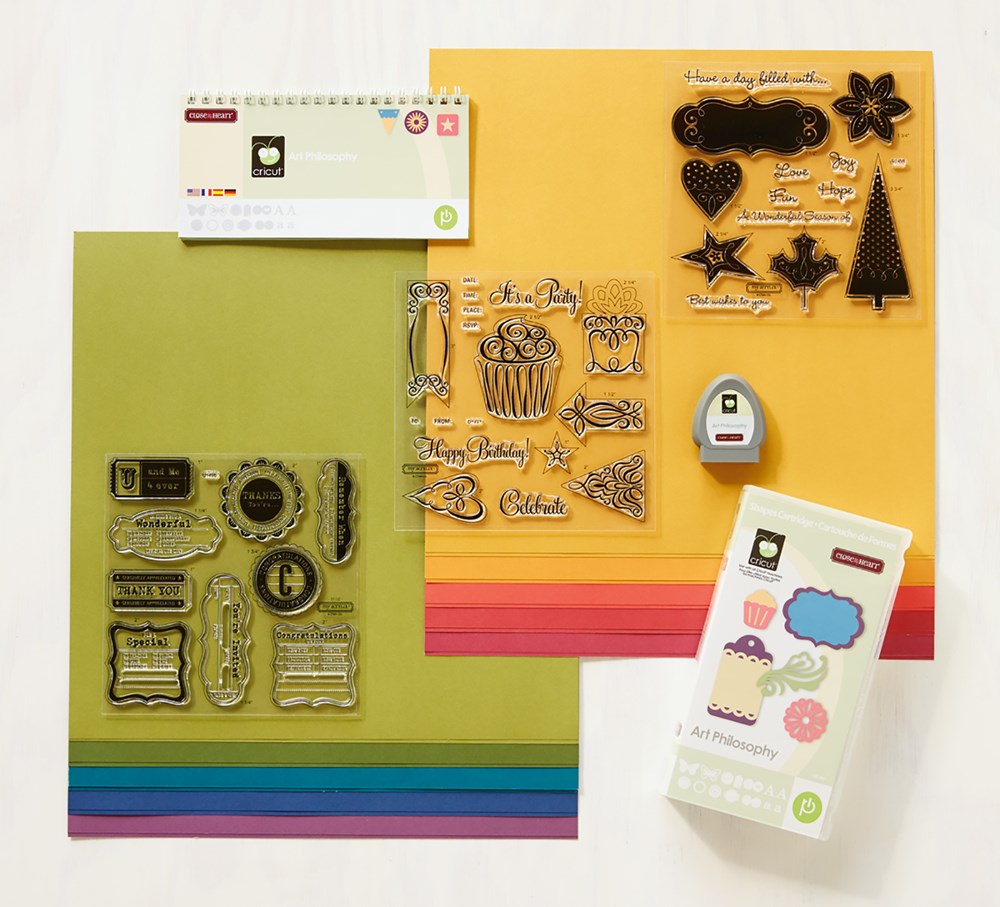
A fantastically crafty fellow teammate, Cathy Derouche, has been sharing her method of making these darling flowers with just cardstock and our Cricut Art Philosophy Cartridge daisy cuts.  You can see more HERE on her blog.  I have been wanting to make one, and knew this would be the perfect way to decorate a gift for my mother for Mother's Day.  She adores Black-Eyed Susan and Daisies! Thanks, Cathy!


This is a super-easy and fun gift to give!  I scoured the internet and Pinterest for the directions to make this particular box, but didn't find anything except the size for the papers around the candy pieces.  According to Pamela O'Connor's directions, they are 1 x 3 inches.  I found that if you cut the matchbox on the Cricut Artiste Cartridge at 4.5 inches in relative size, the box is the perfect size to hold 9 paper-wrapped Hershey's Nuggets candies.

I just love how the flowers Cathy makes have so much dimension!  There are three cuts each in three different sizes (2.75, 2.5, and 2) of the Daisy cut on page 28 of the Art Philosophy booklet.  I used the Creme Brulee Cardstock for the petals and the Cocoa Cardstock for the center.  The center is made with the 3D flower on page 69 cut at 2.5. 


This is a great time for me to introduce another of my Five Fave CTMH tools!  This one just missed the top 5, but is definitely in the top 10--the Quilling Tool.  It is perfect for rolling the 3D flower in the center, but it really came in handy for shaping these petals too...


I also used the My Acrylix Perfect Fit--Mom stamp set for this project.  The sentiment is stamped in Cocoa on a shape that I cut from the Artiste Cartridge with my Cricut on Champagne Cardstock.  I used the same color CS for the inside box of the slider.  The Buzz and Bumble B&T Duos were perfect to use for this project.  Bling?  Of COURSE!


This cleverly hidden message will be revealed as the candies disappear...


A word of advice on the candy.  Make sure you buy enough Nuggets.  Some of them are inevitably lost in the creative process...


 Here is a shot of the matchbox open with the candy inside.


I hope you have a chance to try this box sometime--it is a great gift to give in a pinch!  And you simply HAVE to try making one of these flowers--Cathy has me hooked on them!  :)

Hope to you see you over at this week's Color Dare!  :)

Saturday, April 20, 2013

Buttons Galore!

Hi there!  I have been super-blessed and busy making baby frames for my Etsy shop.  Here is one of two gorgeous little numbers that I just finished up.  I used lots of beautiful buttons in each one, and it just so happens that Heart 2 Heart Challenges would like us to use....{buttons}....so I am linking up to the challenge!

This first is for a new little baby boy...


Here it is in the frame.  I took pics before I put it in to avoid the glare of the glass.  ;)


A great big shout out to Carolyn Burch, The Crafty Lady, for her information that helped me create my very own watermark for my pictures!  What do you think of it?  Did you notice that it sparkles?  ;)

Thursday, January 17, 2013

Color Dare #26 and MORE Spring and Summer Sneak Peeks!

Ever feel like you are wandering around in a black and white movie?  All this playing around with black and white themes has me thirsty for color for sure!  The challenge this week (starting Friday) at the Color My Heart Color Dare is to use black and white with just a {POP!} of color.  I really had a hard time keeping it to just a pop of color!  ;)  I decided to go simply understated for this challenge, and the result is that I came up with quite a few versions of cards!

Here is the first one!  This card was really fun to make.  There were a million and one different directions I could have gone with the spinner spaces, but this is a valentine, so I kept the love theme constant.  I used my Cricut Expression 2 and the Cricut Art Philosophy Cartridge to cut the circle card base from white daisy cardstock.  Then I cut the rest of the shapes according to the stamp sets that coordinate with them.  


The spinner is from the Wheel of Life My Acrylix Stamp Set D1545--available from the new Spring and Summer Close to My Heart Idea Book beginning on February 1st!  This is a fun stamp that can be used in oh so many ways!  My very first Scrapbooking workshop in February will feature this set!  


There was a skinny little cut of our black tulle ribbon lying around, so I tied it right on the fold of the card.  I cut out the arrow after I stamped it, shortened it, and popped it up with a skinny piece of foam.  That silver brad goes right through it all!  Love how it looks.  My pop of color in this card comes from this letter "u" cut with the Art Philosophy Cartridge on Ruby Cardstock.  I also used an adorable stamp from the Whooo's Your Valentine Kit to stamp teeny tiny hearts in Ruby Ink on the circle card base.  The x's and o's on the heart are also from this set.  It is only available until January 31st or while supplies last!  You can get it for ONLY $10 with any $35 purchase!


Ok, so these next two cards are similar to each other yet different.  I used one of my favorite new stamp sets for Spring and Summer, D1540 In the Background.


Isn't this a fabulous pattern stamp?!  I cut the word, "thanks" from the Cricut Artiste Cartridge at 1 inch on Lagoon cardstock. Simple cards can still make a beautiful statement.


This next card features my favorite pattern from the In the Background My Acrylix stamps.  It is a chevron pattern!  The stamp gives it a slightly distressed look, but if you want it more solid, just color in some of the negative space.  :)  It is available beginning on February 1st!


These little guys are from the It's Your Day My Acrylix and are stamped in Black and Lagoon.  I gave them little shimmer trim bodies to add some much needed sparkle after all the black and white!  I cut "thanks" at 3/4 of an inch for this size A2 card.


That is it for me for now with the black and white...but it is just the beginning for you!  Go ahead and link up your paper project to the Color Dare!  It can be a card, layout, 3D item, gift tag, or anything else you might create with black and white and a POP! of color.  Remember, you don't need to use all Close to My Heart products, just include some!  ;)  Link up HERE at Color My Heart--the Color Dare Challenge Blog starting Friday.