Thursday, February 28, 2013

Color Dare #32 Gets Stuck in the Muck

Happy Thursday to you!   It's time for another Color Dare!  This week we are showcasing the three Close to My Heart colors Pear, Lagoon, and Outdoor Denim.

Alright, how many of you have launched yourselves head-first into a project or craft only only to find yourself come to a screeching halt?  (This is where you all humor me and raise your hands, or give up a sassy, "Mmmm HMMM!")  ;)  Well, THAT, my friends is what happened to me this week!  I thought I knew exactly what I was doing with this design, but unfortunately the two cuts from the Artiste Cartridge that I thought went together like peanut butter and jelly, well, they were actually more like peanut butter and ketchup, lol.  Thanks to the wonderful encouragement of the Color My Heart bloggess Sarah, though, the project came together after all!  Here is the finished product...


I had everything embellished by the time I realized that the Outdoor Denim colored card shape was NOT an envelope sleeve for the other cut!  I am not sure why I didn't realize it before, lol, but I sure didn't.  Here is the page in the handbook with the cuts...just so you don't think I am crazy... ;)


Sarah suggested I upload a photo so she could help "unstick" me from my design dilemma.  It is a good thing too, because she pointed out the simplest thing to me that would save the whole design (thanks, Sarah!)  :)  Whew!  Instead of using the entire card shape of the Outdoor Denim shape (yeah, it's not a sleeve, it's a card all on it's own) I simply needed to cut off the back and attach it to the front instead of using it as the sleeve that it was never meant to be, lol!  It worked out great too!  If you ever get stuck on a project, be sure to ask someone for an opinion before you scrap it!  ;)


I bet you thought these colors were from Later Sk8r, right?  Well, guess what?  The Zip Strip from the Chantilly Paper Packet matches it spot on!  All I had to do was change the little dots from pink to white with my gel pen!  ;)


Here it is when you open it up...I trimmed a picture of the girls being silly at the zoo to give to Grandma in this beautiful little presentation.


Here is my creative formulary for this wonderful little tuck card.  (I made up the name, isn't it fitting?  You tuck the end of the paper up under the little flap to close it.)

Cricut Artiste Cartridge
*Provocraft Expression 2 Cricut Cutting Machine
Whisper, Outdoor Denim, and White Daisy Cardstock
Chantilly Paper Packet Zip Strip
*White Gelly Roll Pen
Lagoon and Outdoor Denim Exclusive Inks
D1506 Family Love My Acrylix Stamp
D1546 Frame Flair My Acrylix Stamp
Silver Shimmer Trim
Satin Polka Dot Ribbon
Black Button Assortment
Paradise Assortment Baker's Twine

Now it's YOUR turn!  Get crafty with these three colors along with any neutrals you choose, and link up to the Color My Heart Color Dare!  We can't wait to see what you come up with!  :)

Damask Divas Chantilly Blog Hop


Welcome to another Damask Divas Blog Hop!  (March 1st all links will work!) Thanks so much for stopping in to see the many ways you can put your Chantilly Paper Packet to use!  If you came from Shirley's Blog, then you are in the right place.  If not, just check out the line-up at the Damask Divas Blog.

Chantilly just might be my favorite paper of all time!  Of course, I am a girl who likes to change her mind, so let's just be realistic and call it my favorite for the moment, shall we?  ;) 

I made this shadow box frame for my cousin and her hubs who had their second darling little baby girl in February.  I simply love creating these personalized frames for people who order them from my Etsy Shop.  They are fabulous gifts for new parents and easy to customize.  This is also my entry for the Heart 2 Heart February Challenge, Love is in the Air.  It has been tortuous waiting to link it up until we had the blog hop because I finished this project before Valentine's Day!!  ;)  It was totally perfect for both assignments though, so well worth the wait.


The background paper for this frame was made by dabbing my Twilight Exclusive Ink onto a piece of White Daisy Cardstock with my handy dandy sponge dauber.  I used it all over the paper and then cut out the section that I liked the best.

I used a few different Close to My Heart My Acrylix stamp sets for this one.  The Chantilly Scrapbook Workshop size C set I used for the clouds is currently available and the retired sets I used are Capture the Date, Moments in Time, and February Word Puzzle.  I used all these retired sets for numbers and lettering, so they would be very easy to substitute.  :)


The hot air balloon is a gorgeous cut found on the Close to My Heart Artiste Cricut Cartridge.  It usually has a flag on top of the balloon, but I just cut that off.  ;)   I added a bit of baker's twine to attach the basket.


These letters that spell out "olivia" are the glamour glitter alphabet stickers.


I placed one of the Chantilly zip strips along the bottom of the frame for a bit of grounding effect.  I really love the looks of this particular strip.  The sentiment at the bottom of the artwork melts my heart.  I positively had to place a heart in the basket being carried away...snif!

I hope this has inspired you to create your own beautiful paper piecing!  Have fun on the rest of our blog hop--you won't believe your eyes!  Cydney's blog is your next stop!  :)  Don't forget to enter the rafflecopter giveaway on the Damask Divas Blog for a chance to win a Close to My Heart My Acrylix Stamp Set!!!

Monday, February 25, 2013

CAS Boxed Card Set

I have been making some pretty detailed cards for many of my DT duties lately.  When Heart 2 Heart posted their new CAS (Clean And Simple) Challenge, I knew exactly which card to use.  I recently completed two sets of cards that I am donating for silent auctions.  This one is for the Spotlight Youth Theater's local production of Beauty and the Beast.  I saw it this week (Belle is my favorite princess after all), and it was AMAZING!!!  Those kids are so fantastically talented.

I wanted to make eight cards for the set, so had to keep it simple for time's sake, yet impressive to draw a good bid.  I think I managed to do both!


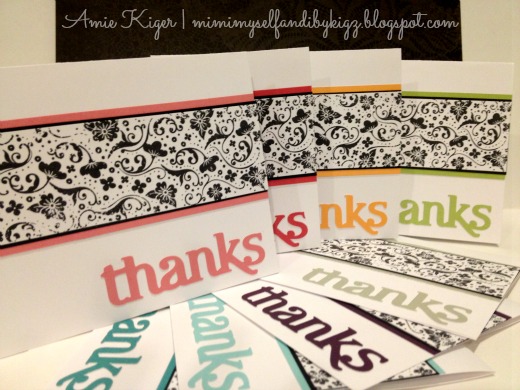
Part of my goal was also to make the set of cards very versatile, so I wanted to use a variety of colors to suit different personalities.  I used the new Close to My Heart My Acrylix set In the Background to make a black and white patterned strip across the card.  Then, I double matted that piece with black and the coordinating color to the sentiment.  The "thanks" sentiment was cut on my Cricut Expression 2 from the Cricut Artiste Cartridge.  Until the end of February, you can order this cartridge from me with free shipping!  Click the link in the upper right of my blog to order!


This adorable Magazine File makes a beautiful box for any card set.  This cut is also on Artiste.  I did bling this up a bit with some For Always B&T Paper, black shimmer trim, and a gorgeous flower made with a cut on our other Cricut cartridge, Art Philosophy.  You can also order this cartridge from me for the month of February for FREE shipping!  I used our awesome silver marker to write the word "cards" on the spine.  I love how this looks on black paper!


I have absolutely no idea where I first saw this use of the black tulle ribbon as layers on a flower, so I am sorry that I cannot give credit to any one consultant, but I can tell you that I did not invent it, cross my heart.  :)

Like I said, I am linking up my cards to the Heart 2 Heart CAS Challenge for February.  Come and play along if you can...you will find tons of fabulous inspiration there!


Sunday, February 24, 2013

Tag, You're It!

I recently discovered that I LOVE making gift tags!  The only problem is that I rarely need to give a gift, lol, so I have a growing collection of tags.  ;)

This one is specially made to enter the Heart 2 Heart Blog Challenge, Tag, You're It.

I started off with this one thinking about woodgrain, so wanted to use the Dakota Paper Packet.
Instead of the woodgrain paper, though, I made my own with some Kraft Cardstock, Saddle Ink, and the wood stamp from the Universal Backgrounds My Acrylix.  I attached this paper to a tag shape that I got from the Dimensional Elements Tags set and covered with Colonial White Cardstock shapes cut to match the tag exactly from the Cricut Art Philosophy Cartridge.


The flower incorporates both sides of one sheet of B&T Duo paper.   I inked the edges with Outdoor Denim Ink to give each layer some definition.  Yep, it was messy, but oh, so worth it!   I LOVE the way it turned out!!!  The leaves are made of Olive ribbon from the retired Designer Ribbon Green Collection.


I used the flower cut on page 54 of the Cricut Artiste Cartridge which I cut at 1.75, 1.5, 1.25, and 1 inch on my E2 cutting machine to form the layers of the flower.


At the center of the flower is a tiny button from the Buttons Basic Assortment that has a thread of the burlap ribbon tied in the center.  I used one that I had carefully pulled from the edges of the ribbon to make it fray a bit.


I selected a versatile THANKS sentiment for my tag that I fashioned with the brand new Keyboard Kraft Alphabet stickers from Close to My Heart.  I also added a houndstooth pattern Irresistibles Frame to ground my embellishments.  The Hemp Bakers Twine that I used as the tie of the tag is in the Mini Medley Accents Wooden Collection.


Do you like to make gift tags?  Have you ever tried one?  Now just might be the time to give it a go and link your creation up with the Heart 2 Heart Challenge!  You have until the end of the month to enter.  :)

Thursday, February 21, 2013

Color Dare #31

It's that time of the week!  Ready for another Color Dare Challenge?  This week the colors are analogous, or next to each other on the color wheel.  The Close to My Heart colors are Buttercup, Honey, and Sunset.  It is also PRIZE WEEK at Color My Heart!  The winner of this week's challenge will receive a brand new My Acrylix Happy Valentine's Stamp set!  Feel free to use products that match these closely if you don't have the any Close to My Heart products, or you can always get some on one of our websites.

I chose to highlight a brand new stamp set, called Honeycomb.  I have been wanting to play around with this one for a while, and I finally had the chance.  I chose to add Colonial White, Cocoa, and Champagne as my neutrals this week.  :)


I wanted to try to keep it CAS (clean and simple) on this card in order to highlight the gorgeous patterns in the hexagon stamps.  Take a look at all of the different patterns in this set...


I used a Kraft card base for this card, and inked all the hexagon edges with Cocoa Exclusive Ink.  I think it looks like grout between tiles, lol!  Now I want hexagon shaped tiles in my kitchen backsplash!  Wouldn't that be FANTASTIC!?  :)

Just for fun, can you see my patten oops in the card?  I didn't notice until I was editing my pics, lol.


I love the sentiment that is included in this set.  It actually spurred me to snatch up a set with little bees on it so I can combine the two sometime.  Not for this one, though.


This gold colored glitter paper is a brand new product this Spring for Close to My Heart!  This color is found in the Brown and Tan Glitter Paper Packet.  I really do like this light color in the pack, and it went really well with my colors, so why not add some bling?   In fact, I liked it so much that I added a strip on the inside of the card as well.  :)


Now, you know the drill!  It is YOUR turn to share your creations using Buttercup, Honey, and Sunset with us over at the Color My Heart Challenge Blog Color Dare!  Have fun, link up to our challenge,  and show us your sparkle!  :)

Here is my complete creative formulary for this card:

Kraft, Colonial White, and Champagne Cardstock
Light Tan (gold) Glitter Paper
Cocoa, Sunset, Honey, and Buttercup My Exclusive Ink Pads
My Acrylix Honeycomb C1537
Sponge Dauber

Tuesday, February 19, 2013

Lunch Box Quickies!

I love making special little notes to put in my kids lunches.  These were some I used recently and I wanted to share them with you to show you how easy it can be to light up a kid's day.  :)


They were a super-big hit and sooooo easy to customize!  Can you guess each kiddo's favorite color?

Why not light up your sweetie's day with a little loving in their lunch?  You will be able to find these and other Lunchbox Quickies in My Etsy Shop soon!  :)

Sunday, February 17, 2013

How to Open Close to My Heart Exclusive Ink Pads

Happy Sunday, everyone!


I happened to come across some discussion this week about what the trick was to opening our Close to My Heart Exclusive Ink Pads.  Let me tell you, I had the SAME problem when I first opened one attempted to pry one open almost a year ago.  I ended up with ink all over myself!  All I wanted was for someone to pleeeease show me how.  Well, now that I have some experience under my belt, I don't feel quite as flustered anymore and can generally get them open without inking myself instead of the paper!  I decided to make a quick video tutorial to show you how I open them just in case you find yourself in the same boat I was in back then.  Hope this helps!  :)


Well, I can assure you that these ink pads are well worth the frustration of learning to open them at first.  I love how they swivel and nest inside the lid while you are using them saving some valuable workspace.  That swivel feature also allows the ink pad to be stored upside-down so that the ink sits right near the surface of the pad when you are ready to use it!  Genius!  Finally, I realized that because they close so snugly, they stay nice and juicy for a long time.  If you find yourself needing extra help to get them open, don't hesitate to contact me, or your own CTMH Independent consultant if you already have one.  :)

Thursday, February 14, 2013

Color Dare Meets Home Decor

Happy Valentine's Day!  Where in the world is the time going?  It is already halfway through February!  Yikes!  I have been doing a lot of multitasking lately, and this post is one of them!  I used my Color Dare DT assignment as a springboard for my Heart 2 Heart inspiration for their Home Decor Challenge.  :)  (Don't count the number of exclamations I used up there...)

The Color Dare this week is to use Pacifica (yay!)...........and.......Sorbet (gasp!)  I cringed when I read it.  (Sorry, Sarah!)  I know some of you just did too.  Now, take a breath.  Exhale.  Stay with me here--we each have certain colors that sort of turn us off.  Peachy shades kind of do that to me, so Sorbet is not a color I reach for when I am freestyling, lol.  BUT, I gave it a whirl and the more I thought about it, the more I lost myself in the design.  I hope you like it!

I finally got my little hands on one of Close to My Heart's new My Creations Canvas Journals.   Then I added Bamboo, Desert Sand, and Chocolate as my neutral colors, and WALLA!!!!!  Take a look at what I did to it...


The beautiful blue ribbon is from the retired Designer Ribbon Blue Collection.  Keep an eye out in my While Supplies Last section of my website, because you never know what awesome things will pop up in there!  The red ribbon is currently available at a crazy-cheap price!

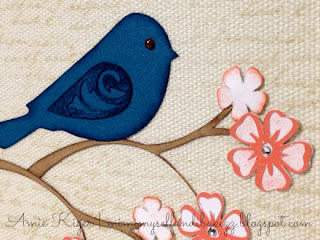
The adorable bird, branches, and flowers are cut on my E2 using the Art Philosophy Cartridge.  The flowers were incredibly fun to play around with while I was trying to figure out how to make them.  I inked some with Sorbet Ink and my sponge dauber.   Bitty sparkles gave them just the right amount of bling.  The bluebird has a chocolate color Opaque for an eye.


These great embellishments are found in two of the fabulous Mini Medley Collections.  The button and flourish are in the Antiqued Gold Collection and the hemp baker's twine is found in the Wooden Collection.


This fancified paperclip was the perfect addition as a little place-keeper accent for my journal.  You can find it in the Mini Medley Accents Antiqued Gold Collection as well.   I added a bitty sparkle to tie it in with the blooms.


Can you see the faint script background image?  I used the Universal Backgrounds My Acrylix to stamp it in Bamboo all over the journal front.  The canvas on the journal gives all the inking a softer, distressed look that I just adore.  I used the Love Blooms My Acrylix stamp to stamp the sentiment in Chocolate at the bottom edge.  I think it is perfect for a journal!


Alright, now, I hope I convinced you to try out this week's Color Dare over at Color My Heart.  I cannot wait to see what you all make! 

Wednesday, February 13, 2013

Valentine's Day Class Treats

Just a quickie for you today, so here we go!

I made treat bags for my kiddos' class parties tomorrow at school.  These are SUPER-easy, so if you are just a busy mom looking for a quick and cute solution to goodie bags, you can DO this!  You can even find punches to make the shapes if you do not have a cricut cutting machine.  I used some heart stickers and cardstock that I already had on hand, so that counts for using my stash! 


I used the to/from square and the"you're sweet" round stamp which are both from the Whooo's Your Valentine Kit last month.  Add a couple of glue dots to stick the scallop and circle together, fold the paper cardstock over the top of the goodie bag, and staple!  Easy-peasy, like I said!  Seriously, a friend reminded me over the weekend that the kids are going to tear these things open anyway, so if you don't have time and energy to get fancy, DON'T!  ;)


Monday, February 11, 2013

Thinking Warm Thoughts in Layout Form

Hello everyone!  It has been a fast and furious few days in my life.  In case I haven't said it lately, thanks so very much for stopping in to read my blog and see what I have been up to in my craft room.

Today I wanted to share this layout I made by using the first book in the new series by the amazing founder of Close to My Heart, Jeanette Lynton.  Make It From Your Heart, Volume 1 contains the instructions for making 18 layouts and 12 cards with easy-to-follow pictures and cutting guides.  At just $7.95, this publication is a wonderfully affordable way to boost your creativity.


My layout is made with pictures from one of our family trips to Florida.  It is a bit chilly here in the midwest as of late, so I needed to feel some warmth with these beautiful beach pics to keep me holding on until spring break finally arrives.  I used pattern number 12 on page 28.


The gray spotted paper is from a special paper packet Close to My Heart had a while back called Dotty for You.  The shades of blue are Sky, Dutch Blue (retired), and Outdoor Denim.


I used two different My Acrylix sets for this layout, the retired Footloose Workshop on the Go (shell and sand dollar) and the currently available Just Chillin' (bucket.)  A few Opaques added some pretty pearls to my beachy scene.


These wooden shapes are also no longer available, but were just the perfect touch for my layout.  


I did add some extra photos to my layout, so it is a bit different from Jeanette's layout, but that is the beauty of our How-To books!  You get all of the design ideas without handcuffs!  ;)

I wanted to also let you know that two of our previously discontinued How-To books are back with our Spring and Summer Idea Book and more affordable than EVER!  They are now in a softcover edition for only $14.95 each!
 Reflections contains 100 scrapbook layouts.

 Originals gives you 100 card patterns to choose from!

Check them out by clicking on the links above.  Jeanette is brilliant, and they have truly become indispensable tools in my craft room.  :)

Thursday, February 7, 2013

Color Dare #29

Welcome back to another Color Dare!  I hope you weren't frightened by last weeks' color concoction, because this week is all about the color of LOVE!  We would LOVE for you to join us!  Our color combo this week is Blush and Cranberry.  How could I NOT make a valentine?  I really enjoy the combination of pink and gray, so I added the neutral colors black, slate, and whisper.


I reached for my cricut scrap cuts first and found some flowers and this awesome torn-out paper cut from the Cricut Artiste Cartridge.  I just love this one!  I pulled out my new Girls Rock My Acrylix set and got to work. 


This heart squiggle boarder stamp was perfect for the paper doodles.   I added some of our Cranberry Baker's Twine and a new button from the Black Button Assortment.  I did type that correctly--there are both black and gray buttons included in this new assortment.  Some of them have GLITTER!  ;)


Next were the flowers.  One of them was exactly the cut for this large flower stamp from the set.  The others didn't fit exactly, but I thought the stamps would give them some great details even if they didn't match up exactly.  I added foam tape for some layered effects, and some new Pink Glitter Gems and black shimmer trim to bling them up too.


The leaves are stamped in Slate ink on Whisper Cardstock.


For the "Love" sentiment, I used the generational stamping technique.  I stamped it first in Cranberry ink at the bottom, and then without re-inking, stamped two more times up the paper.  I absolutely love how you really have more than one color to play with for each ink pad you have!  :)


You have until Thursday the 14th (Valentine's Day!) to link up with us at the Color Dare to play along, so why not give it a try?  I can't wait to see what you come up with!  :)

Wednesday, February 6, 2013

Scraptacular Memories Workshop Time!

Super excited today!  I have finally finished the layout for my first ever Scraptacular Memories Workshop!  I have been doing card workshops (now they will need a cute name as well,) for several months and I decided to go for it and begin to hold scrapbook layout workshops as well this year.

Here it is!  I wanted to keep it low stress to see how it flows, so I am doing one double page layout for starters.  :)   We will be using one of the brand new stamp sets in the new Close to My Heart Spring and Summer Idea Book-- # 1545, Wheel of Life. 


Using spinners is a hot new trend in papercrafting, so I cannot wait to do this one with you!  The Juniper color is really hard to photograph because it looks so different in various types of lighting.   Just pretend there are actual pictures in the mats on the right.  I have to find them, lol...don't worry, you can totally customize this layout to your photos and their orientation.  The photo mats will not be pre-cut.  ;)


Here are some of the details:

Waxy Flax faux stitching technique and the brand new Black Buttons!


Dimensional adhesives for the spinner to POP!


Burlap Ribbon, baby!


Ink distressed edges anyone?   Lettering is all cut by hand--JUST KIDDING!!!  It will all be pre-cut by my trusty workhorse--the E2!  These are made with the Cricut Artiste Cartridge.


Gorgeous little journal tag from the Cricut Art Philosophy Cartridge tucked inside one of our new Paper Pouches! (I broke down and bought them, Stephanie!)


If you would like to attend this first ever Scraptacular Memories Workshop, don't hesitate to RSVP as seating is limited!  Come try out some of the brand new Close to My Heart products and get your copy of the NEW Idea Book!  Click HERE for more details...and keep on sparkling!