Hi everyone! I have an assignment for you today. Think of a person you know who might be going through a rough spot with their health, work, or relationship. Come on, I know you know someone. Now, make them a card. Support them and lift up their spirits. Put a smile on their face for a moment. You just never know when that human touch will be pivotal. Here is a card that I sent to my mom last month. I just so happened to use one of my Five Fave CTMH Embellies on it!
Mom has been going through some health changes lately and things have been rough to say the least. But she is tough...she has been strong as far back as I can remember. She had been so strong lately, in fact, that I hardly put too much thought to what she was dealing with--until she broke down on the phone with me one day. It opened my eyes to the fact that even seemingly emotionally strong people are only so strong by themselves for so long. I made this card to let her know I am here for her always to support her, and try to bring a smile to her face again. It did. :)
I love tying My Five Fave Embellie #4, Black Tulle Ribbon on cards and other projects. I have experimented with several ways to use it. These frames on D1546 Frame Flair are awesome for covering it where I tie it in the middle with a small piece of twine, because it doesn't look all that pretty there. Here is a pic of the super-versatile four-stamp set...
I stamped this one in Cotton Candy Ink. The Love and Hugs sentiment is found on C1524 Words of Comfort. I like the way the black elements really contrast with the Chantilly papers.
God won't give us more to bear than He will help us bear. Who is God asking you to help through that time? I'm willing to bet that you just thought of them at the beginning of my post. ;) Go spread some sparkle, my friends!
Want to see other projects that I used this tulle on? Click HERE!
Never let ANYONE dull your sparkle! Self admitted Cricut fanatic and Shimmer Trim addict. ;)
Showing posts with label Black Tulle. Show all posts
Tuesday, April 9, 2013
Monday, February 25, 2013
CAS Boxed Card Set
I have been making some pretty detailed cards for many of my DT duties lately. When Heart 2 Heart posted their new CAS (Clean And Simple) Challenge, I knew exactly which card to use. I recently completed two sets of cards that I am donating for silent auctions. This one is for the Spotlight Youth Theater's local production of Beauty and the Beast. I saw it this week (Belle is my favorite princess after all), and it was AMAZING!!! Those kids are so fantastically talented.
I wanted to make eight cards for the set, so had to keep it simple for time's sake, yet impressive to draw a good bid. I think I managed to do both!
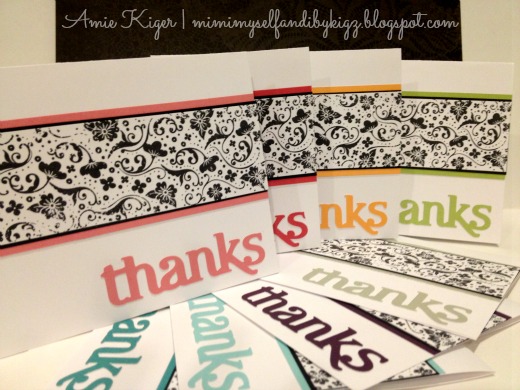
Part of my goal was also to make the set of cards very versatile, so I wanted to use a variety of colors to suit different personalities. I used the new Close to My Heart My Acrylix set In the Background to make a black and white patterned strip across the card. Then, I double matted that piece with black and the coordinating color to the sentiment. The "thanks" sentiment was cut on my Cricut Expression 2 from the Cricut Artiste Cartridge. Until the end of February, you can order this cartridge from me with free shipping! Click the link in the upper right of my blog to order!
This adorable Magazine File makes a beautiful box for any card set. This cut is also on Artiste. I did bling this up a bit with some For Always B&T Paper, black shimmer trim, and a gorgeous flower made with a cut on our other Cricut cartridge, Art Philosophy. You can also order this cartridge from me for the month of February for FREE shipping! I used our awesome silver marker to write the word "cards" on the spine. I love how this looks on black paper!
I have absolutely no idea where I first saw this use of the black tulle ribbon as layers on a flower, so I am sorry that I cannot give credit to any one consultant, but I can tell you that I did not invent it, cross my heart. :)
Like I said, I am linking up my cards to the Heart 2 Heart CAS Challenge for February. Come and play along if you can...you will find tons of fabulous inspiration there!
I wanted to make eight cards for the set, so had to keep it simple for time's sake, yet impressive to draw a good bid. I think I managed to do both!
Part of my goal was also to make the set of cards very versatile, so I wanted to use a variety of colors to suit different personalities. I used the new Close to My Heart My Acrylix set In the Background to make a black and white patterned strip across the card. Then, I double matted that piece with black and the coordinating color to the sentiment. The "thanks" sentiment was cut on my Cricut Expression 2 from the Cricut Artiste Cartridge. Until the end of February, you can order this cartridge from me with free shipping! Click the link in the upper right of my blog to order!
This adorable Magazine File makes a beautiful box for any card set. This cut is also on Artiste. I did bling this up a bit with some For Always B&T Paper, black shimmer trim, and a gorgeous flower made with a cut on our other Cricut cartridge, Art Philosophy. You can also order this cartridge from me for the month of February for FREE shipping! I used our awesome silver marker to write the word "cards" on the spine. I love how this looks on black paper!
I have absolutely no idea where I first saw this use of the black tulle ribbon as layers on a flower, so I am sorry that I cannot give credit to any one consultant, but I can tell you that I did not invent it, cross my heart. :)
Like I said, I am linking up my cards to the Heart 2 Heart CAS Challenge for February. Come and play along if you can...you will find tons of fabulous inspiration there!
Thursday, January 31, 2013
Damask Divas For Always Blog Hop!
Can you believe it?! Here it is! Our first blog hop of the new catalog! This hop officially starts on February 1st, so if you are a bit early be sure to check back in! If you came from Traci Williams' Blog, Paper Crafting 101, then you are in the right place. If not, you can start at the Damask Divas Blog at the beginning. I need to take a few deep breaths, so have a look at my first creation with the For Always Paper Packet while I do that...
I have been wanting to make one of these double pocket cards for a little while, and since Heart 2 Heart posted their fancy folds challenge for week #3, I had the superb motivation! This type of card gave me the perfect opportunity to highlight the beautiful patterned papers of For Always.
The card takes just one sheet of double sided pattern paper. It also conveniently gives you a finished card size 4.25 x 5.5...the standard A2 card size! Here is the video tutorial I used. As you will see--it is unbelievably simple! I used the second version she shows so that the paper patterns alternate in the finished card.
I started by making the sentiment for my card. I cut the "we" and "u" from the Cricut Art Philosophy Cartridge on Ruby Cardstock that comes with the paper packet. The "Love" sentiment is cut from our second Cricut Cartridge, Artiste. Do you see the boarder at the top and bottom of the sentiment? That is the zip strip that you cut off from each of our patterned papers. I really liked how this one looked by covering half of it.
3D flowers were actually one of the first things that drew me to Close to My Heart. At the time, the Art Philosophy Cricut Cartridge was one of only two that had the beautiful cut on it that allowed you to form these beauties. But I needed to know HOW to make them, and I needed the right adhesive. I found Mandy's video tutorial that gave me exactly what I needed to know. I. Was. Hooked. You had me at liquid glass! Yes, I use our amazing liquid glass to hold these beauties together and also to attach them to the card itself. Trust me, it is the BEST product out there for this purpose. It also lasts FOREVER! A little goes a long way. To make a long story shorter, lol, when I saw the black and white script design in For Always, I knew that 3D flowers were going to be the first thing I made with it! I inked up the edges before I rolled them with Ruby, Cotton Candy, Hollyhock, and Blush Exclusive Inks (from left to right above.)
The centers are dotted with our brand new Pink Glitter Sparkles to match each color of ink. They come with 5 different shades all in one pack!
These tags were SO much fun to embellish. Each one matches the personality of the girlie who will be writing a sweet sentiment to their grandma on the back for Valentine's Day. :) They pull out like this so that she can read them:
The tag cut is found on the Artiste Cricut Cartridge. I used our Black Striped Grosgrain Ribbon, Black Tulle, and NEW! Black Shimmer Trim as tag-ties. I added a new Black Button to one with some black waxy flax. The girls' names are spelled out with the gorgeously glittery Glamour Glitter Alphabet.
Sparkle galore!
Well, I have kept you long enough for today! Tammy Smith at Legacy of the Heart is your next stop on the blog hop, so pick up your sparkle and move on along! Thanks for hopping in! ;)
Oh, and don't forget to comment on the Damask Divas blog for your chance to win an awesome Close to My Heart Acrylix Stamp Set!!! HERE
Thursday, January 24, 2013
A Little Shabby Chic for Color Dare #27
Well, January is rolling right along, isn't it? It is already time for another Color Dare from Sarah at Color My Heart. This week, the challenge is to use three shades of green--Sweet Leaf, Topiary, and New England Ivy. OK, so I know you just thought about St. Patrick's Day--I did too, so don't even worry about it. But I want you to challenge yourself to NOT go there! I cleared my head with a quick tidy of my craft room, and went in a totally different direction.
My project this week is a gift tag in a shabby Chic style. I find this style a bit intimidating to pull off, but I LOVE it when it works. I think it did this time! :)
Whew! I did have to work that baker's twine hemp (new product alert!) and burlap ribbon through the tag hole! My tag is cut from the Art Philosophy Cricut Cartridge from Close to My Heart. This is one of my favorite tag shapes on our two cartridges. The neutral colors I added this week are Colonial White, Cocoa, a teeeny bit of black, and Kraft Cardstock.
You can even see the stray fibers in my close ups today! ;) Here are my three greens, two are also cuts from Art Philosophy and the third is from the soon to be released Chantilly Scrapbook Workshop on the Go. Oh my, this one is a keeper, you guys! I also used another stamp from this set for the Cocoa colored leafy background on the Kraft paper.
This crotchet flower and button are from the Bohemian Assortment--and retiring at the end of this month, gasp! Say it isn't so! *pouts* When you see the new products, I promise you will get over it! ;) ( I almost am....) Anywho...I cut two small circles of the black tulle and folded them each in half. Then I laid them side by side with a glue dot on each one to hold it--easy as pie! Did you know it was national pie eating day yesterday? Yep. Don't worry, you can still celebrate. ;) I won't tell!
This fabulous "HELLO" sentiment is on yet another brand new Close to My Heart My Acrylix stamp set, appropriately named, Hello Blooms.
Here is my complete creative formulary for this project:
Cricut Expression 2
*Close to My Heart Art Philosophy Cricut Cartridge
*Colonial White, Kraft, New England Ivy, and Sweet Leaf Cardstock
*My Acrylix Stamps Hello Blooms and Chantilly Scrapbook Workshop on the Go (available Feb. 1)
*Cocoa, New England Ivy, Sweet Leaf, and Topiary Exclusive Inks
*Bohemian Assortment (retiring this month!)
*Burlap Ribbon
*Black Tulle
*Wooden Mini Medley (available Feb. 1)
Now--I dare you to leave the leprechauns at the end of the rainbow, and go get busy with your green side! ;) Link up at Color My Heart the Color Dare Blog by next Thursday! You could be the next winner of the coveted Color Dare Diamond blog badge, so what are you waiting for? I can't wait to see what you make!
My project this week is a gift tag in a shabby Chic style. I find this style a bit intimidating to pull off, but I LOVE it when it works. I think it did this time! :)
Whew! I did have to work that baker's twine hemp (new product alert!) and burlap ribbon through the tag hole! My tag is cut from the Art Philosophy Cricut Cartridge from Close to My Heart. This is one of my favorite tag shapes on our two cartridges. The neutral colors I added this week are Colonial White, Cocoa, a teeeny bit of black, and Kraft Cardstock.
You can even see the stray fibers in my close ups today! ;) Here are my three greens, two are also cuts from Art Philosophy and the third is from the soon to be released Chantilly Scrapbook Workshop on the Go. Oh my, this one is a keeper, you guys! I also used another stamp from this set for the Cocoa colored leafy background on the Kraft paper.
This crotchet flower and button are from the Bohemian Assortment--and retiring at the end of this month, gasp! Say it isn't so! *pouts* When you see the new products, I promise you will get over it! ;) ( I almost am....) Anywho...I cut two small circles of the black tulle and folded them each in half. Then I laid them side by side with a glue dot on each one to hold it--easy as pie! Did you know it was national pie eating day yesterday? Yep. Don't worry, you can still celebrate. ;) I won't tell!
This fabulous "HELLO" sentiment is on yet another brand new Close to My Heart My Acrylix stamp set, appropriately named, Hello Blooms.
Here is my complete creative formulary for this project:
Cricut Expression 2
*Close to My Heart Art Philosophy Cricut Cartridge
*Colonial White, Kraft, New England Ivy, and Sweet Leaf Cardstock
*My Acrylix Stamps Hello Blooms and Chantilly Scrapbook Workshop on the Go (available Feb. 1)
*Cocoa, New England Ivy, Sweet Leaf, and Topiary Exclusive Inks
*Bohemian Assortment (retiring this month!)
*Burlap Ribbon
*Black Tulle
*Wooden Mini Medley (available Feb. 1)
Now--I dare you to leave the leprechauns at the end of the rainbow, and go get busy with your green side! ;) Link up at Color My Heart the Color Dare Blog by next Thursday! You could be the next winner of the coveted Color Dare Diamond blog badge, so what are you waiting for? I can't wait to see what you make!
Thursday, October 4, 2012
My St. Louis Regional Contest Entries
OK, so I rearranged the order of my posts juuuuust a bit. I have been absolutely dying to share these projects with my teammates (read Diana, lol), but was keeping them under wraps until after the contests. Well, the contests are long over! First up is my entry to the Card contest using the new Alcohol Markers. I have not had any training in the pretty coloring and shading that some of you are so amazing at, so I approached this one from another angle and used the markers in sort of random coloring. I also did not take any pics of the other entries because I have no idea yet how to color like that, lol, sorry! You will just have to take my word for it that they were amazing and ALL variations of coloring in pictures, so I was apparently clueless in this one. No prize for this one, but I absolutely adore it. :)
Yep, my coloring stinks, but I love the card! I can do this one in so many different colors and plan on making some sets to sell with different sentiments. This one will go to the next lucky couple I know getting married. :) I used a silver brad in the center and some bitty sparkles around the medallion edge. This Black Tulle Ribbon is simply mahvelous, darling!
The Love Life My Acrylix stamp set provided the perfect background pattern. Then I used Beautiful Friendship My Acrylix for the medallion shape, and the Avonlea Scrapbooking Workshop on the Go Stamp set for the sentiment.
My favorite new product (I may have mentioned that before), Shimmer Trim, made itself at home bordering the sentiment.
I even added the flourish stamp from the background to the envelope. SO who's getting married?! ;)
NEXT up is my entry for the 3D object contest using the new chalkboard paper or shapes. Again, no prize, but man you should have seen the competition!!! Wowzers there are some super-talented consultants out there, and I had no idea how these things went. NOW I know, lol. Anyway, I used the chalkboard paper and my cricut to make my favorite of the 3D shapes--the Magazine File filled with cards in the same beautiful Avonlea paper.
Slate Satin Polka-Dot Ribbon? Check. Shimmer Trim? Oh you betcha!
I used an antiqued copper brad and a couple of stamps from the Avonlea Scrapbooking Workshop on the Go for this embellishment.
Now, for some pics of some of the other entries...
The winner:
and some of my faves...
They did not post the names of the consultants who created these, so I cannot even mention the fabulous designers, sorry!
Now, back to our regular programming tomorrow! ;)
Yep, my coloring stinks, but I love the card! I can do this one in so many different colors and plan on making some sets to sell with different sentiments. This one will go to the next lucky couple I know getting married. :) I used a silver brad in the center and some bitty sparkles around the medallion edge. This Black Tulle Ribbon is simply mahvelous, darling!
The Love Life My Acrylix stamp set provided the perfect background pattern. Then I used Beautiful Friendship My Acrylix for the medallion shape, and the Avonlea Scrapbooking Workshop on the Go Stamp set for the sentiment.
My favorite new product (I may have mentioned that before), Shimmer Trim, made itself at home bordering the sentiment.
I even added the flourish stamp from the background to the envelope. SO who's getting married?! ;)
NEXT up is my entry for the 3D object contest using the new chalkboard paper or shapes. Again, no prize, but man you should have seen the competition!!! Wowzers there are some super-talented consultants out there, and I had no idea how these things went. NOW I know, lol. Anyway, I used the chalkboard paper and my cricut to make my favorite of the 3D shapes--the Magazine File filled with cards in the same beautiful Avonlea paper.
Slate Satin Polka-Dot Ribbon? Check. Shimmer Trim? Oh you betcha!
I used an antiqued copper brad and a couple of stamps from the Avonlea Scrapbooking Workshop on the Go for this embellishment.
Now, for some pics of some of the other entries...
The winner:
and some of my faves...
They did not post the names of the consultants who created these, so I cannot even mention the fabulous designers, sorry!
Now, back to our regular programming tomorrow! ;)
Subscribe to:
Posts (Atom)