Showing posts with label For Always. Show all posts

Monday, January 20, 2014

Makeover Monday Valentines with the Close to My Heart Cloud Nine Cardmaking Kit with Video

Are you having a good time with my Makeover Monday posts?  I am having a blast making the cards, so I hope so! 

Today I have some valentines to share with you that I made with several different paper packs along with the Close to My Heart special purchase for National Papercrafting Month--the Cloud Nine Cardmaking Kit.


I just love the variety possible with our cutting guides!  All I had to do was swap out the patterned paper that came with the kit to get several different looks...unfortunately, the papers are disappearing fast from our warehouses with the end of our Autumn and Winter Idea Book so the Chantilly and For Always are no longer available!  :(


Chantilly Paper Packet

For Always Paper Packet

Laughing Lola Paper Packet
The good news is that you can use ANY papers on this layout to create the same look by following the cutting guide included with the kit!  Here is a short video I made to tell you about the three brand new products coming out in the Close to My Heart Spring and Summer Idea Book that you receive with this kit:


You can only get this kit in January while they last, and supplies are halfway gone!  Visit my website to fill your cart with $35 in regular price products to be able to add this kit for only $15!!!  It had a retail value of $46, so it is quite the bargain!  The best part is that you will have plenty of product left to play around with your other papers!   Here is another peek at the My Acrylix set that is included:


Want to earn the kit for FREE?!?!

Check out the details HERE to see how you can do that AND invest in your creative side for FREE!!!

Sunday, September 29, 2013

A Freshly Made Sketch for Christmas!

I love the new sketch for this week on Freshly Made Sketches...it is by fellow Close to My Heart Consultant Allisa Chilton!  :)  I am a huge fan of Allisa's, and adore the clean lines in her cards.  I especially love her knack for matting...which this great sketch is all about!  :)


What a great opportunity to get to work on some Christmas cards!  I made my 6 x 6 card base out of Black CS.  Then I matted my heart out with White Daisy, Ruby, and a paper from the For Always Paper Packet.  Since I haven't quite been able to get my hands on our Close to My Heart Sparkle and Shine papers due out soon (exciting!) I decided to leave the Christmas portion of my card to the Green Glitter Paper!  I just KNEW it would do the trick! 


I traced this ornament from a set of retired ornament chipboard shapes.  The hook connector is made with our Silver Glitter Paper.  The beautiful script word, JOY, is cut from our brand new Cricut Artbooking Cartridge onto White Daisy CS and attached with glue dots for strength on the glitter. 

I didn't stop there, though!  I also added a bit of shimmery metallic tinsel-laced twine and a poinsettia embellishment from the Mini Medley Accents Ruby collection. 


On the inside, I used the gorgeous silhouette of the nativity from Glory to God  and a beautiful sentiment to tie the JOY ornament to the rest of the card from Merry and Bright.


Now I am starting to get ahead of myself in the seasonal celebrations, so I better slow down!  Maybe I should just start my Christmas shopping instead?  ;)

Sunday, September 22, 2013

Catching Up With the Card-A-Day Challenge!

I really cannot keep up the blog posts with this card a day challenge, lol!  Along with the cards, I still have that LIFE thing every day too!  ;)

Here are a couple of cards from this week to catch up on.  First is Day 14: Woodgrain...


I used the retired Dakota papers that I have been using all month!  Love that woodgrain pattern paper.  I also used the Laughing Lola WOTG Cardmaking Kit My Acrylic Stamps.

Day 16:  Use hearts...do NOT laugh, I know this picture is sideways!  But I could not for the life of me get it to load the right way, lol!  :)


Red shimmer trim and hearts just naturally go together.  :)  The black and white papers are from the For Always Paper Packet.  The adorable little "i <3 u" is a leftover cut from the Artbooking layout I made HERE.  I save these things for a reason, people!  ;)


Finally, Day 18:  masculine card...


OF COURSE I used the Dakota!  ;)

I also used natural hemp, the Chantilly WOTG Cardmaking Kit My Acrylix Stamps, and Durables Round Studs.

I am WIPED!  See you back here again soon! 

Thursday, September 5, 2013

The Perfect Pinterest Inspired Wedding Gift

I can't believe it has already been a week since I attended a very special wedding.  One of the "kids" I used to babysit for in college married his High School sweetheart, and it was such a beautiful sight!  After I was finally able to drown out the sound of my hubs whining about the start of college football that day (huh?), I was swept away into memories of days gone by...WAAAAAY BY!  ;)

Anyhow, as I prepared for this big event, I recalled a project that a friend had begged me to make that she had seen on Pinterest (thanks, Kate!)  I found lots of different versions to browse through, so I was able to locate a cute tree cut on my cricut carts and make a version of my own!


I am not quite sure what you would call this, but I refer to it as "the Wedding Tree" now.  The tree is cut on a beautiful script B&T Duo paper in the For Always Paper Packet with the Wall Decor and More Cricut Cartridge.  I altered the image in the Cricut Craft Room to make it just right.


I punched the hearts out on some beautifully textured Bazzill CS that was JUST the perfect shade of "madly in love" red.   The newlyweds' initials are printed on the hearts...


I hope Jon and Monica treasure this as a reminder of that special day in August when their two hearts officially became one (and my heart officially felt old!)  :)

I also grabbed my silver glitter paper, bitty sparkles, and Monogram C stamp from Close to My Heart and blinged up the ribbon on the package!


It is so great to have these supplies on hand at times like this!  No need to run anywhere but my scrap room!  ;)

Thursday, August 29, 2013

Throwback Thursday!

Hi everyone!  Do any of you guys remember this card I made a while back?


I had created it for Heart 2 Heart Challenges All That Glitters Challenge in January...and won Top Chic!  I had no idea then that I would be on the design team in another 6 months!  ;)

Well, I posted it up in my Etsy Shop, and made my first sale recently!  My customer wanted hers with a black ribbon, so I wanted to show you what it looked like!  :)


The beautiful For Always paper packet that I used is still available for purchase on my website if you like the looks of it...and the Close to My Heart Artiste Cartridge I created the sentiment with is still amazing!


I could make this one over and over again!  Thanks for stopping in today for a trip down memory lane with me!  :)

Friday, July 12, 2013

Starburst Card Makeover with Close to My Heart Free Printables!

Hi everyone!  Happy Friday!!!

I have the second card for my Free-For-All Workshop all set!  Guess what?  It showcases the FREE printable download that you can get from Close to My Heart as a part of our "Rediscover Close to My Heart" Campaign.  Just click on THIS link and scroll down to below this banner...


...and click the link to download!  Print them out on some white CS and you are ready to go!  OR, you can come to my Free-For-All Workshop and make one!  Woot, WOOT!

Here is the card which uses one of the eight printables...


My consultant friend, Susan Williams, has a fantastic blog where she shows how to make this kind of starburst effect.  Go HERE to see it!  Thanks, so much, Susan for sharing your talents with us!

I used the For Always Paper Packet and my Dream Pop promotional paper for this one and added some black shimmer trim for added WOW!


Then, I realized that I could add some Claire paper in there to qualify for the H2H Challenges Mix and Mingle July challenge!  Yep, three paper packs used now!  :)  This is the perfect type of design to mix it up with your patterned papers for sure!


Come to my July 19th Close to My Heart Preview Party...also called the Free-for-All, lol...to make this card and other fun projects, enter a drawing, and get your copy of the brand new Autumn/Winter Idea Book with coupon, AND see the new products in person....all for just $10!

I JUST found my picture of the printables!  Adding it here for you to see the colors!


Sunday, July 7, 2013

Celebrating with Mojo Monday 300!

Hi everyone!!!  I am sooooo glad to be back in my scrap room after a wonderful trip out to WA state for a family reunion.  I'll share some pics a little later, but I really needed to bust a move and get my Mojo Monday 300 entry blogged and linked!  They are having some amazing giveaways over there to celebrate, so check it out if you can whip up a card in a few minutes...lol, sorry, but I am totes last minute on this one!  (My pre-teen taught me that word--totes--it is apparently hip and short for totally, but only when used correctly...huh?)

Anyhow, here is my entry and the gorgeous 300th Mojo sketch!


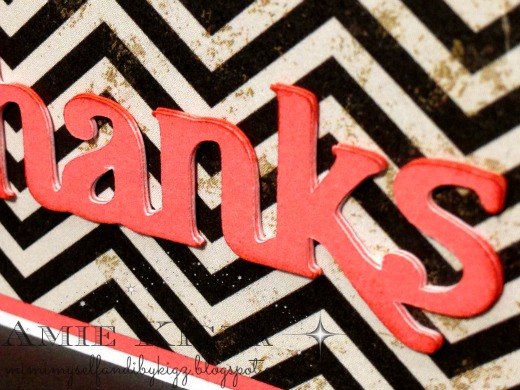
I fell in love with this sketch immediately...and even knew which stamp sentiment I was going to use from looking at it just once.  :)  That strong square in the front was begging for the Close to My Heart Be Still My Acrylix stamp.  I also wanted to use the gorgeous round stamp from Love Doily in place of the circle in the sketch. 


This flower is made from some retired CTMH blooms in Tulip and Creme Brulee.  They are the perfect accent colors for the black and white papers.  A black button with black sparkle grounds the flower to the rest of the black tones.  Black shimmer trim fishtail flags instead of green leaves keep the monotone in the background nicely.

Now, lets take a look at this skinny little border that I added as per the sketch.  I didn't think faux stitches would work with the overall feel of this card.  I opted instead to use the zip strip from one of the B&T duo papers from the For Always paper packet where I found these black and white patterns.


I carefully trimmed the sides from this zip strip....and used my bonding memories glue pen to adhere it nicely to the card.  LOVE the way this looks...it reminds me of a ball chain or a zipper.  :)


I added dimension to the layers on my card as well.  What would I ever do without my foam squares?  Actually, I don't want to find out, so it is time to order more!  ;)  I used a 5x7 card base for this one since my sentiment was so large...I forgot to mention that!  ;)


Thanks for coming in to see my Mojo Monday 300 entry!  Hey, did you know that this month Close to My Heart is running a super special!  In case you wanted to check out any of the supplies I used for this card, you can also get the Workshops on the Go Canvas Art Kit for HALF PRICE!!!  You read that right, for this month only, you can get this fantastic kit for only $19.95!!!  There is no other purchase required to get this fantastic deal, so check it out!  :)  Better hurry, because when they are gone, or when July is over, they are history!  Here is a pic...but it doesn't show the stamp set that is included! 


Tuesday, June 18, 2013

You Had Me at Chevron!

So, I was doing my usual run through FB morning routine when I saw the next Atlantic Hearts Challenge sketch.  The chevron background stopped me in my tracks.  Well, yeah, of course I can do that!

There has actually never been a more perfect set-up, because the remnants from my previous craftiness was still spread out over my workspace...and it fit PERFECTLY!!!  I just dug out my favorite paper with a chevron pattern from the Close to My Heart For Always Paper Packet, and trimmed out the background...I was done in record time with this little cutie!  :)


Here is the sketch:


The June Stamp of the Month has turned out to be a wonderful addition to my stamp collection.  I stamped this flower  in Smoothie Ink on Smoothie CS, and the leaf in Topiary Ink on Topiary CS, inking the edges as well.  These black glitter buttons remain one of my favorite embellishments.  The little bit of Hemp tied in the middle is a great touch with the gold flecks in the chevron paper.


I love the sentiments included on this stamp set too, but they would not have shown up on the bold chevron background.  I decided to solve this by cutting the word, "thanks," from the Cricut Artiste Cartridge instead.  I actually used a great layering trick that I have seen before on cards.  I cut it three times in Smoothie CS and layered them to stand out more.  LOVE the effect with a bit of Smoothie Ink on the edges for emphasis.


So glad this all came together in a flash so I could link up again with this challenge!  :)

Remember, the June Stamp of the Month won't be available for long--when June is gone, so is it!  Check it out here on my website for the amazing price of $5 with any other $50 purchase!  Just fill your cart with your wishlist and then you will be prompted to add the stamp at the discounted price.  It's that easy!  Of course you can always buy this set at the regular price of $17.95 during the month of June!

Look for more artwork on my blog using this stamp set later this week!  :)


Monday, May 13, 2013

Assembling an Artiste Matchbox Gift Made with For Always

I have to admit that I should probably actually read the assembly guide that comes with the Close to My Heart Artiste Cartridge.  I came to this conclusion when I made my final version of the Matchbox Candy Box for my sister's Mother's Day gift.  I am not sure WHY I decided to look at it, but I did.  And I had assembled it WRONG in a different way than the directions showed, lol! 

First of all, here is my sister's finished gift...


The For Always Paper Packet is super-versatile.  My sister likes yellow, so added a Buttercup stamped flower that I made using my Cricut Artiste Cartridge and the Hello Blooms My Acrylix set.  The leaves are stamped on Pear cardstock using the Just for You My Acrylix.  I will be linking this gorgeous little flower up with the H2H Challenge, May Flowers.  Finally, the sentiment that I stamped in Lagoon is in the Perfect Fit--Mom My Acrylix.


Now, here is the little change I made accidentally in how I assembled the box, and how the handbook tells you to...I left these flaps UP, and the instructions show you to adhere them down...


like so...


I feel that the flaps left up kind of give the box a bit of a sturdier feel, but less of a "finished" look, so the choice it up to you!   Here are my previous two boxes with the sides left up...


What do YOU think?  Have you tried this matchbox cut yet?  Let me know!  :)  HERE is a link to my first matchbox that has all the measurements for you!  :)