Monday, March 30, 2015

Sticky Boy Framed!

So, I pulled out my March 2015 Stamp of the Month to have one more go-round before the month ended.  AM I GLAD I DID!!!


As I took a second look at the cute frame images in this set, I couldn't help but think of my Sticky Boy in a frame!  Love how it ended up when I popped it up on the thin foam tape...

LOVE the look of the soon to be released Extra Thick Twine in Thistle at the top.

His round balloon looked GREAT in the different patterns of the Confetti Wishes Paper Packet...and again I used the twirly strings from the SOTM on them...

The Happy Birthday sentiment is from the Joyful Birthday My Acrylix.

Be sure to pick up your Stamp of the Month before March is over...because just like the name implies, once the month disappears, so does the stamp!  :)


You could even win the March Madness Mystery Hostess giveaway I am having RIGHT NOW!!!
Read all about it here!

Seaside for Spring Break!

Greetings from spring break!  I used the Seaside Paper Packet from Close to My Heart to scrap some pics from spring breaks past...don't judge, I have LOTS of years to catch up on!  ;)


The Brown and Tan Glitter Paper sure looks GREAT with this color combo...and the zip strips from the pattern papers make FANTASTIC journaling strips!

That's my shadow at the bottom, not a smudge, lol...

I used Desert Sand CS and Ink to create this complementary layout.  The seashell images are found on the Treasured Friendship My Acrylix stamp set, and the little antiqued gold shapes are in the Seaside Assortment.  


LOVE this paper for my beach pics...stick around all week for more!  :)

Shop my Mystery Hostess Giveaway and win FREE CTMH products!!!

Saturday, March 28, 2015

Jamberry Nail Cardmaking Inspiration!

Yep, you totally read that right!  Take a peek at my inspiration for this next card creation...

My awesome Jamberry Nails for St. Patrick's Day!
How's THAT for unexpected?  :)  I was in the car when this one popped into my head and had to wait until later to create this card for my baby sister's birthday today...


This was almost too easy for words.  I used the Distressed Backgrounds My Acrylix Stamp set to make the black houndstooth background.  Then I just added layers of the Blossom Complements stickers!  The simple circle sentiment is an image from the Blossom Workshop on the Go Cardmaking Kit.  I LOVE THE IMAGES ON THE STAMP SET IN THIS KIT!!!


Check out the inside sentiment I chose that is also in the Kit...including the little burst shape I added around the "O."

I added some glitter pen to the center of the word, "YOU."

I easily added the same distressed houndstooth pattern to the flap of the envelope to coordinate them.  I just wish I had cut a white border around the flower element to better match the rest of the flowers.


ALL of the Blossom line of My Reflections products are going to be available starting in April!  :)

Happy Birthday, Brena JOY, you talented thing, you!!!!! 

Friday, March 27, 2015

Always Be Your Own Kind of Awesome

Happy Friday!  Here is the next FANTASTIC creation from my guest designer, Becca Whitham, using one of my favorite words EVER!!!  See you later, alligator!

My favorite thing about stamping is how it has no creative limits.  The same stamp set can be used thousands of different ways.  Designer paper can be altered to fit your needs.  And, when you start combining a little from here and a little from there, the sky's the limit.

For design team duties over at Mimi, Myself, and I, I combined two stamp sets, a few papers, and several oldie-but-goodie stamping techniques to create a unique card by adapting a pattern from the Originals Card Confidence Program.


Here's the supply list with links for your shopping convenience:
The first technique I used was to score my Cocoa cardstock every 1/4 inch then sand it to expose the white core.  I sanded both horizontally and vertically to get it nice and distressed.  I also distressed the edges on the Seaside paper and did a bit of sanding over the top of it as well.  Using a sponge dauber, I added Slate ink to the distressed parts.  I love how distressing plain cardstock and then sponging gives it the same shabby-chic feel of the cracked paint designer Seaside paper.

The second technique doesn't show up well.  I masked off the word "Wonderful" from the original sentiment (see below) and substituted "awesome" in Cocoa ink from You're the Bomb.
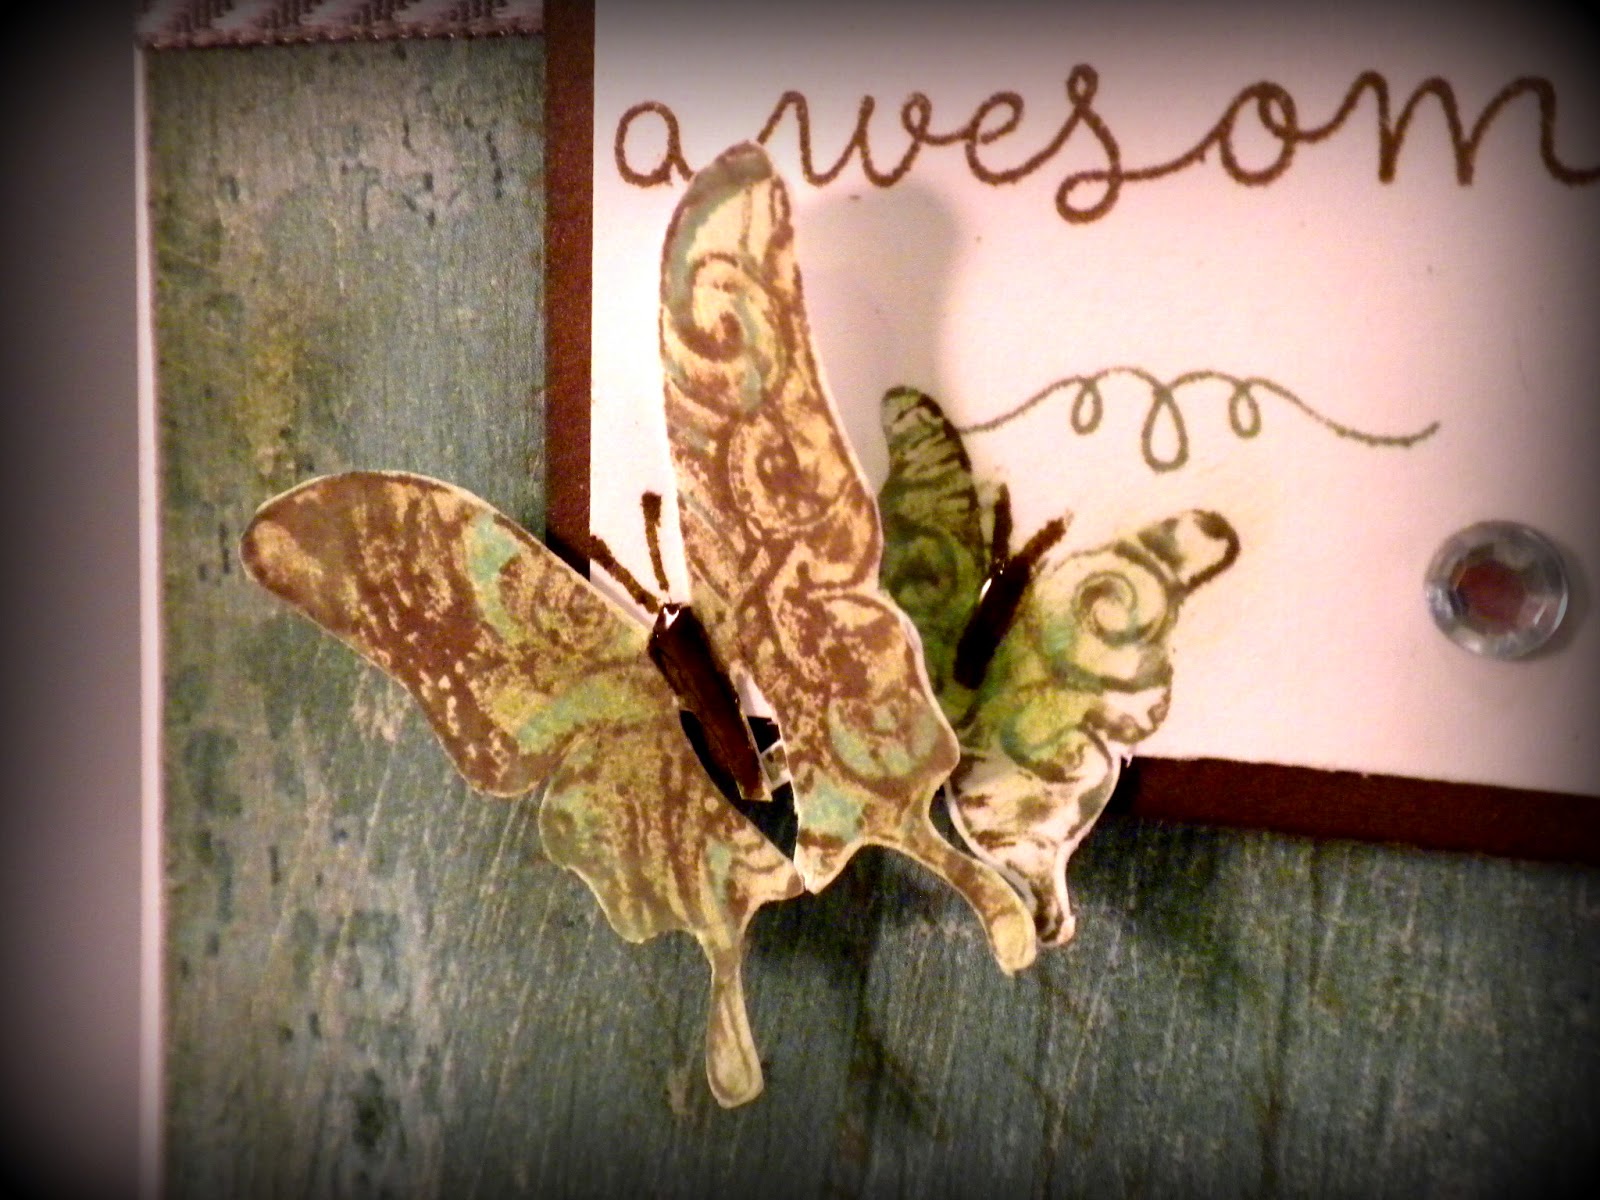
Liquid Glass is my "go to" accessory.  As you see in this close-up, I used it to give the butterfly bodies some shine and dimension.  It's also great to adhere a tiny, butterfly body because it's strong enough you can fold up the wings knowing it will stay put. I also used it to affix the tails of the ribbon where I wanted them.  I rarely get the tails of either knots or bows to naturally fall the way I like, and it used to bug me.  Then I saw someone dot tiny bits of Liquid Glass under the tails and cement them in place.  Genius!

There are a couple other things I want you to see about these butterflies.  The first is how I got that very cool swirly pattern on them.  I started by inking the largest solid butterfly from You're Own Kind of Wonderful (bottom, left) in Glacier ink and rolling the edges in Slate ink.  Then I inked the largest, swirly butterfly (top, left) in Cocoa ink.  I "kissed" the solid butterfly to the swirly one, twisted without taking the two images apart, then pulled them apart.
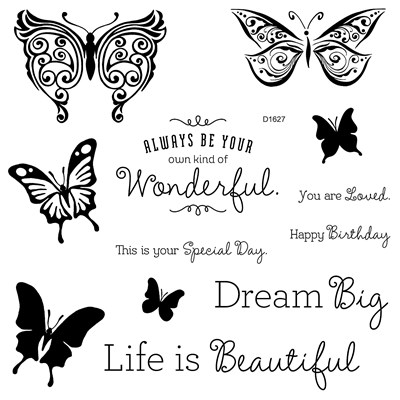

I did the "kiss and twist" technique a couple times to cover the entire surface of the solid butterfly.  I stamped it on a separate piece of white card stock, trimmed it out (cutting off the antennae), and colored the body with the Bronze marker.  I did the same "kiss and twist" technique using the same colors with the medium, solid butterfly (middle, right) and stamped it under my sentiment.  I had stamped my sentiment onto a rectangle of white cardstock that was extra long.  I then used my Paper Trimmer to slice up to the edge of the small butterfly and used scissors to trim out the bottom of the butterfly.  After I adhered the larger butterfly over top of the smaller one, I used a marker to re-draw the antennae.

Because I'd distressed my background paper, I had to touch up the butterflies with the sponge dauber to tone down the colors.

The last technique used on this card was adapting the card pattern from Originals.  As shown, it's a 4.75 x 3" card, but I wanted a standard 4.25 x 5.5" card.  Basically, I looked at the picture and created my own measurements. After creating my card base, I cut another piece of White Daisy cardstock at 4 x 5.25" and adhered the Seaside paper (4 x 3.75") and Cocoa cardstock (4 x 1.5"). Having a card panel that goes over the top of card base allows me to tape the edges of ribbon (or staple, or poke holes, or...) without the card recipient ever seeing my mess.

I want to re-create this card and substitute "Beautiful" for "Wonderful" then send it to my daughter. But that only uses one stamp set, and it's my job to make you want more than one. (**Big, cheezy grin**)

Until next time,
Becca --

I LOVE the You're the Bomb My Acrylix stamp set...AND it even provides a donation to Operation Smile when you purchase it!  BUT, it is ONLY available until the end of March...


Don't forget!  Any orders you place now until April 7th will qualify you for my March Madness Mystery Hostess giveaway, so make your wish list, and head on over to my website for a chance to win at least $25 in CTMH goodies!


Thursday, March 26, 2015

A Doctor Who Birthday Card with the Artfully Sent Collection

My niece celebrated her birthday this week.  She happens to be a HUGE fan of Doctor Who, so when I first laid eyes on the new Artfully Sent Cartridge from Close to My Heart, I was immediately drawn to one of the images...


Now, the original card had a cute little Scottie Dog at the bottom as well as a sentiment cut out in the word bubble.


I easily used the contour feature in Cricut Design Space to hide the cuts so they are not in the final card.  I LOVE how Design Space (for the Explore machine) and Cricut Craft Room (for the other Cricut machines) make my images go so much farther--PLUS the software is FREE to use!

To hide the image, just follow these simple steps:


The word, "telephone" appears at the top of this booth, but I am using it as a police call box for my Dr. Who fan...so I had to add a bit of sparkle!  You can also use the hide contour feature to hide this one--unfortunately, I didn't realize it until I had cut it out already, lol!  ;)


See how the front opens?


I just traced the booth onto White Daisy CS to back it for the card front.


These Stuck on You Puffies provided the perfect addition to my sentiment.  I used my Carmine ShinHan Touch Twin Alcohol Ink Marker to make it truly red instead of the dark pink it was originally.  I am linking up with the Simon Says Stamp Wednesday Challenge with this little ink tip (even though they are a different brand.)


It turns out that I added that bow tie AFTER making a little mistake with my ink...but always remember, there are no mistakes, just opportunities for embellishment!  ;)
The Artfully Sent Collection comes with ALL these fantastic sentiments for your cards...


Do you see the "Happy Birthday" that I used on mine?

NOW is the perfect time for you to pick up the Close to My Heart Artfully Sent Collection from my website, because you could be chosen to be my March Madness Mystery Hostess!  If you are chosen, you will get to choose at least $25 worth of FREE Close to My Heart papers, inks, stamps, and blocks...really!  You get one chance for every $25 in products you buy, and you have until April 7th to order on my website HERE!!!


Wednesday, March 25, 2015

Washi Wednesday Pocket Card Continued! (Finally!)

Welcome to another HUMP DAY, which I affectionately like to call Washi Wednesday around here.

A couple of weeks ago, I shared a cute little Washi creation (HERE) that I had yet to complete...and NOW I have finally completed it!  Thanks for hanging in there with me.  I used it as a GREAT little pocket to send a prize off to one of my fantastic blog readers!  :)


It was SO incredibly easy to use my 1" circle punch to make the notches in the top so the card inside could be easily removed...


Then I just cut a piece of CS to fit inside the pocket sleeve, wrote a little note on the back, and attached the goodies to it with....wait for it....

WASHI!!!!  :)

Check out the Washi Dispenser, Flaxen Extra Thick Twine and Gold Sequins on my website!
I even dolled up the envelope with a bit of...what else...Washi!  This one is a sneak peek of ONE of the new Washi rolls coming in April!  :)


Get your hands on all the washi you like on my website and YOU could be the winner of my March Madness Mystery Hostess Giveaway!  :)  Read all about it HERE!


Monday, March 23, 2015

Makeover Monday!

This is the last week before spring break, and I cannot tell a lie--I am soooooooo ready!

Today I am sharing my envelope makeover for the darling little card I shared with you last week over on THIS POST.  Here is a pic...


Now, here is the made-over coordinating envelope!


I knew it was going to be hand-delivered, so I could do practically anything I wanted to the outside.  I used my Scallop Edge Punch to make a little piece of trim from the floral pattern in the Blossom Paper Packet that debuts next month and added it to the envelope flap.  So easy!  Then I used a hole punch so that I could add my Extra Thick Twine in Glacier (also coming in April!)  I used about half of the thickness to give it a curlier look. 

The March Stamp of the Month from Close to My Heart features four GREAT frame images.  I chose one to frame the front of the envelope where the name will go...


And then I blinged it up, of course!  :)  These sparkly jewels are Pink Glitter Gems.


You can only get the March 2015 Stamp of the Month until the end of March...so get your happy on with Choose Happy!  :)   You could also be quite happy by being chosen as my March Madness Mystery Hostess in a couple of weeks!  :)  Find all the details HERE!


Friday, March 20, 2015

Guest Blogger Alert!

Hello everyone!!!  Remember when I said I was excited to share a few things with you guys?  Well, I can finally share another one!  My amazingly talented friend, Becca, over at Expressions is going to be making some guest appearances on my blog as my own little DT!!!  You are going to SWOON over her creations, starting with this unexpected little number right here...enjoy her post, and be sure to leave her a little blog love!  :)

I'm excited to be starting some design team duties with my friend, Amie Kiger, over on her blog at Mimi, Myself, and I.  We "met" when we were both on the design team over at Color My Heart.  For my first card, I wanted to put a different spin on both a stamp set and paper pack.


Here's the supply list (with links for your shopping convenience):

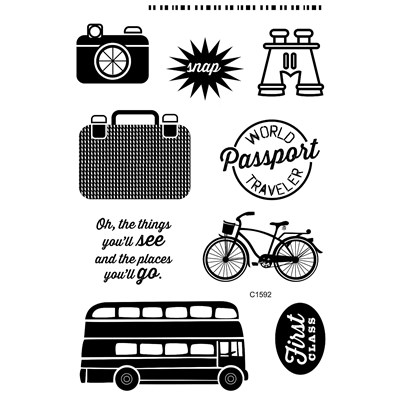
I wanted to show you a picture of the stamp set so you could see how I created the "Oh, snap."

I stamped "snap" in Smoothie then very carefully inked just the "Oh," from the sentiment in Black and stamped it on top of the "snap."  I used the micro-tip scissors to cut out the "snap" leaving a border.

When you combine the custom sentiment with the weave paper from Seaside, and add the Smoothie color, the entire card has a completely different feel than what either the stamp set or paper indicates.  But that's my point.  Versatility is only a "hey...what would happen if" away!

Until next time,
Becca --

OK, it's Amie again!  :)

Don't you just ADORE what she did with that stitch guide???  I am really going to have to play with mine soon!

Now is a FANTASTIC time to pick up any of these products--especially those glittery puffy stickers that will not be available on my website after March.  Yikes!  Shop my March Madness Mystery Hostess link, and you could be chosen as the Hostess with the Mostest who gets to choose $25 or more worth of CTMH goodies FREE!  Join by April 7th to qualify to win!  Get more details on MY POST HERE.


Wednesday, March 18, 2015

Sneak Peeks for a Special Friend

I am relieved to say that my week is going well after a couple of heart-wrenching days, and my special little friend is doing FANTASTIC!!!  I cannot say enough prayers of thanks and praise!

I am also so excited to be able to share the card I made for this amazing little friend today...because it has a LOT of peeks at new Close to My Heart products coming next month!  :)


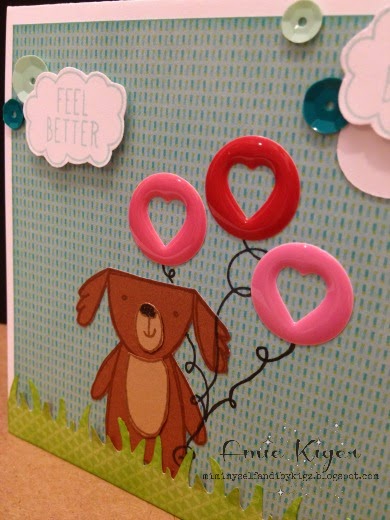
This new paper pack is absolutely flavored with the colors of spring.  I absolutely love any green and blue patterns to use for scenic cards.  I used my Fiskars grass border paper punch to make this one and inked it with Pear Exclusive Ink.


These new enamel shapes are SO cute!  Um, and so are the colorful sequins!!!  The balloon strings are a combination of doodles and the March Stamp of the Month, Choose Happy.  :)


Choose Happy

I used the Cricut Artiste Collection to cut the white CS cloud.  Then I stamped these cute little feel better cloud images from the Cuddly Salutations Hostess Reward My Acrylix


LOVE this zip strip from the new paper pack too!  Don't forget to dress up the inside of your cards!  Next week I'll show you how I dressed up the envelope, so be sure to come back!  :)


So how do you get your hands on this Hostess Rewards Stamp set?  Simple!  Just place an order on my website to join my March Madness Mystery Hostess giveaway! 


I am celebrating three years as a Close to My Heart Independent Consultant, and one lucky person will get to choose the FREE Products from my gathering.  You can even choose the HOSTESS ONLY My Acrylix stamp sets like this one!  That's the ONLY way to earn this set...so get your orders in by April 7th to qualify for my giveaway, and make your wish list!  Click HERE for the details!

Cuddly Salutations