Showing posts with label liquid glass. Show all posts

Tuesday, January 3, 2017

Welcome Home, 2017!

Welcome to 2017...and welcome National Papercrafting Month!!!

I briefly introduced you to this GEM of a kit that you can actually get for FREE this month!  It is called the Welcome Home Wreath Kit from Close to My Heart.  Here's mine all finished...


I absolutely love it sooooooooo much more than I ever thought I would!  It was super easy to punch out the floral parts and assemble it with my trusty Liquid Glass.  No hot glue gun required, so no worries!!!  Here are a few close ups...


I added a new Gold Glitter Gem to the center of each rose and on each side of the "Welcome" banner.

Sea. Glass. Glitter. Paper. Boom.

Now for some tips and tricks to use if you want to assemble one of these beauties yourself!

1.  It took me a good 4 hours to really personalize mine the way I wanted.  I inked the edges of most of the papers.  Do it!  If you do--ink everything FIRST!  I used Topiary Ink on the truest green leaves and petals,New England Ivy on the rose leaves, and Fern Ink on the rest of the greenery.  The blue flowers petals I edged with a light hand in Peacock Ink--yep I know, pretty dark!  I love the contrast, but you could go lighter with Glacier for a more subtle effect. Your fingers will be very inky, so wash your hands really well before assembly too--do NOT touch those white roses after inking--curl them FIRST and hide them, lol, or make sure your fingers are good and clear of smudging ink on them.  Actually, just roll them first!

Look at the difference in the petals of the succulents both inked and non...


2. Add glitter if you like!  I ended up adding layers of my gorgeous Sea Glass glitter paper to the blue flowers...and it was super easy!  I just used the empty punch outs as a stencil to trace on the back side of the glitter paper...then cut them out!  These cuts are also available on the Flower Market Cricut Cartridge, but I only wanted to cut a few, so this was way faster and conserves the glitter paper.


The glitter paper is pretty thick, so I peeled off that back layer to let the petals curl more easily later...


3. Add the twigs and leaves as you go...not at the beginning!  Better yet, lay it all out like I did before you start gluing anything to the hoop...flowers first, making sure you know which ones are layered over others, then see where you want to add the other greenery and twigs.  Place your banner so you know where you would like it to be as well--before you attach anything!  After I knew I liked the arrangement, I took a picture for reference.  I glued the large white rose on first and kind of made my way out from there.


If you can't wait to get your hands on one of these kits there are 4 great ways to do that!  Three of those ways get it to you FREE!!!!  You can purchase the kit on my website for just $18.95.  You can get it for FREE along with a $60 order, OR earn it free as a Hostess when your party reaches level 2 in sales, OR you can get one FREE when you join my team this month!!!  Now the only question left is, how are you going to snag one?  :)

Here is a GREAT little video to show you the kit assembly!


Only in January! 

Friday, March 27, 2015

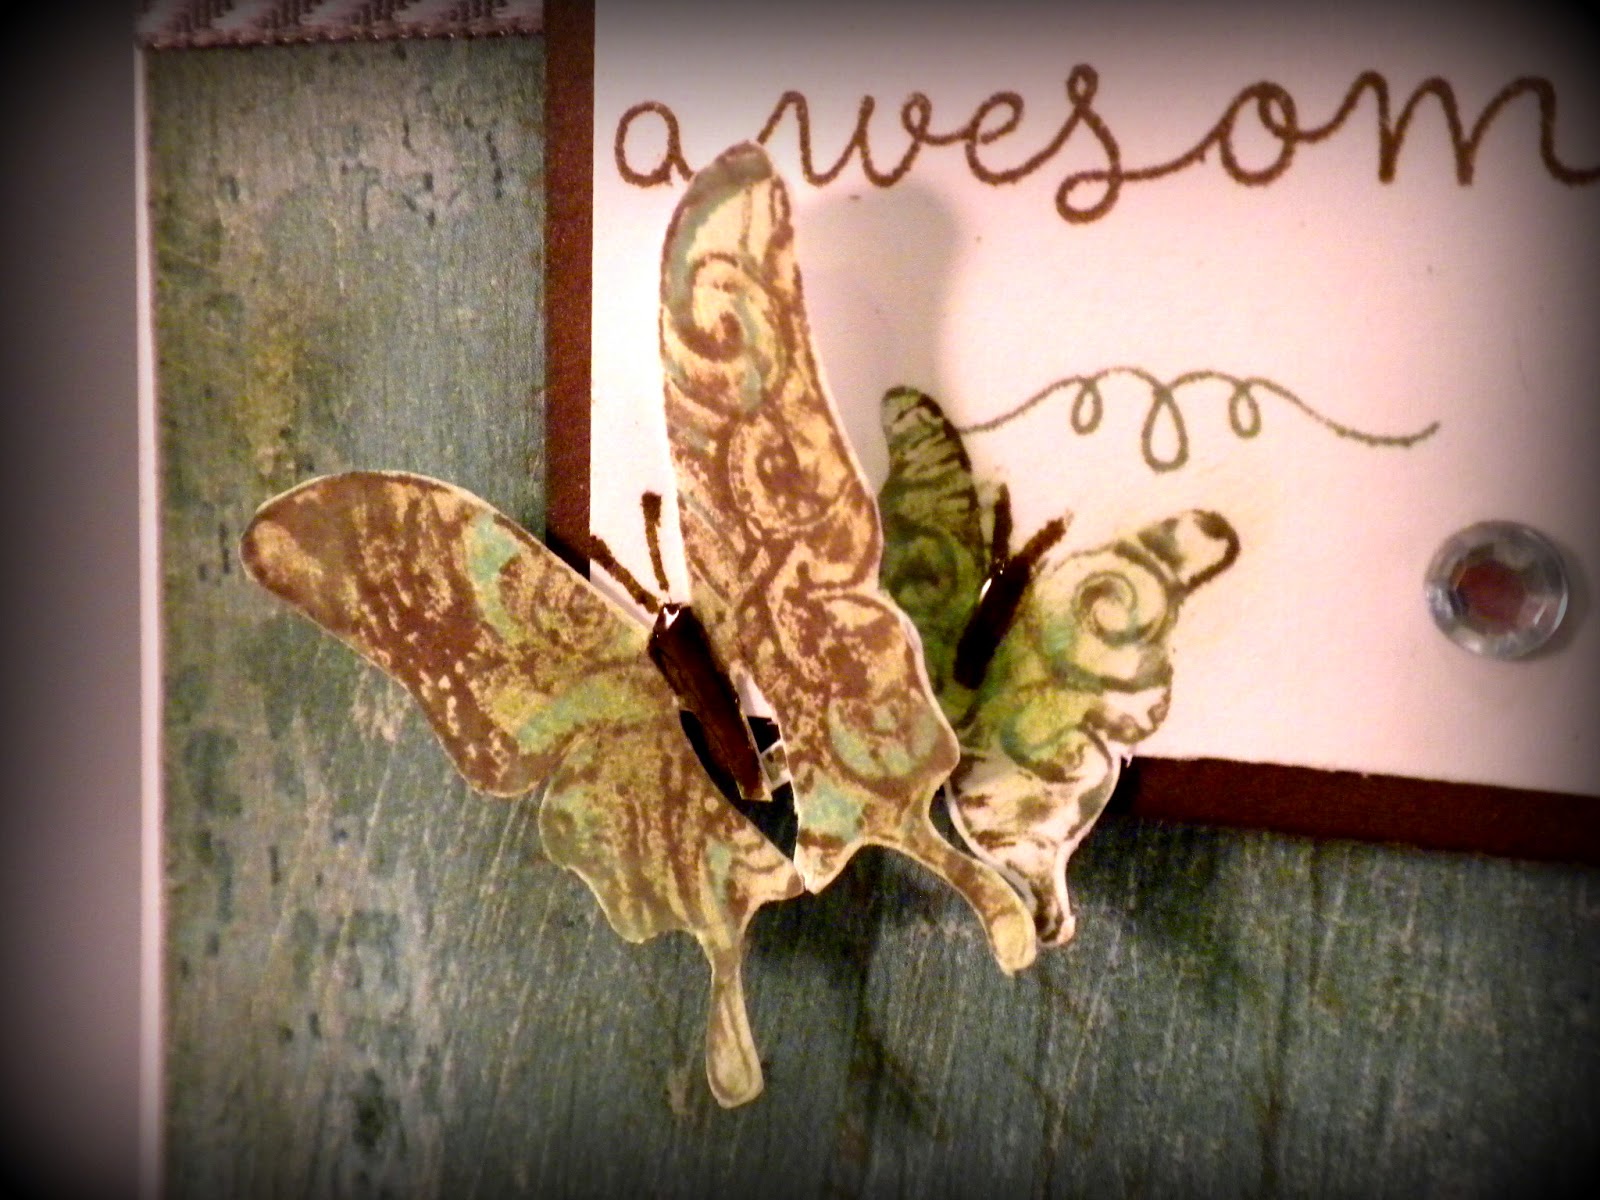
Always Be Your Own Kind of Awesome

Happy Friday!  Here is the next FANTASTIC creation from my guest designer, Becca Whitham, using one of my favorite words EVER!!!  See you later, alligator!

My favorite thing about stamping is how it has no creative limits.  The same stamp set can be used thousands of different ways.  Designer paper can be altered to fit your needs.  And, when you start combining a little from here and a little from there, the sky's the limit.

For design team duties over at Mimi, Myself, and I, I combined two stamp sets, a few papers, and several oldie-but-goodie stamping techniques to create a unique card by adapting a pattern from the Originals Card Confidence Program.


Here's the supply list with links for your shopping convenience:
The first technique I used was to score my Cocoa cardstock every 1/4 inch then sand it to expose the white core.  I sanded both horizontally and vertically to get it nice and distressed.  I also distressed the edges on the Seaside paper and did a bit of sanding over the top of it as well.  Using a sponge dauber, I added Slate ink to the distressed parts.  I love how distressing plain cardstock and then sponging gives it the same shabby-chic feel of the cracked paint designer Seaside paper.

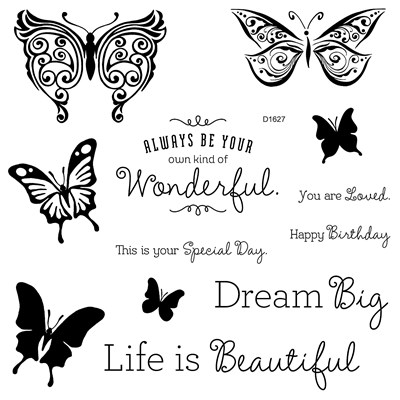
The second technique doesn't show up well.  I masked off the word "Wonderful" from the original sentiment (see below) and substituted "awesome" in Cocoa ink from You're the Bomb.

Liquid Glass is my "go to" accessory.  As you see in this close-up, I used it to give the butterfly bodies some shine and dimension.  It's also great to adhere a tiny, butterfly body because it's strong enough you can fold up the wings knowing it will stay put. I also used it to affix the tails of the ribbon where I wanted them.  I rarely get the tails of either knots or bows to naturally fall the way I like, and it used to bug me.  Then I saw someone dot tiny bits of Liquid Glass under the tails and cement them in place.  Genius!

There are a couple other things I want you to see about these butterflies.  The first is how I got that very cool swirly pattern on them.  I started by inking the largest solid butterfly from You're Own Kind of Wonderful (bottom, left) in Glacier ink and rolling the edges in Slate ink.  Then I inked the largest, swirly butterfly (top, left) in Cocoa ink.  I "kissed" the solid butterfly to the swirly one, twisted without taking the two images apart, then pulled them apart.


I did the "kiss and twist" technique a couple times to cover the entire surface of the solid butterfly.  I stamped it on a separate piece of white card stock, trimmed it out (cutting off the antennae), and colored the body with the Bronze marker.  I did the same "kiss and twist" technique using the same colors with the medium, solid butterfly (middle, right) and stamped it under my sentiment.  I had stamped my sentiment onto a rectangle of white cardstock that was extra long.  I then used my Paper Trimmer to slice up to the edge of the small butterfly and used scissors to trim out the bottom of the butterfly.  After I adhered the larger butterfly over top of the smaller one, I used a marker to re-draw the antennae.

Because I'd distressed my background paper, I had to touch up the butterflies with the sponge dauber to tone down the colors.

The last technique used on this card was adapting the card pattern from Originals.  As shown, it's a 4.75 x 3" card, but I wanted a standard 4.25 x 5.5" card.  Basically, I looked at the picture and created my own measurements. After creating my card base, I cut another piece of White Daisy cardstock at 4 x 5.25" and adhered the Seaside paper (4 x 3.75") and Cocoa cardstock (4 x 1.5"). Having a card panel that goes over the top of card base allows me to tape the edges of ribbon (or staple, or poke holes, or...) without the card recipient ever seeing my mess.

I want to re-create this card and substitute "Beautiful" for "Wonderful" then send it to my daughter. But that only uses one stamp set, and it's my job to make you want more than one. (**Big, cheezy grin**)

Until next time,
Becca --

I LOVE the You're the Bomb My Acrylix stamp set...AND it even provides a donation to Operation Smile when you purchase it!  BUT, it is ONLY available until the end of March...


Don't forget!  Any orders you place now until April 7th will qualify you for my March Madness Mystery Hostess giveaway, so make your wish list, and head on over to my website for a chance to win at least $25 in CTMH goodies!


Friday, November 7, 2014

Liquid Glass: the Duct Tape of My Life

I am not kidding!  Some people use duct tape to solve all their "fix-it" issues at home...I use my Close to My Heart Liquid Glass!  I have shared many of these here on my blog from re-attaching stuffed animal eyes and cabinet knobs to fixing broken rings and Christmas ornaments.  Today I have a new one for you! 

Re-soling shoes!  Really!


This was my daughter's combat boot last week...yeah, awesome.

Still wearing my Captain America Jamberries from Halloween!  ;)

I had nothing to loose (except $50 on a new pair!) so I grabbed my Liquid Glass and gave it a shot!


I clipped it down to hold it while drying all day...


AND I kid you NOT, it held, and is still holding strong by the end of the week!!!  I am ecstatic and so is my daughter (who is essentially adult-sized!)  I think I just might call this stuff Liquid GOLD instead of glass!  ;)

You won't even find all these amazing abilities on the packaging (although I am going to suggest a better description for sure!)  Trust me, though, that I use it in so many ways besides adding heavy embellishments to my papercrafts and Base and Bling jewelry.  The amazing thing is that one bottle lasts an incredibly loooooong time.  It's kind of like Chinese food in that way...lol...seems to keep on multiplying no matter how much you consume! 

Check out some Liquid Glass on my website, and don't forget to check out the specials for November!  Have a GREAT weekend!

November Stamp of the Month!

Psssssst!  You should be sure and check out THIS amazing Studio J dealio this month too!  We have NEW ALBUMS here and more on the way!!!  Will YOU be one of the lucky customers who wins?

Check out Studio J for FREE today!

Thursday, October 16, 2014

Sparkling While Exhausted is NOT for Wimps

I cannot believe it is only Wednesday!  That is pretty sad, too, since we didn't have school on Monday--so I also didn't have to work.  I am just exhausted from my new job--but I would not trade it right now, that's for sure.  I had to laugh when a friend posted this on their Facebook this past week...


So, how exactly does a person SPARKLE while exhausted?  Well, sometimes you just need a bit of help from your glitter, to be honest!   I made mine using the Close to My Heart Base and Bling line of customizable jewelry, my Liquid Glass, and the FABUTASTIC retired (boo) Prisma Glitter.


So THIS is my sparkle for tomorrow...


Have you got yours?  :)

$5 Stamp of the Month and FREE Ribbon!

Monday, October 6, 2014

Liquid Glass to the Rescue (Again!)

Have I ever mentioned how much I love our Liquid Glass from Close to My Heart?  Yeah, I KNOW I have!  Here is a little story (in pictures) of how I use it OUTSIDE my craft cave!  ;)

Oooops!  My knob popped off!


Can't live without it!  :)

Check these offer out on my website!


Saturday, June 28, 2014

Base and Bling Magnets and a Pendant with a Twist

Back again!  I have a quick post about two of the little gifties I created for my CTMH sisters at convention.

I just love how easy these were!!!  I used the clear cover/glass of the Base and Bling necklace to make some little magnets with liquid glass.  I started off super-simple, and then had a stroke of inspiration!


I still can't get over the mickey ears!  I cut them out from the Mickey and Friends Cricut Cartridge.  They were actually left over from another project that I still have to show you...AFTER a certain something happens!!!!  EEEEEK!  I just cannot wait!!!  ;)

One more little something from the base and bling!  I made this awesome Damask look pendant using the For Always Textiles!  Added bonus on this one when the fabric turned BLUE in places!  Isn't it a neat look?


Be back soon!  :)

Monday, April 28, 2014

Another Page in My Cricut Artbooking Ariana Mini Album

Welcome back!  I hope you stopped back in today to see more of my Ariana Mini Album that I made with the awesome Artbooking Cartridge from Close to My Heart.  This one uses my favorite pattern in the pack!  :)


This page was so fun to embellish!  I started with the title cuts found on Artbooking.  The fishtail flag cuts just like this from the cartridge, and I backed it with Tan Glitter Paper with a thin layer of Liquid Glass


The single chevron Marquee Enamel Shape is a great addition since it pops off the pattern paper.  Some Sparkles and the tiny bow from the Ariana Assortment are wonderful feminine touches.


If you want to play along with us at the Color Dare this week, click HERE!  

What if I told you that until the end of the month you can actually get the Artbooking Collection for FREE???   It's true!!!  Anyone who purchases the New Consultant Kit in April can choose a FREE Cricut Collection!  Whether you have your sights set on starting a business, or just starting up a collection of products at a great discount, you are welcome to join Close to My Heart this month.  There has never been a better time to join!  There are only THREE days left to take advantage of this amazing offer, so READ HERE if you have any questions!  If you already know you want to take advantage of this offer, then CLICK HERE to become a part of team Been There, Blinged That!  :)

Here is everything that comes in the New Consultant Kit (over $300 value!):

Read Me First Letter, Spring/Summer 2014 Idea Books (qty. 10), Hostess Order Forms (qty. 25), Customer Order Forms (qty. 25), Close To My Heart Color Swatches (W471), Spring/Summer 2014 B&T Duos™ Sampler (W1127), Petite Perks Delicate Wings Incentive Stamp Set (qty. 5) (W2028), Reflections Scrapbook Program (9037), Originals Card Confidence Program™ (9036), Workshops on the Go™ Skylark Scrapbooking Kit (G1072), Skylark Complements Dimensional Elements (X7177C), Skylark B&T Duos™ Bulk Paper (BULK322), Skylark Bulk Resin Flowers (BULK340), Durables Triangle Studs (Z1928), Teal Shimmer Trim (Z1918), Lagoon Exclusive Inks™Pad (Z2195), Desert Sand Exclusive Inks™Pad (Z2118), Slate Exclusive Inks™Pad (Z2173), My Acrylix™Hopscotch Alphabet Stamp Set(E1028), My Acrylix™True to Life Stamp Set (C1575), My Acrylix™Believe in Yourself Stamp Set (C1574),3" x 3" My Acrylix™Block (Y1006), 4" x 5" My Acrylix™Block (Y1012), 2" x 6 ½" My Acrylix™Block (Y1010), Non-Stick Micro-Tip Scissors (Z1836), My Acrylix™Stamp Scrubber (Z1782), My Acrylix™Spritz Cleaner (1778), Bonding Memories™Glue (1512), Sponge (Z697), Liquid Glass (Z679), and Cello Bags (qty. 25) (W1152)


Wednesday, April 23, 2014

My Creations Clear Pillow Box Treats for Spring

I love making little treats for people to say thanks, or just to let them know I am thinking about them.  Close to My Heart has several different creative options for me to use to do that, including these Clear Pillow Boxes.  They come in sets of three for just $2.95 and are food safe.

I decorated this pillow box in a spring theme for my daughter's teacher and added a gift card and some candy inside...


The little boxes measure about 5.75 x 3.5 when assembled.  They are the perfect size to hold a bit of candy and a gift card.

I embellished this one using the Skylark Textiles, Balloon Ride Paper Packet, and Gold Polka-Dot Washi Tape.  The eggs are cut from the Cricut Art Philosophy Cartridge and then I added a layer of Liquid Glass for an enamel look.  You can find the directions for my nest tag HERE.


There are really so many ways to make a super-fun gift for people using your CTMH craft supplies!  What little containers do you like to use for spreading a little sparkle?

Want to pick up the supplies to make this treat box AND spread some sparkle to a mom for Mother's Day this year?  Any order placed on my website this month qualifies you for the drawing to win this awesome Mother's Day stamp!  Click HERE to shop and win!


Tuesday, April 22, 2014

Who Needs a Hot Glue Gun?

I thought this was super-fun to share with you today...just had to alter it a bit since I try really hard to never have to use a hot glue gun...


Hee, hee!  I love my Close to My Heart Liquid Glass, and it can do the same things a hot glue gun can...and you will still have fingerprints!  ;)  Check it out if you haven't!  Now is the perfect time to try it because...


Friday, January 31, 2014

Damask Divas Ivy Lane Blog Hop!


 Hello, my crafty peeps!  Welcome back for another edition of the Damask Divas Blog Hop!  This time, we are debuting the BRAND NEW Ivy Lane Paper Packet! Our entire hop goes live on February 1st, so all of the links will be working by then--please bear with us as we get the kinks out and help our newest Divas get the hang of this thing!  :)

If you came from Jessica's blog, then you are on the right path!  If not, feel free to start at the beginning over at the Damask Divas Blog where you can see the entire line-up of Divas participating!  :)

Since February is a month of love at our home for a variety of reasons (V-day and two anniversaries!), I wanted to focus on that for my theme.  I had never made the mailbox from the Close to My Heart Cricut Artiste Collection, so I figured it was about time!


This amazing paper project is found on page 51 of the Artiste handbook.  I LOVE how they color coordinated the parts in the pictures so you know just what you are cutting with each step.  It really makes choosing your papers a breeze!  Then, it even shows you how to put it together in the Assembly Guide.  Thank goodness, because I did NOT do it the right way at first!  ;)


I used Cocoa CS that is included in the Ivy Lane Workshop on the Go Cardmaking Kit for the main body of my mailbox.  The trim was cut on Kraft CS.

These gorgeous 3D flowers were JUST the thing to decorate my mailbox.  I used Kraft CS, Hollyhock CS from the Cardmaking Kit, and the double sided pattern paper included as well--one side for the leaves and the other for the flowers.  :)  These beautiful cuts are also found on Artiste...the leaf is right underneath the flower.


I attached a great little love banner that is found on the Remarkable Wreath My Acrylix.  This has long been one of my favorite stamp sets from CTMH, and I even bought it BEFORE I became an independent consultant.  I stamped it in Cocoa Ink and blinged the ends of the banner up a bit with a couple of the smallest gems in the Sparkles Brown and Tan Assortment.


Back to those flowers for a moment...I inked the edges with my Sweet Leaf Exclusive Ink Pad and dauber.  Then I folded them along a faux vein to give them some depth.


See the bit of glimmer on those inked edges?  I used my Wink of Stella glitter pen to easily add the pretty sparkle.  Super-easy and quick, PLUS I love the effect on the flowers!   I attached them to the mailbox with Liquid Glass--THE BEST go-to adhesive for bulky embellishments! 


Here is one product you won't find anywhere else in the NEW Spring and Summer Idea Book--GOLD Shimmer Trim!!!  It is exclusively available in the Ivy Lane Workshop on the Go Cardmaking Kit!  Let's just say it was on my FIRST order!  ;)  It matched really well with these Rolos candies that I decorated with a simple 3/4 inch scallop punch.  These were PERFECT to fill my mailbox!  I used the Almond Hershey Kisses that are wrapped in gold for another version of this box (and my friend adored it, BTW!)


I hope you found some mojo to take with you from my blog today! 

Your next stop is Brenda's blog!  Have a great time browsing all the fabulous creations on the rest of the hop, and never let ANYONE steal your sparkle!  :)

February Stamp of the Month!

Embossing is BOSS!!