Tuesday, April 30, 2013

Damask Divas Dream Pop Blog Hop!


Nope, you are not seeing double, lol!  The Damask Divas are putting on two blog hops this month!  So let's get to it!

If you found your way here from Cheryl's Blog, then you are in the right place!  If you want to start at the beginning, just head on over to the Damask Divas Blog for the whole line up.  :)

I used the colorful Dream Pop papers to make a cheery banner for my friend's birthday.  She is battling cancer, and I wanted to make something for her to look at each day and be lifted up by God's promises.  I am thrilled with how it turned out, and I know I used exactly the right papers.


It isn't easy to photograph a banner, unfortunately, so here are some partial shots to see the details better.  Can you see the shine of the specially embossed cardstock?


These are some of the other Close to My Heart products I used to make the banner:

Joyful Jar (retired)
May 2013 Stamp of the Month
C1538 Girls Rock
D1545 Wheel of Life
A Rainbow (retired)
He is Risen (retired)
Be Still
D1440 Everlasting Life
Cricut Art Philosophy Collection
Cricut Artiste Collection
My Creations Mini Banner
For Always Textiles
Sparkles
Shimmer Trim
Baker's Twine Paradise Assortment
Black and Grey Glitter Paper

I hope you are inspired by this one to make something bright and cheerful with the Dream Pop papers too!  Your next stop is Traci at Papercrafting 101.  Enjoy the rest of the hop!

Don't forget to stop by the Claire Hop too!  ;)

Damask Divas Claire Blog Hop!


Welcome back for another amazing Damask Divas Blog Hop!  Did you know we have not one, but TWO hops today?  Yep!  This hop is for the Claire Paper Packet, but we have another one for the National Scrapbook Month Dream Pop Paper Packet too!  You can find that hop HERE.  If you are on the road for the Claire Hop, from Traci's blog, then you are in the right place!  You can find the complete list of Divas in the Claire Blog Hop on the Damask Divas Blog HERE.

The Claire Papers had me from hello chevron.  ;) /\/\/\/\/\/\/\/\/\/\/\/\/\/\/\/\/\/\/\/\/\/\/\/\/\/\/\/\/\/\/\/\/\/\/\/\
I LOVE the patterns on these B&T Duos, and the color scheme is super adorable.  They were perfect to use in the prototype for my newest creation/invention, the Tooth Fairy Friend.


WARNING!!!  Frank and open talk about the Tooth Fairy to follow, so log out now or quit reading out loud if the little ones are around!

How many of you have forgotten *gasp* to leave money for your child's tooth that he or she left under the pillow?  How many of you remembered, but could not FIND the tooth that had been carefully placed under the pillow?  How many of you could not even GET to the pillow because it was on the top bunk!?  And how many of you reading now have a child that is TERRIFIED of a stranger, even the Tooth Fairy, coming into his or her bedroom at night to retrieve a tooth?  Well, help has finally arrived!  This handy Tooth Fairy Friend can be placed on ANY doorknob for easy access.  If your little Susie cannot sleep because the Tooth Fairy might sneak into her room at night, then by all means hang it on the other end of the house!  The Tooth Fairy Friend makes the tooth for money exchange a whole lot less painful than loosing a tooth!  ;)


 AND these new alcohol ink markers make hiding the score lines in your 3D items painless too!  ;)  I found this door hanger on the Art Philosophy Cartridge and cut it at fit to page.  This is the largest size you can make it on your 12 x 12 mat.


These adorable mini clothes pins are super useful when it comes to banners!  The Keyboard Kraft Alphabet is ready for any kind of color.


I used the Girls Rock My Acrylix, outdoor denim chevron ribbon, and pink glitter gems to add some bright color.


So, where do you put the tooth?  In one of these handy tooth pouches, of course!   You can easily find the tooth, leave the money for your little one, and head off to bed knowing the job is done!  What I wouldn't give to have had one of these for all of my girlies' Tooth Fairy days!  I can't wait to list some up in my Etsy shop for other parents to use!  :)


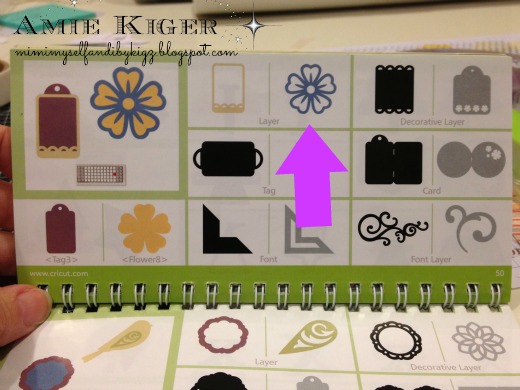
I stumbled upon this tooth shape on page 50 of my Art Philosophy Cartridge while decorating THIS journal.  I had a bunch of pieces left on my desk after cleaning off the cricut mat, and thought to myself, where did all these teeth come from???  This is what they were...


...leftovers from this gorgeous flower layer! 


Isn't that the funniest thing!  You never know what shapes you will stumble upon in our cartridges!

I hope you enjoyed my project today, and I hope you visit our Dream Pop Blog Hop too!  Your next stop to see Claire at her best is Jamie's blog.  Enjoy!  OH!  And don't forget to enter the Rafflecopter giveaway on the Damask Divas Blog to win a My Acrylix Stamp Set from creative Diva, Cydney! 


Monday, April 29, 2013

Be Still And Know that I AM God

I have a request to go along with this card.  Prayers, and lots of them.


I made this one for a friend who has been very suddenly diagnosed with stage four cancer.  There it is again...THAT word.  I don't want to say it anymore, don't want to hear it anymore, don't want to feel the pain of another family struggling to deal with it.  I'm giving this one to God, just like the verse says.  "Be Still and Know that I AM God."  Without Him, I don't know what else to do.  Her treatment has been nothing short of miraculous so far, and I expect nothing less in the weeks to come.  Thanks in advance for all your prayers for her, it means the world to a lot of people, including me.  We love you, Betty Boop! 

Saturday, April 27, 2013

Five Fave Close to My Heart Tools #4

Alright, let me start by saying, I'm not 100% sure that this qualifies as a tool, but as far as I am concerned, it is now!  Picture this:

My hubs and kiddos are playing a real-life version of Slender Man.  Not sure if you have heard of this or not, but in short it is some crazy online game where this guy leaves notes for you to find and then scares the living daylights out of you while you search for them.  NOT my kind of entertainment, but since I would not let the kids play it, they made up their own version.  So, long story short(er), the hubs got a bit overzealous while hurling a stuffed penguin across the room to scare the kids and the poor penguin lost an eye!  Ooops.  I took one look and sent him straight to the infirmary...otherwise known as my craft room.  ;)

I pulled out my Five Fave CTMH Tools #4: my bottle of Liquid Glass and took him straight into surgery...


I puddled up the liquid glass in the eye socket...


Then I held the eye in place for about 30 seconds to a minute...


There he is, good as new!  Whew!  That's my story, and I'm sticking to it!  ;)


This stuff is great for sooooooo many crafty AND non-crafty uses!  I use this adhesive for holding my rolled flowers, adhering heavier or awkward embellishments to cards and scrapbook pages, and to secure items that I use in creating shadow boxes.  You can even use it to put a shiny finish on elements of your pages!  I am sure I will find and share many more ways to use it, too!  :)  It is available in my online store for only $6.95.  Pick up a bottle today!  :)

Friday, April 26, 2013

This Color Dare is Dedicated to Mom :)

Welcome back to another Color My Heart Color Dare!  Every week we post a new color-related challenge for you to try with your Close to My Heart Color Pallet.  If you don't have the specific colors to participate, please feel free to substitute similar ones or you can see one of our fabulous CTMH consultants to get your hands on our amazing products for next time!  :)

This week, we have a second round of Buzz and Bumble colors:  Creme Brulee, Goldrush, and Sunset.  When I read the colors, I KNEW what I was going to make as an embellishment for whatever project I made, AND who it would be for!  I love instant inspiration like that!

A fantastically crafty fellow teammate, Cathy Derouche, has been sharing her method of making these darling flowers with just cardstock and our Cricut Art Philosophy Cartridge daisy cuts.  You can see more HERE on her blog.  I have been wanting to make one, and knew this would be the perfect way to decorate a gift for my mother for Mother's Day.  She adores Black-Eyed Susan and Daisies! Thanks, Cathy!


This is a super-easy and fun gift to give!  I scoured the internet and Pinterest for the directions to make this particular box, but didn't find anything except the size for the papers around the candy pieces.  According to Pamela O'Connor's directions, they are 1 x 3 inches.  I found that if you cut the matchbox on the Cricut Artiste Cartridge at 4.5 inches in relative size, the box is the perfect size to hold 9 paper-wrapped Hershey's Nuggets candies.

I just love how the flowers Cathy makes have so much dimension!  There are three cuts each in three different sizes (2.75, 2.5, and 2) of the Daisy cut on page 28 of the Art Philosophy booklet.  I used the Creme Brulee Cardstock for the petals and the Cocoa Cardstock for the center.  The center is made with the 3D flower on page 69 cut at 2.5. 


This is a great time for me to introduce another of my Five Fave CTMH tools!  This one just missed the top 5, but is definitely in the top 10--the Quilling Tool.  It is perfect for rolling the 3D flower in the center, but it really came in handy for shaping these petals too...


I also used the My Acrylix Perfect Fit--Mom stamp set for this project.  The sentiment is stamped in Cocoa on a shape that I cut from the Artiste Cartridge with my Cricut on Champagne Cardstock.  I used the same color CS for the inside box of the slider.  The Buzz and Bumble B&T Duos were perfect to use for this project.  Bling?  Of COURSE!


This cleverly hidden message will be revealed as the candies disappear...


A word of advice on the candy.  Make sure you buy enough Nuggets.  Some of them are inevitably lost in the creative process...


 Here is a shot of the matchbox open with the candy inside.


I hope you have a chance to try this box sometime--it is a great gift to give in a pinch!  And you simply HAVE to try making one of these flowers--Cathy has me hooked on them!  :)

Hope to you see you over at this week's Color Dare!  :)

Wednesday, April 24, 2013

Five Fave Tools Close to My Heart Tools #5! :)

Happy Monday, everyone!  It's time for a new Fave Five, although I am not sure how quickly I will get these out, lol.  I am going to be sharing my Five Fave Close to My Heart tools!  Let's count down backwards from #5...er, well and #6.  ;)

This one is a new tool to me, and I LOVE it!!!  You know all that "yuck" that accumulates on your Versamat?  Well, this strange looking Rub and Remove Eraser Z1207 from Close to My Heart will take it RIGHT OFF!!!  It is true!
Take a look at my little video I made when I got it--I was super-excited to see how it worked and it is now my #6 Fave CTMH Tool.  ;)


If you don't have a Versamat, you NEED this bad boy!  I love it, and it is my #5 Fave Tool from CTMH.

I use it for lining up papers on layouts, cards, you name it.  The reverse side is the perfect soft surface for stamping, too.  I like the larger surface to work with instead of only having the 6 x 6 insert from the My Acrylix stamps.  I would have to say that I use this mat every time I craft!  Thanks for watching.  :)

Monday, April 22, 2013

Happy Birthday, Carlie!!!

Today is the birthday of a certain little red-head that I know.  ;)

I made her sister an adorable journal last month on her birthday.  You can see it HERE.  Guess what I made for THIS birthday girl?  Well, her own journal, of course!  I just happened to get some happy mail with my new Close to My Heart Dream Pop paper preview inside, so this is your official first sneak peak at it! These gorgeous flowers are inspired by consultant Susan Gardner-Williams.   I adore her work.


Carlie is a girly-girl, no doubt about it, so I knew her journal needed to say just that!  Sparkle and shine just goes along with her personality.  :)


Can you see the shiny lines in the pink flower petals?  The Dream Pop paper packet (which is available starting May 1st!) has 24 sheets of paper/cardstock.  Half are double sided papers and half are cardstock that has this kind of embossed look on one side.  Isn't it amazing!?


Here is the darling little card to match.  :)


The shimmer brads are retired, unfortunately, but I love it as the center of the flower.


The "Happy Birthday" sentiment is found in CTMH My Acrylix B1419 Joyful Birthday.  I just love the swirliness of this one!  See the pattern paper at the bottom?  More Dream Pop Paper!!! 


I will show you more sneak peaks of Dream Pop (shown below) in the next couple of weeks.  It will be the special in May for National Scrapbook Month!   I'll share more details later!  :)


 Ok, so I couldn't wait!  Watch this video if you can't either!  :)


God bless you on your birthday, Carlie!!! 

Saturday, April 20, 2013

Buttons Galore!

Hi there!  I have been super-blessed and busy making baby frames for my Etsy shop.  Here is one of two gorgeous little numbers that I just finished up.  I used lots of beautiful buttons in each one, and it just so happens that Heart 2 Heart Challenges would like us to use....{buttons}....so I am linking up to the challenge!

This first is for a new little baby boy...


Here it is in the frame.  I took pics before I put it in to avoid the glare of the glass.  ;)


A great big shout out to Carolyn Burch, The Crafty Lady, for her information that helped me create my very own watermark for my pictures!  What do you think of it?  Did you notice that it sparkles?  ;)