I recently needed a way to wrap up some cards as a gift for a friend. I had seen a tutorial on splitcoaststampers.com about how to make a pizza box, so decided to change up the measurements to fit by size A2 cards and envelopes. You can find the tutorial HERE. I am going to share with you how I created mine in the size I needed in the following picture by picture "how-to" guide.
1. First, I figured out my starting paper size using their equation in the tutorial. I determined that in order to end up with a 4.5 x 6.5 box, I would need to begin with an 8.5 x 12 inch sheet of double-sided cardstock. You can see what the finished box will look like in the background. I used a sheet of B&T Duo from the Stella Paper pack to coordinate with my Stella Card Trio.
2. Place the paper on your scoring board with the 8.5 inch side along the top. Be sure the pattern that you want to be on the OUTSIDE of the finished box is DOWN. Make your first score at 1".
3. Without moving the paper, make your second score at 7.5".
4. Now turn the paper so that the 12 inch side is now along the top of the scoring board.
5. Make your four scores on this side at 1", 5.5", 6.5", and 11".
6. Now you need to make some cuts. Pay close attention to your score lines while cutting. I found it was easier to see my scores on the dark side of the paper. Cut each score line on the LONG side of the paper in one inch, stopping at the perpendicular score line.
It will look like this when you are finished.
7. Now it is time to make your folds. Make sure you have the proper side on the outside of the folds.
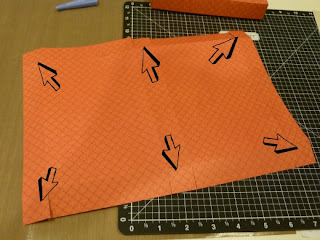
8. Time to put it together with some adhesive. I use my ATG for assembling 3D objects. It is a strong adhesive that is quick and easy to apply. Place your paper with your outside box pattern up and put the adhesive on each one-inch tab as shown by the arrows.
9. Flip your paper back over and bend the tabs to the inside to adhere the longer flaps.
You may need to trim up your corners to make everything line up.
There you go!
10. Now for the fun part! Decorate to your little heart's content! I tied a Cocoa ribbon around my box, stamped a sentiment on a tag, and added a folded up strip of paper to the front along with an Opaque.
How will you decorate yours? :)


so cute ... you're ambitious!
ReplyDeleteHi Shelly! Hahahaha--it was super-easy, so don't give me too much credit on this one! Thanks so much!
Deletesuper cute!
ReplyDeleteHi Lalia! I think so too--love Stella paper still! Thanks!
DeleteI love that box and especially the way you decorated it!
ReplyDeleteHop over and visit my blog sometime if you can:
www.grammiejudys.blogspot.com
Have a wonderful day
Thanks, grammiej! I have been there and am following--keep it up!
Deletevery nice. great job on the tutorial!
ReplyDeleteJust signed up as your newest follower via the CTMH blog tour. Please visit and follow back if you will at"
http://cutonedesignsbyrobin.blogspot.com/
Hi Robin! Thanks for stopping in and taking a peek. I would start following you, but I already am, lol! ;)
DeleteHi, I'm a fellow Damask Diva. I think your blog is Great and wanted to Thank You for the inspiration. I've nominated you for the Liebster Award!
ReplyDeletehttp://love4creativity.blogspot.com/2012/07/award-blog-nomination-2012.html
How have I NOT seen this??? This is amazing!!!
ReplyDelete