Thursday, June 21, 2012

Everlasting Rose Brooch

You may have seen this post of mine in the Damask Divas Blog, but you might not have!  So for those who haven't, be sure to go check out our team blog that my Senior Director, Mandy Leahy put together. I have a whole back-log of posts from when I was knee-deep in getting my CTMH business up and running and this is one of them.


I wanted to share this realistic looking rose brooch that I whipped up to decorate my CTMH apron.  I needed a bit of bling to dress it up, so decided to make one just the night before my first Gathering, lol!  The base is actually the circle of chipboard that I punched out of the center of one of the decorations in the My Originals Sweet Surprises Card Kit.   Yep–it really is!  I try to find a use for everything.  Then I used liquid glass to attach it to one of my girls’ old, plastic alligator hair clips.  With the base finished, I cut out a rose at 5″ from the Art Philosophy cartridge in Tulip and then inked the edges with black.  After rolling it up and adhering it with liquid glass, I added a large black Opaque in the center.  I layered it onto a large Just Blooms Paper Shape to make it pop a bit from the black apron.  The leaves are cut out of New England Ivy cardstock by hand.  Then I used my embossing tool to make a center vein on the leaves and inked the edges with New England Ivy Ink.  Everything was added to the chipboard base with liquid glass, so I don’t have to worry about it going anywhere!

Monday, June 18, 2012

Stella Gets Roses :)

Hi everyone!  Now that the hopping is over, I have a project to share that I made for my Kick-Off.  I wanted to use the My Creations Milk Carton as a vase somehow, just was not sure how until it all came together.  I experimented with different ways to make the roses too with our Art Philosophy Cartridge.  Here is the finished project all decked out with Stella papers:
 I added a Bling Button with this natural hemp to add some sparkle.
 FYI--I tried to stamp a heart on the metal tag, but it didn't work with my Ink.  Not sure if the Stayz On would have worked, but I might try that another time.  I used the Stella Compliments on this side.  Have I ever mentioned that this is my FAVORITE paper pack right now?  ;)
 It was not difficult to measure this up to paper the sides at all--very easy measurements.
 I had to use my favorite stamp set right now in this project too--Just For You.  The Pewter Badge Button adds exactly the right touch.
 These leaves were so much fun to make.  I used my stylus to make the veins and then inked them up really well around the edges and some in between dabbing.  I was not careful to keep the paper flat so that it would look more "handled."  The stems of the roses are sucker sticks from the local craft store that I rolled on my Olive Ink pad.
 Experimenting with the roses was super-fun.  For this one, I rolled two cuts at the same time.  You can see that it opened a bit more than I would have liked at the center.  Wish I had a larger Opaque to pop in there than this one.  This is the biggest there is, however.  I will just have to work the paper a bit more next time I try this technique.
 This might be my fave.  Colonial white tipped with hmmmmm...yep not sure!  My best guess is Hollyhock Ink.  Isn't it gorgeous?  I can almost smell it.  ;)
 This rose is cut out of Sunset cardstock and tipped with the same color ink.  Subtle, but I like that the white core is hidden.  Can you see the base of some of the roses?  I inked up one of the small pointed flowers from the Just Blooms Paper Shapes to thread them on the stem.  I really like the leaffy effect it gives and it also makes a nicer transition from the flower to the stem.
 This one is in Colonial White and just so elegant.
 My personal favorite side is this one...the bracket is from the Irresistibles Miracle Chipboard Die Cuts.
Which side or flower is your favorite?  :)

Friday, June 15, 2012

June Stamp of the Month Blog Hop!

Welcome to our first monthly Stamp of the Month Blog Hop! On the 15th of each month we will be showcasing the current SOTM set with various projects created by talented Close to my Heart consultants. If you are visiting from Judith, then you are on the right track.  If not, please start at the beginning with our hostess Pam!


Life is tweet with the set for June! So many options with this set! You can do birthdays, anniversaries, or just general thinking of you projects. The possibilities are endless!  I knew I had to have this set when I saw the play on words they use with "tweet."  I am a total sucker for that, and with my cricut cartridges, I have lots of birds to choose from.  ;)  Also, just a side note, THIS IS MY FIRST BLOG HOP!!!!  Woot!  I am a bit excited!


Here is my creation:
 This is a standard size A2 card (4.25 x 5.5)
 Inside sentiment:
 The balloon stamp inspired me to use color on this particular card.  The White Daisy cardstock really makes them POP!  I also used to be one of those people who thought they would NEVER take the time to cut out and use stamped images other than the easy-peasy cricut cuts, lol--never say never!
 Tied the balloons up with a piece of baker's twine so they wouldn't get away.
 Here is a little tip too.  I wanted to draw the string lines on the card behind some of the balloons, so I just placed a little dot at the place where each should start.  This allowed me to remove all of the balloons at the same time and left plenty of room for drawing the lines.  :)

Here is a complete list of CTMH supplies for this card:


Life is Tweet June Stamp of the Month
Desert Sand, Creme Brulee, Baby Pink, and White Daisy cardstock
Tulip, Hollyhock, Lagoon, Pansy Purple, Creme Brulee, Pear, Desert Sand, and 
Black Exclusive Ink Pads
Paradise Assortment Baker's Twine in Lagoon 
Sparkles Red, Pink, and Purple Assortment
Fine-tip, black marker
AND my trusty micro-tip scissors!


Now if the goblins of cyber space have gotten you lost along away here is the list of all the talented consultants who are participating in this months blog hop!


        2. Amber La Mons- http://www.scrapperstherapy.blogspot.com/
*you are here* 13. Amie Kiger http://mimimyselfandibykigz.blogspot.com/


If you happened along in the middle of all our fun, just go back to number one form me!  Pam is our hostess with the mostess!  Thanks, Pam!

DON'T FORGET!  June STAMPAGANZA is on right now!  Buy two any size A, B, C, D, or E stamp sets  and your third set is FREE!!!  This is not a joke, lol--and it doesn't happen very often, so go check them off your wish list NOW!  Only through June 30th!  www.mimimyselfandi.ctmh.com

Monday, June 11, 2012

Color Dare Challenge #3

Time for another CTMH Color Dare Challenge!  This one, I will openly admit, was tricky for me color-wise.  I am not a coral-loving girl in any way, so putting my personal color prejudice aside was harder than usual.  The colors for this week are complimentary colors:  Dutch Blue and Sorbet

You could also add one of the optional color choices, which I chose to do by including Sweet Leaf.  It did not drown out the Sorbet as I hoped, lol, but did tone it down a bit.  I have no Sorbet Ink (go figure), so I went with the papers that I have with that color including the Elemental Paper pack.  The neutral colors I added were Desert Sand and Colonial White.  Also this week, as a bonus, we can try our hand at one of the projects in the current Idea Book.  I chose the little pillow box on page 139 as my inspiration for this card:
 I had been wanting to give these flowers a try with my cricut because I love the dimension they give.  I inked the edges with the Desert Sand Ink and popped a silver brad in the middle.  After I was finished, I added the leaves stamped in Sweet Leaf from the Card Word Puzzle My Acrylix set.  I used the AP cartridge for the boarder cut in Dutch Blue and to cut the background for the sentiment that is stamped in Dutch Blue and found in the Thoughtful Tidings February 2012 Stamp of the Month Set.
I only wish I had the Desert Sand pen to add some stitching around the outside of the Sorbet cardstock.  That would have been the perfect touch.  Thanks for looking!

Sunday, June 10, 2012

Bookmarks Galore!

Happy Sunday!  Today, I happen to have a theme--baptisms and bookmarks!  Today, we had the awesome experience of witnessing three good friends being baptized and professing their commitment to God.  I wanted to give each of the girls a little memento of their special day, so decided to make some bookmarks for their bibles commemorating the date.  Here is what I came up with:
 Nothing overly fancy, just a great way to always remember this occasion.  I really did want to include the date, so I got out the November 2011 Stamp of the Month, Cherish the Day.  The stamp set perfectly captures my sentiments. 
I also used the following CTMH products: 
White Daisy cardstock
Dotty for You Paper Pack
Smoothie, Black, and Sweet Leaf Inks
Paradise Assortment Baker's Twine
White Daisy bitty brad
Just Blooms Paradise Paper Shapes
Trinity Alphabet (how appropriate!)  ;)

Sooooooo...it is also my niece's baptism birthday tomorrow!  I made her a bookmark as well.  I think these are a useful gift, and something easy to send in the mail with a card. 


CTMH Products Used:
Colonial White and Lagoon Cardstock
Pear, Lagoon, and Outdoor Denim Inks
You Are...the April 2012 Stamp of the Month
E1025 the Rock the Block My Acrylix stamp set
Paradise Assortment Baker's Twine
Glitter Glitz

May God bless you all in your baptisms today, and happy baptism birthday, Abbie!

Tuesday, June 5, 2012

Graduation Card Makeover

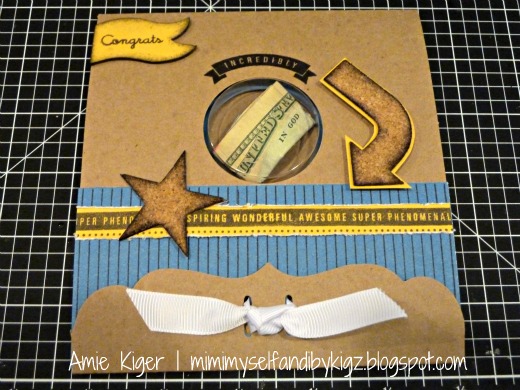
I only have one graduation party to go to this year, so I wanted to make a special card.  I decided to use the My Originals Sweet Surprises Card Kit.   The kid contains all the contents you need to create 10 treat filled cards.  This time, however, instead of a sweet surprise, it would be one of the cold, hard cash variety.  ;)  I only used the card base, envelope, and chipboard flag from the kit, and dressed it up with some other CTMH products.  This card is for a friend's son, so I went with a color scheme of Honey and Dutch Blue with Black as my neutral other than the Kraft card.  Here is the front:
 I really like these cork shapes in the Color-Ready Evergreen pack.  They are fun to ink up, and really add a great texture to any project.  I used my distressing tool on the strip of honey here because I wanted to continue the rugged theme of the card.  
 For this arrow, I stuck it to the Honey cardstock and then trimmed it out.  OK, so yes, I MATTED the arrow sticker.  Can you really blame me?  I LOVE matting!  Here it adds some extra pop and color.  :)
 The inside of the card includes some cuts from the Happy Graduation Cricut Cartridge from Provo Craft.  The stamp sets I used are Tag the Occasion, You Are..., and Thoughtful Tidings.
In looking back at these pics, I realized I missed out on another matting opportunity with the blue strip of stars at the top of the inside of the card.  Wouldn't it have looked fabulous matted in Honey?  Sigh.  Maybe next time.  Thanks for looking!


DON'T FORGET!!!  Stampaganza only lasts until June 30th!  The last time Close to My Heart ran this buy 2, get 1 free promotion was almost THREE YEARS ago, so take advantage of it while it lasts to grab those My Acrylix Stamp sets you have had your eyes on!  You can link to my website here to browse and order:  http://mimimyselfandi.ctmh.com/ 

Monday, June 4, 2012

Color Dare Challenge

Happy Monday!  I wanted to share this little blog I was directed to because I decided to give their challenge a try.  It is called Color My Heart Color Dare, and they just started up at the end of May.  Each week they will pose a challenge to use certain colors in the CTMH pallet in a paper project of your choosing.  This week's dare was to use the colors Moonstruck, Lagoon, Topiary, and Pear. 

 I do not have anything in Moonstruck, so chose to go with the combo of the final three colors (there is an option to do this in the challenge instructions since many people would not necessarily have all the colors.)  I added the neutral colors Colonial White, Desert Sand, and Bamboo.  I used the awesome Originals Card Confidence Program to create the Background Bar 6 x 6 card layout.  Here it is:
 I used my edge distress-er on the Colonial White.  LOVE the effect!
 This is the My Acrylix A Tree size A stamp set.  You can see in the pic below that I stamped the tree leaves in Topiary on another sheet, cut it out, and used glue dots to add a bit of dimension.  I think the lagoon sparkle adds just the right touch to the butterfly. 
 I hope to be able to do many more of these Color Dares over the summer!  It is a good way to branch out and experiment with some colors that I might not combine otherwise.  I really enjoy the creative challenge.  Thanks for looking!