Showing posts with label Thin Cuts. Show all posts

Friday, September 22, 2017

Boo to You!!!

Welcome to my booooootiful blog!

You have probably hopped over from Wendy's Blog, so you are in the right place!  If not, be sure to keep clicking around the hop until you see her boooootiful layout!  ;)

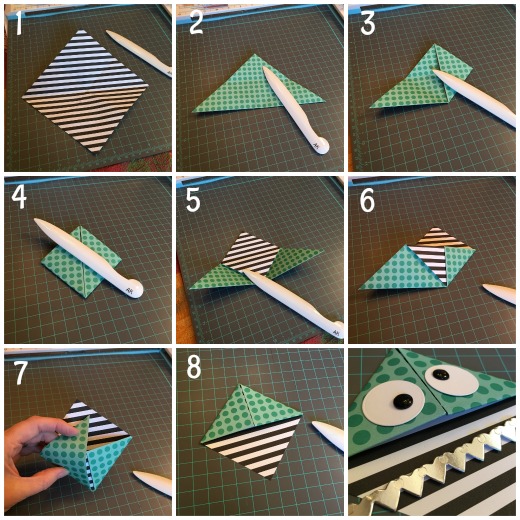
This project is quite popular around the Pinterest boards, and you can find a million and one different versions.  It has been on my "to do" list for longer than I care to admit, lol.  I found a quick and simple tutorial HERE, cut my 6 inch paper square from the new Cats and Bats paper from Close to My Heart, and got to work.


I used a couple of Thin Cuts Dies to make his cutie pie face--the Heart Border and the Basic Circles.   I used my Black and White Dots for his eyeballs...and some retired Poppy Thick Twine for his mop of hair.  Those harmless choppers are made out of shiny Silver Foil Paper.  Here he is hanging out in my Everyday Life Stripes Album where I store my dies.


He's going to come in VERY handy to mark my place!


Here's a quick pic tutorial before you leave...


Doesn't he remind you of the abominable snowman from Rudolf without his teeth?  LOL!!!


You are now on your way over to Katy's Blog!  Don't be afraid...bwahahahahahaaaaaa!

Here's our entire Blog Hops with Heart lineup today...enjoy!!!


Amie (that's me!)


Tuesday, July 11, 2017

Thin Cuts Tip for Tuesday!

I completely missed this pic when I posted my project last month using the Little Dreamer stamp and Thin Cuts from Close to My Heart.  HERE is a link back to see it if you missed it.

I had a GREAT tip to share when using the stamps and thin cuts on multi-stamp images.  This unicorn has several different stamps to line up to create the image.  If you are a stamp then cut girl like me, this can get a bit tricky.  I found that using the die cut as a guide helps to keep all the "parts" within the frame of the die cut...


Anyone else do this a different way?  Please share your ideas!  :)

Sunday, July 2, 2017

One More Watercolor

I had some more watercolored paper to use after my jawsome shark, so I decided to use up some other stamped and colored Lawn Fawn images and die cuts in my stash.

And if you're going to make a card, you might as well make it a shaker!!! Am I right?   ;)


Shaker window cards are deceptively easy to create if you have some clear packaging (for instance from those cricut cartridges you bought, lol,) 3D foam, and a handful of items to create the "shake." It also makes it super easier if you have any die cuts.  I used my Oval Thin Cuts from CTMH, loose sequins from my stash and added some paper fish from the Mermaid for You stamps and dies that I had already created.  I colored all my images with the ShinHan Touch Twin Alcohol Ink Markers and Copics. 


That adorable plaid paper is also from Lawn Fawn. I drool over it each time I see it!  My watercolor supplies and white dots are from Close to My Heart.  I used the leftover MCT stitched frame from my jawsome card, and just trimmed it to the right size...it is definitely times like these that I am happy to be a hoarder keeper of paper scraps!


Finally I used some loose twine and die cut banners from the LF Box Card Die set to create my sentiment.  The alphabet letters are the Pen Pal Alphabet by CTMH.  This is definitely one of my go-to alphas!


It was GREAT to use up some of the leftovers piling up on my workspace!  Are you a scrap keeper or tosser?  
Join in on the challenge here!

ALL SIZES!!!!  Lowest price will be FREE so place your orders accordingly or contact me for help.  :)

Storybook Alphabet (not included in Stampaganza)

Wednesday, June 7, 2017

Little Dreamer...with Sparkle!

How is it already June 6th???  Seriously.

OK, so I finally saw one of my BFF's to give her this FANTASTIC little birthday card...so I can FINALLY share it with you!!!


Isn't it just YUMMY?!?


I used a LOT of different toys to make this one...including my Sizzix Big Shot!  Did you know Sizzix is giving away a $50 gift card to their shop???  Yep!  You can totally get a Big Shot with that kind of dough! 


I will make a list of everything I used at the bottom of my post...


This is the die set I used in my Sizzix Big Shot.  It is from (shocker here, lol) Close to My Heart, Thin Cuts--Stars...


This shaker card was an absolute BLAST to make!

Here is my list of supplies...

Close to My Heart--
Thin Cuts--Stars
Little Dreamer Paper Packet
Sea Glass Cardstock and Glitter Paper
White Card Bases

Papertrey Ink--
Make it Market Shakers and Sprinkles Kit
Sparkle Die


Monday, January 9, 2017

New Year Organization...Check!

Sooooooo, is anyone getting more organized this year? 

I have a FABULOUS little tip for you if you have the new Close to My Heart Thin Cuts pilling up without a clue how to store them. 

It all starts with the Everyday Life Albums and Protectors...here is mine!


Do you believe those magnetic carrier sheets that come with the thin cuts fit snugly but nicely into the 4x6 pockets???


Just slice them in half to fit in the 3x4 pages!


This beautiful Everyday Life Album with gold foil accents is actually on clearance right now too!!!

This Black and White Striped version is the one I showed you above...

The Sea Glass version is even on the website still!!!  (my fave...and the one I use with the Planner Pages!)
 There are two sizes of protectors I used... 4x6...

 and 3x4....
I am LOVING this system to store my stand alone Thin Cuts!!!  I store the Thin Cuts that coordinate with any stamp sets WITH the stamps in the envelope.  Hope this helps you in your storage resolutions this year!

Only in January!
Just for National Papercrafting Month!

Monday, November 21, 2016

Makeover Monday!

Hello!!! 

Makeover Monday is back in a BIG way!  I am pretty excited over this one, you see, because I haven't had a workshop in what seems like AGES.  Well, this weekend I buckled down and scheduled a Christmas Workshop!!! 

One of the gift tags we will be making uses the perfectly beautiful plaid paper from the Close to My Heart Cut Above 'Tis the Season Card Kit.  I ADORE this little piece of paper, you guys!


You will just have to imagine the string on this one as I was in a hurry to get my workshop email out today...but I can't WAIT to show you the rest of my creative session!  See you soon!

Here are the other CTMH products I used to make this one....

A1193 Wreath My Acrylix Stamp

CC1157 Thin Cuts Wreath 

Z4005 Thin Cuts Gift

C1665 Season of Magic My Acrylix Stamp

Poppy Enchantment Exclusive Inks Mini Pigment Pad

Emerald Exclusive Inks Stamp Pad

Red Glitter Paper 


Thursday, October 20, 2016

Close to My Heart Planners are BACK!!!

YES!!!  My Cubs are up 10-2 in the 7th inning as I type this AND the Close to My Heart Planner pages are BACK....does it get any better than that??? 

It DOES!!!!  The new 2017 pages have COLORING illustrations for you to get your creativity on!!! 


Believe me when I say you need to grab these sooooooon if you want them!  Available for a limited time only, and last year the pages sold out faster than expected!

ALSO!!!  New Thin Cuts available!!!  Check out these fantastic new thin cuts available while supplies last!


FINALLY!!!!  Close to My Heart has completely redesigned their INK PADS!!!!!  This is a very welcome change--and you will not believe how easy the magnetized cases are to open!


Only in October!

Monday, September 26, 2016

Swan Lake with Attitude

It's finally finished!!!  I started this layout last month after playing around with the Purr-fect Halloween Stamp of the Month for August...and then hit a wall with no time to finish.  My sister finally showed me how to use my ShinHan markers to make a beautiful Birman version of the cat image, which was quite the improvement on my first attempts.  After that, I just needed TIME! 

Our sweet girl, Willow!
I ended up using the Swan Lake Papers and Complements for this layout in a way I never quite expected. Do you see the 4 Picture My Life cards I used?  One of them is matting a pic at the top middle of the page, two are sticking out right behind that one, and the fourth is used as a journaling box!
I didn't need the swans anyway!
I simple adore the Thin Cuts Hearts in any color!  Here I used the Rustic Home Fundamentals Kraft paper, and even added a bit of glitter with the new CTMH Shimmer Brush!  I cannot say enough about this amazing new product!  You can use it as-is to add a bit of sparkle...OR...add some ink to create lots of colored shimmer!


The Swan Lake Compliments include a touch of gold glimmer...and I dug out an oldie but goodie--White Marquee Enamel Shapes!


The Complements also have several title stickers that are FANTASTIC for layouts!  I snipped the "G" in one of them to turn "Gratitude" into "Cat-itude!" It was a great little stumble onto the perfect addition to my layout!  :)


Don't worry!  I am still full of gratitude! Thanks for stopping in today!  ;)

This week only!!!
Don't miss the Create Kindness Kit--there are less than 1000 left!!!


Tuesday, August 16, 2016

A Bunch of Love for Florence

The Florence Paper Packet is only here for a short time longer, so I wanted to be sure and show you the beautiful thank you cards I made with it using the Bunch of Love My Acrylix Stamp set and matching Thin Cuts.

I love the Rose Gold Foil Tape with these papers...

This typeset print is one of my two faves...

There are even matching Florence sequins!
The flower images are so easy to color with the ShinHan Touch Twin Alcohol Ink markers.  You can easily match them to your papers.

The August Stamp of the month, Purr-fect Halloween, is pretty fun to color too, so don't miss it!


I will be back with three more cards featuring these products soon!  :)

Wednesday, August 10, 2016

Never Let Anyone Dull Your Sparkle!

Time for a quick update on my move-in!  This one involves some glitter...just sayin'!  ;)

Before we actually KNEW we were definitely moving, a friend of mine gave me a wonderfully thoughtful gift of wall art featuring my FAVORITE saying:  Never Let ANYONE Dull Your Sparkle!
Now, I knew it was going to have to wait until we found our new home to actually install it, and I am NOT good at waiting.  I just barely held out, so as soon as I figured out where my crafty supplies were going to be located in the new place, I applied it to my Craft Cave door! 


Isn't it AMAZING?!?!?!  Absolutely the perfect sentiment for my door...but it totally needed a LITTLE something...hmmmmmm...perhaps a little more BLING!  ;)


I used my retired Oceanside Sequins,Thin Cuts--Hearts, and Sea Glass Glitter Paper to jazz things up.


Now it's definitely home to me!  Thank you SO MUCH, Heidi!!!!  :)