A little birdie told me recently that I had not updated my blog in a while...and oh my word was that bird right (thanks, Gallery!!!) I was pretty shocked when I logged in to find that I missed an entire month...or three!
Today I want to give a little shout out to my crafty peeps who are caught up in the midst of unwanted changes or challenges that are pushing you to your limits and eating up your time and energy--keep pushing through! You are not alone. You can do this. I did not really think about it much before, but some wonderful people have shown me recently that your previous circumstances may also be able to give someone else the hope they need to get through THEIR climb.
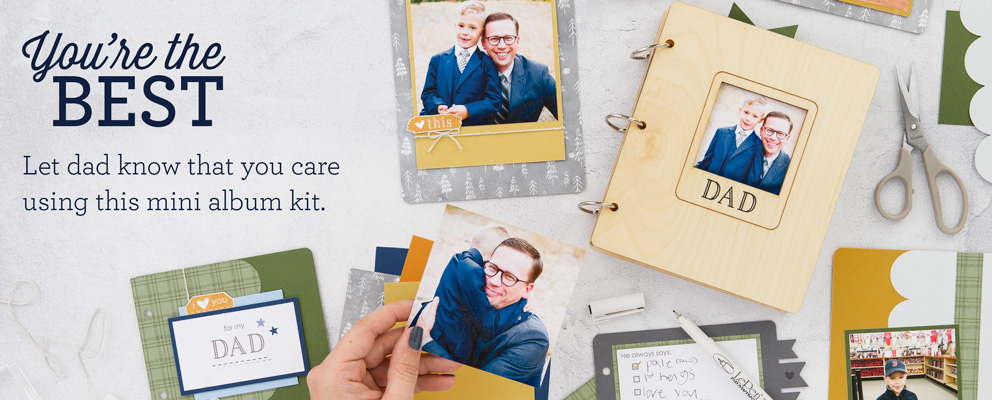
Moving on to some crafty news...this month is my birthday month! For every order of $25 or more on my Close to My Heart party HERE, I will be sending YOU gifts! I want to thank you guys from the bottom of my heart for sticking with me lately...my creative mojo is making a comeback soon I am sure! I was actually born on Father's Day...and will be celebrating together with my dad again this year! I am hoping to put together the You're the Best Mini Album to give him as a gift.
Take a look at this new June-only special which gives you a FREE two-page
layout kit with the purchase one of four different stamp sets available now! The Best Moments Are Free
promo directions for the layouts are actually...wait for it.................................................................................
FREE to download with or without a purchase! Just follow the link above and scroll down to the bottom of the page. :)
Lastly, let's talk about the June Stamp of the Month--It's Your Day to Sparkle....
Can you EVEN think a better themed set to have for my birthday month???? If you have been following along with my crafty antics for a while, then you know I am all about the sparkle. My motto most days is "Never Let Anyone Dull Your Sparkle!" I've been allowing myself some grace to have some very UN-sparkly days as of late, but I am working up to living it daily again.
As always, you can add the Stamp of the Month to a $50 order for just $5. Just add $50 worth of CTMH products to your cart first, and then it will prompt you to add the STOM. You can always order it at full price during the month of June as well if your wish list isn't that long.
I would LOVE to add some sparkle to your day by sending YOU a little gift for my birthday month, so be sure to visit my Close to My Heart website in June to place a $25 or more order!
Never let ANYONE dull your sparkle! Self admitted Cricut fanatic and Shimmer Trim addict. ;)
Showing posts with label Sparkle. Show all posts
Saturday, June 1, 2019
Wednesday, June 7, 2017
Little Dreamer...with Sparkle!
How is it already June 6th??? Seriously.
OK, so I finally saw one of my BFF's to give her this FANTASTIC little birthday card...so I can FINALLY share it with you!!!
Isn't it just YUMMY?!?
I used a LOT of different toys to make this one...including my Sizzix Big Shot! Did you know Sizzix is giving away a $50 gift card to their shop??? Yep! You can totally get a Big Shot with that kind of dough!
I will make a list of everything I used at the bottom of my post...
This is the die set I used in my Sizzix Big Shot. It is from (shocker here, lol) Close to My Heart, Thin Cuts--Stars...
This shaker card was an absolute BLAST to make!
Here is my list of supplies...
Close to My Heart--
Thin Cuts--Stars
Little Dreamer Paper Packet
Sea Glass Cardstock and Glitter Paper
White Card Bases
Papertrey Ink--
Make it Market Shakers and Sprinkles Kit
Sparkle Die
OK, so I finally saw one of my BFF's to give her this FANTASTIC little birthday card...so I can FINALLY share it with you!!!
Isn't it just YUMMY?!?
I used a LOT of different toys to make this one...including my Sizzix Big Shot! Did you know Sizzix is giving away a $50 gift card to their shop??? Yep! You can totally get a Big Shot with that kind of dough!
I will make a list of everything I used at the bottom of my post...
This is the die set I used in my Sizzix Big Shot. It is from (shocker here, lol) Close to My Heart, Thin Cuts--Stars...
This shaker card was an absolute BLAST to make!
Here is my list of supplies...
Close to My Heart--
Thin Cuts--Stars
Little Dreamer Paper Packet
Sea Glass Cardstock and Glitter Paper
White Card Bases
Papertrey Ink--
Make it Market Shakers and Sprinkles Kit
Sparkle Die
Friday, March 27, 2015
Always Be Your Own Kind of Awesome
Happy Friday! Here is the next FANTASTIC creation from my guest designer, Becca Whitham, using one of my favorite words EVER!!! See you later, alligator!
My favorite thing about stamping is how it has no creative limits. The same stamp set can be used thousands of different ways. Designer paper can be altered to fit your needs. And, when you start combining a little from here and a little from there, the sky's the limit.
For design team duties over at Mimi, Myself, and I, I combined two stamp sets, a few papers, and several oldie-but-goodie stamping techniques to create a unique card by adapting a pattern from the Originals Card Confidence Program.
Here's the supply list with links for your shopping convenience:
The second technique doesn't show up well. I masked off the word "Wonderful" from the original sentiment (see below) and substituted "awesome" in Cocoa ink from You're the Bomb.
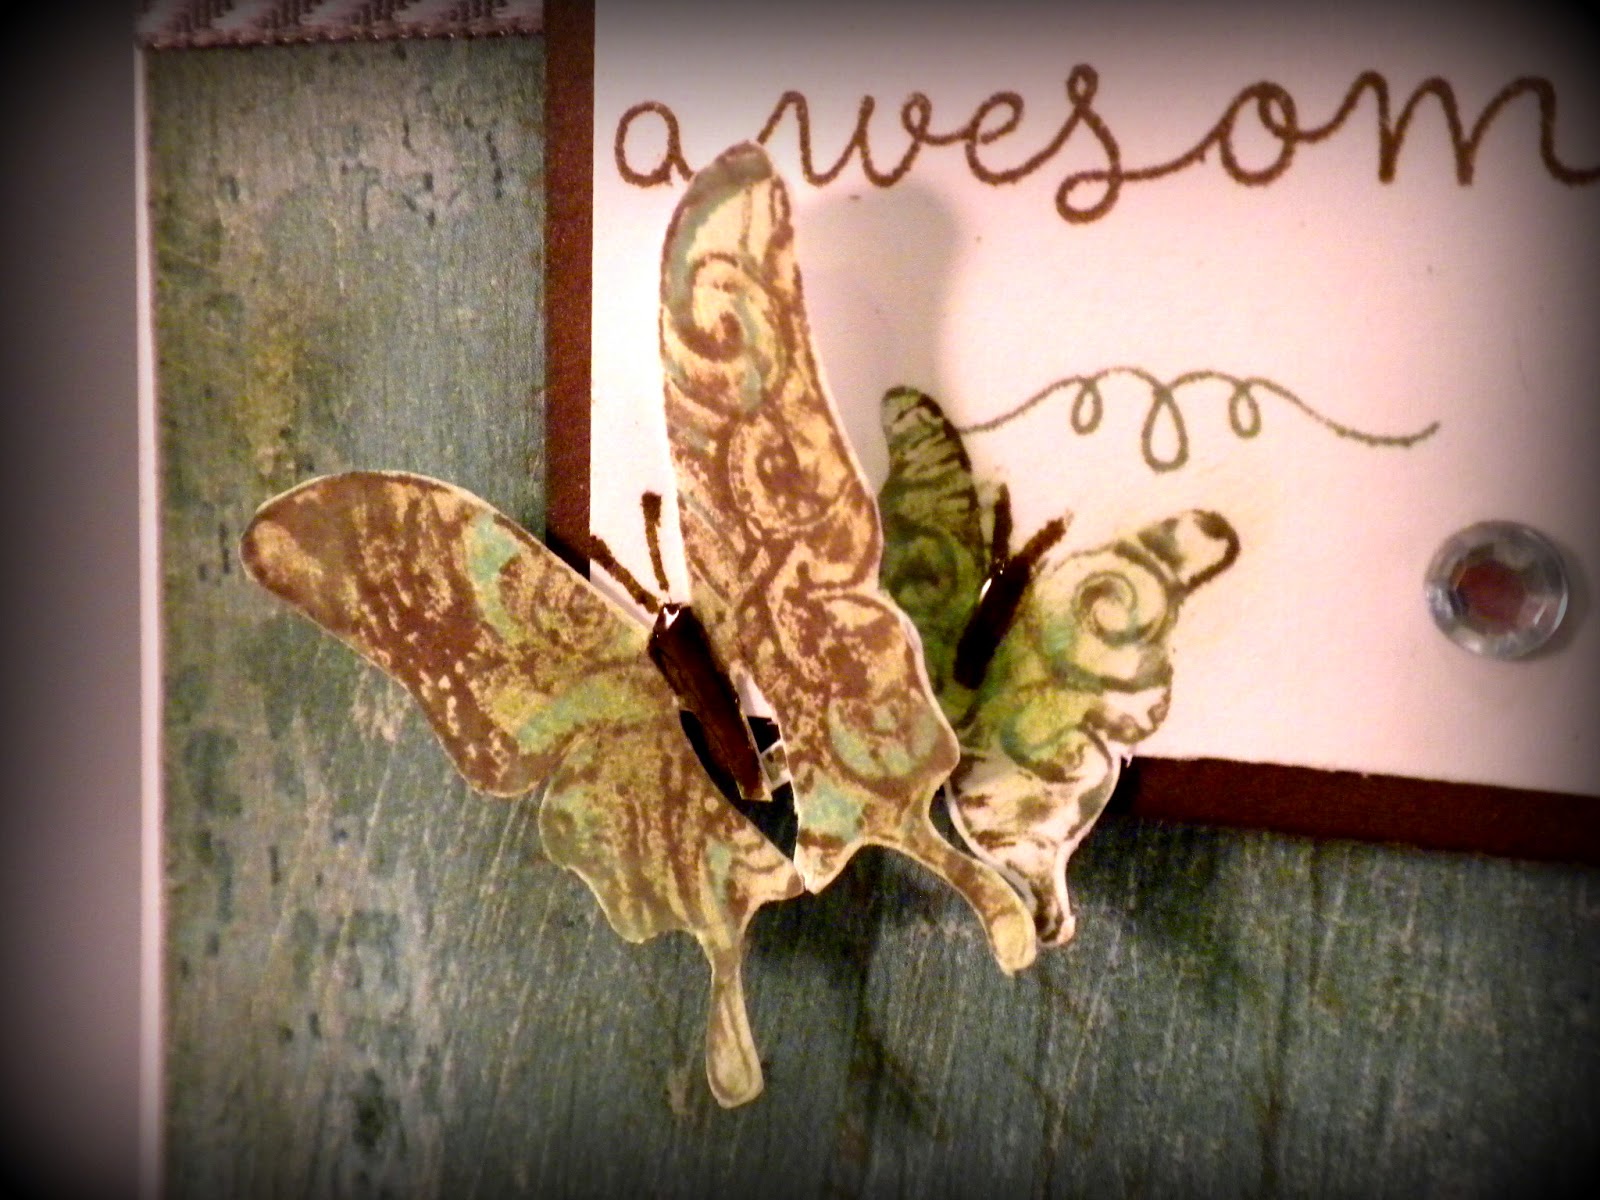
Liquid Glass is my "go to" accessory. As you see in this close-up, I used it to give the butterfly bodies some shine and dimension. It's also great to adhere a tiny, butterfly body because it's strong enough you can fold up the wings knowing it will stay put. I also used it to affix the tails of the ribbon where I wanted them. I rarely get the tails of either knots or bows to naturally fall the way I like, and it used to bug me. Then I saw someone dot tiny bits of Liquid Glass under the tails and cement them in place. Genius!
There are a couple other things I want you to see about these butterflies. The first is how I got that very cool swirly pattern on them. I started by inking the largest solid butterfly from You're Own Kind of Wonderful (bottom, left) in Glacier ink and rolling the edges in Slate ink. Then I inked the largest, swirly butterfly (top, left) in Cocoa ink. I "kissed" the solid butterfly to the swirly one, twisted without taking the two images apart, then pulled them apart.
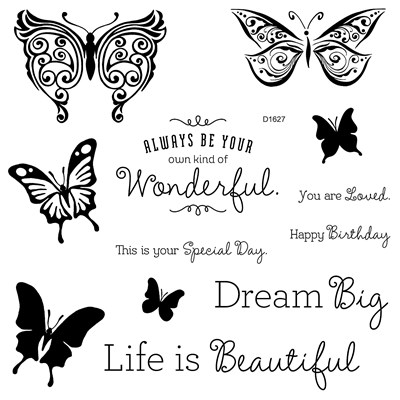
I did the "kiss and twist" technique a couple times to cover the entire surface of the solid butterfly. I stamped it on a separate piece of white card stock, trimmed it out (cutting off the antennae), and colored the body with the Bronze marker. I did the same "kiss and twist" technique using the same colors with the medium, solid butterfly (middle, right) and stamped it under my sentiment. I had stamped my sentiment onto a rectangle of white cardstock that was extra long. I then used my Paper Trimmer to slice up to the edge of the small butterfly and used scissors to trim out the bottom of the butterfly. After I adhered the larger butterfly over top of the smaller one, I used a marker to re-draw the antennae.
Because I'd distressed my background paper, I had to touch up the butterflies with the sponge dauber to tone down the colors.
The last technique used on this card was adapting the card pattern from Originals. As shown, it's a 4.75 x 3" card, but I wanted a standard 4.25 x 5.5" card. Basically, I looked at the picture and created my own measurements. After creating my card base, I cut another piece of White Daisy cardstock at 4 x 5.25" and adhered the Seaside paper (4 x 3.75") and Cocoa cardstock (4 x 1.5"). Having a card panel that goes over the top of card base allows me to tape the edges of ribbon (or staple, or poke holes, or...) without the card recipient ever seeing my mess.
I want to re-create this card and substitute "Beautiful" for "Wonderful" then send it to my daughter. But that only uses one stamp set, and it's my job to make you want more than one. (**Big, cheezy grin**)
Until next time,
Becca --
I LOVE the You're the Bomb My Acrylix stamp set...AND it even provides a donation to Operation Smile when you purchase it! BUT, it is ONLY available until the end of March...
Don't forget! Any orders you place now until April 7th will qualify you for my March Madness Mystery Hostess giveaway, so make your wish list, and head on over to my website for a chance to win at least $25 in CTMH goodies!
My favorite thing about stamping is how it has no creative limits. The same stamp set can be used thousands of different ways. Designer paper can be altered to fit your needs. And, when you start combining a little from here and a little from there, the sky's the limit.
For design team duties over at Mimi, Myself, and I, I combined two stamp sets, a few papers, and several oldie-but-goodie stamping techniques to create a unique card by adapting a pattern from the Originals Card Confidence Program.
Here's the supply list with links for your shopping convenience:
- Stamps: Your Own Kind of Wonderful, You're the Bomb
- Ink: Glacier, Cocoa, and Slate
- Paper: Seaside, Cocoa cardstock, White Daisy cardstock
- Accessories: Slate Striped Ribbon, Liquid Glass, Sparkles Clear Assortment, Bronze ShinHan Marker
- Tools: Bonding Glue, Paper Trimmer, Micro-Tip Scissors, Foam Tape, Score Board, Sanding Kit, Sponge Daubers, Originals Card Confidence Program (p. 13, "Center Accent")
The second technique doesn't show up well. I masked off the word "Wonderful" from the original sentiment (see below) and substituted "awesome" in Cocoa ink from You're the Bomb.
There are a couple other things I want you to see about these butterflies. The first is how I got that very cool swirly pattern on them. I started by inking the largest solid butterfly from You're Own Kind of Wonderful (bottom, left) in Glacier ink and rolling the edges in Slate ink. Then I inked the largest, swirly butterfly (top, left) in Cocoa ink. I "kissed" the solid butterfly to the swirly one, twisted without taking the two images apart, then pulled them apart.

I did the "kiss and twist" technique a couple times to cover the entire surface of the solid butterfly. I stamped it on a separate piece of white card stock, trimmed it out (cutting off the antennae), and colored the body with the Bronze marker. I did the same "kiss and twist" technique using the same colors with the medium, solid butterfly (middle, right) and stamped it under my sentiment. I had stamped my sentiment onto a rectangle of white cardstock that was extra long. I then used my Paper Trimmer to slice up to the edge of the small butterfly and used scissors to trim out the bottom of the butterfly. After I adhered the larger butterfly over top of the smaller one, I used a marker to re-draw the antennae.
Because I'd distressed my background paper, I had to touch up the butterflies with the sponge dauber to tone down the colors.
The last technique used on this card was adapting the card pattern from Originals. As shown, it's a 4.75 x 3" card, but I wanted a standard 4.25 x 5.5" card. Basically, I looked at the picture and created my own measurements. After creating my card base, I cut another piece of White Daisy cardstock at 4 x 5.25" and adhered the Seaside paper (4 x 3.75") and Cocoa cardstock (4 x 1.5"). Having a card panel that goes over the top of card base allows me to tape the edges of ribbon (or staple, or poke holes, or...) without the card recipient ever seeing my mess.
I want to re-create this card and substitute "Beautiful" for "Wonderful" then send it to my daughter. But that only uses one stamp set, and it's my job to make you want more than one. (**Big, cheezy grin**)
Until next time,
Becca --
I LOVE the You're the Bomb My Acrylix stamp set...AND it even provides a donation to Operation Smile when you purchase it! BUT, it is ONLY available until the end of March...
Don't forget! Any orders you place now until April 7th will qualify you for my March Madness Mystery Hostess giveaway, so make your wish list, and head on over to my website for a chance to win at least $25 in CTMH goodies!
Saturday, May 24, 2014
Freshly Made Sparkle!
Hey everyone! I finally got to use it! I snatched up this great new stamp set from My Favorite Things, because it's all about MY favorite thing--SPARKLE! I paired it up with the fab new sketch over at Freshly Made Sketches, and ended up with some serious bling going on. :)
I used several different products on this card. From Close to My Heart I used Black and White Daisy CS, Lollydoodle Paper, Black Glitter Paper, Black and Cotton Candy Ink, and the Timberline WOTG My Acrylix set. I used some silver vinyl from Silhouette for the faux sequins that are so easy to make with the MFT Sequin Dies.
Can you see where I used the Wink of Stella Glitter brush? It sure makes it easy to leave a little sparkle everywhere you like! ;)
I have lots more to come from this stamp set, so stay tuned! :)
Shop 24/7 from home at my website, mimimyselfandi.ctmh.com, for some of the products I used for this card, and this month's specials:
I used several different products on this card. From Close to My Heart I used Black and White Daisy CS, Lollydoodle Paper, Black Glitter Paper, Black and Cotton Candy Ink, and the Timberline WOTG My Acrylix set. I used some silver vinyl from Silhouette for the faux sequins that are so easy to make with the MFT Sequin Dies.
Can you see where I used the Wink of Stella Glitter brush? It sure makes it easy to leave a little sparkle everywhere you like! ;)
I have lots more to come from this stamp set, so stay tuned! :)
Shop 24/7 from home at my website, mimimyselfandi.ctmh.com, for some of the products I used for this card, and this month's specials:
Thursday, February 27, 2014
#tbt Sparkles Again!
I was shopping over the weekend when I found this fantastically sparkly sign at Claire's. All it usually takes is the sight of glitter on something in my daily life to remind me of this amazing and uplifting phrase. This week it hasn't been very easy to remember though, and I haven't felt very sparkly. Because of the losses of friends' and family pets and humans, it has been really tough to weather the winter this week for me. I am doing my best to climb out of the pit, but sometimes it is far too easy to slide back a few paces. Here's hoping this helps someone, somewhere along in their climb too! We CAN do it...with a little hope, a lot of prayer and trust, and perhaps just a bit of pixie dust.
Hugs, my friends!
Saturday, January 4, 2014
New Year=One Word
Happy Weekend, everyone!
I know that some of you are cozied up for a long winter's nap right now with some pretty frigid temps...ME TOO! ;) I am always amazed at how low the temp can go. I believe it already! No need to prove it any longer, lol.
Now, back to my blogging business at hand. Please take a moment to read this...I know there are a lot of words, but I promise it is worth it!
I wanted to start off the year fresh, you know, that whole clean start, yada, yadda. But I don't make resolutions. Period. If you recall the beginning of 2013, I was supposed to be rolling out a measly scrapbook layout a week, but that lasted about oh, 6 weeks if that! If it happens, so be it. Real life is just not scripted by you and me.
If you were with me at the start of 2013, you also might remember my word(s) for the year: Never let anyone dull your SPARKLE!
I wanted to do a better job of keeping that ball rolling last year, I really did. I sparkled, you all sparkled and left me lots of sparkle here which I thank you for! I just wish I had spread it a bit wider. Well, this year, I intend to keep on sparkling, so don't you worry! I just have another little bitty word to throw in with it. DANCE!
No, I am not taking dance lessons, lol! In the days leading up to the New Year, I was in the midst of searching for my one word for 2014 when I happened to pull out my new Bible study called Make Over by Jen Hatmaker. As I finished up the day's reading, my word hit me smack between the eyes! Jen was talking about attitude and motivation when she said that it all really boiled down to one simple question...who are YOU dancing for? The implications of that little sentence really hit me hard, and I knew that I had finally found my new word for 2014. DANCE.
Here is the card I was inspired to make as my one word happened to coincide with the CAS-ual Fridays challenge: In A Word. (Coincidences always happen when you are on the right path, my friends!) I used the sketch from Freshly Made Sketches 117.
The background is stamped in Whisper Ink with the retiring (but still available until the end of January) My Acrylix Universal Backgrounds. I use this set ALL the time! I used the pretty papers in the Laughing Lola Paper Packet, and my trusty Black glitter paper! See that little touch of teal? That is the brand new teal shimmer trim that is only available right now in our Cloud Nine Cardmaking Kit. It will be available February 1st in the new Spring and Summer Idea Book! :) The word dance is welded together in the Cricut Craft Room using the font on the new Cricut Artbooking Cartridge. LOVE!!!
Would you believe I actually, physically stitched the line of black waxy flax on this one? I cannot believe it either! I used my piercing tool and ruler like this...
I needed a sentiment for the inside since I have no stamps with just the right words. I used my Close to My Heart Glamour Glitter Alphabet stickers to make my own...
Not your neighbor's beat. Not that gorgeous supermodel's beat. Not the beat of your grandmother. YOUR beat. Maybe your beat will be similar to mine if we are dancing for the same reason, but it sure won't be the same dance!
Well, my crafty friend, I hope you stop in to see what I am up to frequently this year, and no matter what, I hope you dance! And if you happen to sparkle while you're dancing, then you just might be dancing for all the right reasons! :)
My upline is having another month of daily challenges, #projectaday, and this one fit right along with today's--Use Scraps! My banners are all scraps from previous projects. Scraps are your friend! ;)
I know that some of you are cozied up for a long winter's nap right now with some pretty frigid temps...ME TOO! ;) I am always amazed at how low the temp can go. I believe it already! No need to prove it any longer, lol.
Now, back to my blogging business at hand. Please take a moment to read this...I know there are a lot of words, but I promise it is worth it!
I wanted to start off the year fresh, you know, that whole clean start, yada, yadda. But I don't make resolutions. Period. If you recall the beginning of 2013, I was supposed to be rolling out a measly scrapbook layout a week, but that lasted about oh, 6 weeks if that! If it happens, so be it. Real life is just not scripted by you and me.
If you were with me at the start of 2013, you also might remember my word(s) for the year: Never let anyone dull your SPARKLE!
![]() |
| remember that old watermark? sigh... |
I wanted to do a better job of keeping that ball rolling last year, I really did. I sparkled, you all sparkled and left me lots of sparkle here which I thank you for! I just wish I had spread it a bit wider. Well, this year, I intend to keep on sparkling, so don't you worry! I just have another little bitty word to throw in with it. DANCE!
No, I am not taking dance lessons, lol! In the days leading up to the New Year, I was in the midst of searching for my one word for 2014 when I happened to pull out my new Bible study called Make Over by Jen Hatmaker. As I finished up the day's reading, my word hit me smack between the eyes! Jen was talking about attitude and motivation when she said that it all really boiled down to one simple question...who are YOU dancing for? The implications of that little sentence really hit me hard, and I knew that I had finally found my new word for 2014. DANCE.
Here is the card I was inspired to make as my one word happened to coincide with the CAS-ual Fridays challenge: In A Word. (Coincidences always happen when you are on the right path, my friends!) I used the sketch from Freshly Made Sketches 117.
The background is stamped in Whisper Ink with the retiring (but still available until the end of January) My Acrylix Universal Backgrounds. I use this set ALL the time! I used the pretty papers in the Laughing Lola Paper Packet, and my trusty Black glitter paper! See that little touch of teal? That is the brand new teal shimmer trim that is only available right now in our Cloud Nine Cardmaking Kit. It will be available February 1st in the new Spring and Summer Idea Book! :) The word dance is welded together in the Cricut Craft Room using the font on the new Cricut Artbooking Cartridge. LOVE!!!
Would you believe I actually, physically stitched the line of black waxy flax on this one? I cannot believe it either! I used my piercing tool and ruler like this...
I needed a sentiment for the inside since I have no stamps with just the right words. I used my Close to My Heart Glamour Glitter Alphabet stickers to make my own...
Not your neighbor's beat. Not that gorgeous supermodel's beat. Not the beat of your grandmother. YOUR beat. Maybe your beat will be similar to mine if we are dancing for the same reason, but it sure won't be the same dance!
Well, my crafty friend, I hope you stop in to see what I am up to frequently this year, and no matter what, I hope you dance! And if you happen to sparkle while you're dancing, then you just might be dancing for all the right reasons! :)
My upline is having another month of daily challenges, #projectaday, and this one fit right along with today's--Use Scraps! My banners are all scraps from previous projects. Scraps are your friend! ;)
Monday, December 31, 2012
Happy 2013!!!
Hey, it's 2013 somewhere anyway, right? ;) Soooooo the big question today is are you making any New Year's resolutions? What are they and why?
CAUTION: LOTS of words ahead! ;)
Personally, I have made so many resolutions that didn't survive even one month that I am done with those. THIS year I am going to try something a bit different. I am not ready to take on more commitments, so haven't looked into the whole Project Life thing quite yet. I have heard tidbits about something on Big Picture Classes called Just One Word, but again, haven't put much time into researching it yet. This year, I chose a phrase to try my best to live by~nothing remarkably lofty or thought provoking~but something life changing nonetheless. I saw this little sign while scrolling through Facebook posts the other day and it truly said something to me. I ran with the inspiration and crafted a sign to hang up in my craft room...
I have NO idea at all who to credit with this adorable phrase, but how perfect is this?! My readers probably recognize my obsession with the Close to My Heart shimmer trim, and would only expect me to be crazy over the new glitter papers we are getting in the new Spring and Summer Idea Book, so are you shocked? ;) But it is way more than just that kind of sparkle that I am after. I am going for the gold, lol, so to speak. I want to be ME with all the trimmings without fearing someone else might think what I love is ridiculous. I want to reach for things without hesitating for a split second to wonder if certain people will approve or not if I am convinced that it is the right thing to do. I want to sparkle without limits and spread a little glitter on someone's day! For me personally it is a challenge to not always try to squish myself into the box of other people's opinions and expectations, although sometimes those are a good guide. But I don't want it to ruin my day when someone tailgates me all the way home because I am a cautious driver. I don't want to change my mind on an idea just because one other person pooh-poohs it! I don't want to loose MY sparkle because of other people's mud flinging. In the reverse, I don't want to stomp out any other person's sparkle either! I literally JUST came across this prayer from Sharon Jaynes of Girlfriends in God and it went straight to my heart. Sometimes you don't even need to be still to hear what God is saying!
So I'm gonna need all the help I can get! Who's ready to SPARKLE in 2013? I AM!!!
On a side note....
I always talk about CCR on my blog, but for those who might not be familiar with it, here is a screen shot of what it looks like while designing with the Cricut online Craft Room software. You can alter images from cricut cartridges and see exactly how things line up before you cut them. It is totally free, and all you need to use it with your Cricut is a printer cable. Super duper easy! I highly recommend it! You can find the place to download it by going to cricut.com and clicking on Craft Room at the top. You can find videos, and all sorts of useful info there too. Shoot me a message if you ever have questions! I would be happy to try to help. :)
CAUTION: LOTS of words ahead! ;)
Personally, I have made so many resolutions that didn't survive even one month that I am done with those. THIS year I am going to try something a bit different. I am not ready to take on more commitments, so haven't looked into the whole Project Life thing quite yet. I have heard tidbits about something on Big Picture Classes called Just One Word, but again, haven't put much time into researching it yet. This year, I chose a phrase to try my best to live by~nothing remarkably lofty or thought provoking~but something life changing nonetheless. I saw this little sign while scrolling through Facebook posts the other day and it truly said something to me. I ran with the inspiration and crafted a sign to hang up in my craft room...
I have NO idea at all who to credit with this adorable phrase, but how perfect is this?! My readers probably recognize my obsession with the Close to My Heart shimmer trim, and would only expect me to be crazy over the new glitter papers we are getting in the new Spring and Summer Idea Book, so are you shocked? ;) But it is way more than just that kind of sparkle that I am after. I am going for the gold, lol, so to speak. I want to be ME with all the trimmings without fearing someone else might think what I love is ridiculous. I want to reach for things without hesitating for a split second to wonder if certain people will approve or not if I am convinced that it is the right thing to do. I want to sparkle without limits and spread a little glitter on someone's day! For me personally it is a challenge to not always try to squish myself into the box of other people's opinions and expectations, although sometimes those are a good guide. But I don't want it to ruin my day when someone tailgates me all the way home because I am a cautious driver. I don't want to change my mind on an idea just because one other person pooh-poohs it! I don't want to loose MY sparkle because of other people's mud flinging. In the reverse, I don't want to stomp out any other person's sparkle either! I literally JUST came across this prayer from Sharon Jaynes of Girlfriends in God and it went straight to my heart. Sometimes you don't even need to be still to hear what God is saying!
So I'm gonna need all the help I can get! Who's ready to SPARKLE in 2013? I AM!!!
On a side note....
I always talk about CCR on my blog, but for those who might not be familiar with it, here is a screen shot of what it looks like while designing with the Cricut online Craft Room software. You can alter images from cricut cartridges and see exactly how things line up before you cut them. It is totally free, and all you need to use it with your Cricut is a printer cable. Super duper easy! I highly recommend it! You can find the place to download it by going to cricut.com and clicking on Craft Room at the top. You can find videos, and all sorts of useful info there too. Shoot me a message if you ever have questions! I would be happy to try to help. :)
Subscribe to:
Posts (Atom)


