Showing posts with label Surf's Up. Show all posts

Thursday, April 16, 2015

Throwback Thursday Picture My Life Photo Tip!

Hey everyone!  I finished up my 12 x 12 layouts for Spring Break that I was working on, but I had lots of random leftover pics.  What do you do with those leftovers that don't quite fit into your pages, but you can't bring yourself to toss them?  I FINALLY found the perfect solution!  :)

Picture My Life!!!!  The pocket style pages made for this system also referred to as Project Life, are just perfect to toss those extra pics in at the end of your 12 x 12 album!  It takes just a few minutes to tuck them in along with some pre-made PML cards.  :)  Here are a few that I added to the end of mine...


The journaling cards are just perfect for my kiddos to write their own special memories to add to the album.  I can add some anecdotes, dates, names, etc. without taking much time as well. 

I hope you like my solution, and hope you find it useful!  I used some cards from the retired Picture My Life Surf's Up Kit and retired Heartstrings Kit.  You can see all the available Picture My Life cards and pages on my website right HERE.


Sunday, December 22, 2013

My Creations Box for the Birthday Girl

Happy birthday to my sweet middle girlie today!

I used one of Close to My Heart's fantastic My Creations 3D items to make the perfect gift box for her present...the Ring Box.  Can you spot the sneak peek of two brand new products coming out in the 2014 Spring/Summer Idea Book?  ;)


This sturdy little ring box is perfect for a small gift--like the necklace I am giving!  I made a rosette cut from the Artiste Cricut Cartridge with Crystal Blue CS and placed a hand trimmed Single Snowflake stamped in Lagoon on top.  See those shiny silver triangles?  They are a BRAND NEW product in the new Idea Book called Triangles Durable Studs.  I adore how they accent the corners of the box top.  I also added a sprinkling of Bitty Sparkles.


The sides of the box were a lot simpler.  I just used strips of Silver Washi Tape, Surf's Up Zip Strip, and Teal Shimmer Trim.  Wait a minute!  TEAL shimmer trim???  Yep, another BRAND NEW product in the 2014 Spring and Summer Idea Book from Close to My Heart!


The little tag in the shape of a mitten is cut with the Art Philosophy Cricut Cartridge on the sweet chevron pattern in the Frosted Paper Packet.  Just a leftover cut from a past project--save those scraps, I tell you!  ;)  I added a bow of white baker's twine and attached it with a Slate Striped Twist Tie


Stay tuned to my blog to find out how YOU can get your hands on these two new products, plus another one, before they are released in the 2014 Spring and Summer Idea Book!

Now, off to celebrate the birthday girl!  :)

Saturday, November 9, 2013

Sneak Peek of the Close to My Heart Picture My Life Collection


Hi everyone!  I have the most exciting news!  Corporate has released some brand new images of the new Picture My Life scrapbooking system that will debut in the next Idea Book!  I wanted to share the amazing pics with all of you!

For those of you familiar with the Project Life scrapbooking method, this will look pretty familiar.  I had been looking into it myself to see if I could incorporate any of my current CTMH supplies to that system--and now I won't even have to since Close to My Heart is so amazingly awesome at keeping up with the current trends!  :)

Here they are!


What do you think?!  I didn't caption the pics on purpose because I want to see if you notice anything about these papers...does anything look familiar to you?

These are all based on current or past Close to My Heart Paper Packets!!!  How awesome is that?!  These coordinate with Avonlea, Babycakes, Chantilly, Later Sk8ter, Laughing Lola, and Surf's Up!

Want to be one of the first to get your hands on one of these kits?  I know I do!  Well, right now, when you join my team and sell your first $300 of product by March 31, 2014, YOU can choose one of these amazing programs for FREE!  Each set features 122 double-sided cards, a 12 x 12 cover page, plus 10 unique memory protectors to capture your life as it happens.  There are 8 different themes to choose from (yep, they are keeping two of them under wraps,) and each one is based on a popular My Reflections paper packet!  Do you think there is a chance we will see one with Stella's beautiful papers?  A girl can dream!  :)

Are you a die-hard CTMH scrapbooker?  Bonus #2 for signing up to be a consultant is that you just won't have to wait so long to get your hands on this awesome new product plus you receive an instant discount!  The program goes live to the public next February, but as a consultant, you can already purchase your kits at the consultant price in January to play with and get to know your new products!  
Bonus #3 for becoming a consultant on my team, Been There, Blinged That, is that you will receive all the help and guidance you need to get your business up an running from me!  I can help you with the behind the scenes experience to get off on the right foot.  It doesn't matter if you live near or far either.  Technology has made it possible for us to stay connected in ways other than a face to face group meeting, so you can totally learn that way if you so choose--I did!  My upline lives over halfway across the country!  That didn't stop me from learning from her though, and made me take charge of some of my own resources.  My team has their own FB page were we can all learn together and stay on top of the action!  :)

If you would like any more information about this opportunity, please do not hesitate to contact me here or at mimimyselfandi@outlook.com.  I am here to help!

Monday, July 22, 2013

At H2H There's Water, Water Everywhere!

Hello again!  Welcome back for another week at Heart 2 Heart Challenges with Team Sunset!  This week's challenge at Heart 2 Heart is Water, Water Everywhere.  Chose a way to make your project include something to do with water.  Well, I really don't know anything that says water better than washing your hands! 

This challenge turned out to be great motivation for me to do a project re-do.  I had found this sign on Pinterest, and made one of my own a while back that you can see here.  It is almost painful to go back that far in my blogging days, lol!  If you look, you will see that my link doesn't even work!  Oy vey!  Here is my original inspiration for this saying.

And here is my re-do!


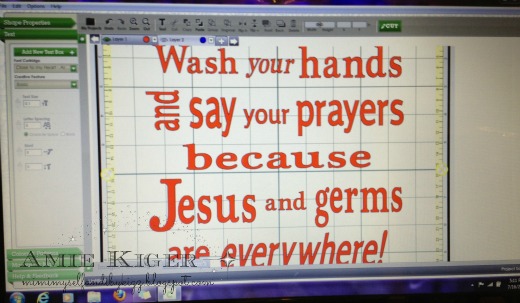
I think we have some improvements upon last time, no?  ;)  Let's get into the details!  I started by going into Cricut Craft Room to play around with the fonts on the Cricut Art Philosophy and Artiste Cartridges.  You can do all sorts of things to alter your images and cuts, so if you want to play with word art, this is the place to be!   It is totally free to use the Craft Room, you just have to own the cartridges to cut the things you design with them.  This is what it looked like on my screen...


See how I was able to resize the letters and even tilt some of them?  You do that by clicking and dragging your cursor over the words to group them.  Then you can move them anywhere or edit them as a whole word.  After I finished getting it all laid out just right (red), I copy pasted each portion to another tab (blue) so it would be spaced easily to fit all my papers on one cutting mat.  Huge time saver there, and I didn't have to cut out the entire thing for each color paper I wanted to use!  Did I mention how much I love this program?


I didn't want it to cut the letters just yet, though, so I switched out my blade housing for the Cricut black marker.  This would be the base for attaching my lettering.  Could you imagine lining up all those letters freehand?  Yikes!  I did a test run on scrap paper before actually writing it on this pattern from Close to My Heart's Surf's Up Paper Packet.


Then I laid out all the paper on my cutting mat according to which color paper I wanted each word to be and ran the cutting mat through just once!  The outline of the marker gave the perfect pop to the patterns I used and even allowed me to offset some of the letters for a great effect.  I love the dark grey glitter paper


I popped up some of the letters with foam tape.  See the long arrows stamped on each side of the phrase?  I used Crystal Blue Ink and a brand new Autumn stamp set called One Way Borders to add those...pointing down for hands under the water, and pointing up for prayers on the way!  ;)


Finally, the blinging could begin!  This great wave was cut right on my Cricut E2 since the NEW Artbooking Cartridge is not available in CCR yet.  Have you pre-ordered yours yet???   I also added glittery buttons and clear buttons as bubbles, and some Small Sparkle Flourishes and these great new Twist Ties (available August 1st) as some splash!


I used my paper piercing tool to give them a twist like this!  


I added a cluster of splash to the top corner too...those are blue sparkles in the buttons.  They won't be back in the next Idea Book, so get them by the end of July before they run out!


I hope you are inspired to come play along with us at Heart 2 Heart Challenges!  We would LOVE to see what you make!  Here is a quick link to the rules.

You have until the end of the month for all of the July challenges, so go get your craft on and show us YOUR sparkle!  :)

Friday, July 5, 2013

Color Dare Heads to the Beach!


Welcome back to my blog for another Color My Heart Color Dare Challenge!  This week, we are headed right for the beach and want you to show us your creations with the Close to My Heart Surf's Up Paper Packet!  I have a huge number of beach photos from our family vacations, so decided to to make a layout.  Unfortunately, I was in a rush to get things done before leaving on vacation and left out the TEAL!!!  Don't forget to use yours!  ;)  I wanted to still share the layout, though, so here you go!


This flower image is from the retired Lucy Workshop on the Go My Acrylix.  I stamped it in Sorbet and Black Ink on the Surf's Up Gold and liked the effect.  Then I stamped them on White Daisy with the outline only in Smoothie and also on the Gold again with a Black Ink outline only.


These great sticker additions including the faux washi tape are found in the Surf's Up My Stickease Assortment


I had trimmed out the cloud Stickease images to better lay them out to fit them on my page.  After I was finished applying them, I realized that I had two awesome sticky-back cloud outlines to use that were left on the backing!  THAT was a great accidental discovery.  :)


The wooden buttons and shapes, and the hemp baker's twine are found in the Wooden Mini Medley, and the adorable painted button is in the Surf's Up Assortment.


I had not used this adorable stamp set called Splendid Day from the previous Idea Books, but this page certainly called for it!  


The chevron arrow stamp is found on the Chantilly Cardmaking Workshop on the Go My Acrylix.


There you go!  This spectacular beachy paper is actually carrying over to the Autumn/Winter Idea Book, so you have plenty of time to get one and play sometime if you don't have it for this particular challenge.  You can always use some similar colors and link up with us now for the Color Dare  instead.  Go get those creative juices flowing, and just do it...but don't forget the TEAL!!!!  ;)

Monday, March 4, 2013

Heart 2 Heart Takes on Daylight Savings Time

Happy MONDAY!  Wait, what am I saying?!?!  Actually, I really do mean it--this is my first Monday as Guest Designer for the Heart 2 Heart Challenge Blog, so I am super-excited to show you the project that I gave you this teeny tiny peak of yesterday.  I have to say that I was quite impressed with my iPhone pic!  ;)


Are you ready for the first challenge of March Madness?  Here it is:  Daylight Savings Time!

Now, when I think of coming to the end of Daylight Savings Time, I think...more sunshine, baby!  That means winter is about to make a final exit and usher in some warmer days.  In anticipation of many warm, sunny, sparkly days ahead, here is the card I made.


Can't you feel the warmth of this sunshine?  I used the round frame from the Frame Flair My Acrylix Stamps to make this beaming sun breaking out from behind the cloud.  This is one of my FAVORITE new stamp sets in the Spring and Summer Idea Book.  The stamp set that comes with the Chantilly Scrapbook Workshop on the Go completes the center of the sun.  I love how the rays of tan glitter paper add even more warmth to the card.  The sunbeams are created with stamps from the Patterned Pennants My Acrylix stamps using Honey, Buttercup, and Goldrush Exclusive Inks on White Daisy and Buttercup Cardstock.  Here is a peek at how I laid out the paper on the card...and then just snipped off the ends so they were even with edge of the card.


The bottom blue patterned paper is from the Surf's Up Paper Packet.


This gorgeous ribbon is the Close to My Heart Color Ready Seam Binding Ribbon (For those of you who have seen my Hot Cocoa Tutorial, I can say it now, lol!!!)  I used our Goldrush Reinker, a ziplock baggie, and a spray of stamp cleaner to color it up and crinkle it.  I love this look and the subtle variation this method gives the color.  I tied up the double bow with some white bakers twine and added a little antique gold button to top it off.  I also added some tiny sparkles from the Sparkles Brown and Tan Assortment around the frame of the sun.


All of the shapes that I used for the sun and cloud are cut from the Cricut Artiste and Art Philosophy Cartridges.  I absolutely love how easy they make it to create shapes to match our stamps!

I hope you will share your interpretation of Daylight Savings Time with us over on the Heart 2 Heart Challenges this month.  You have the whole month to create something and link it up!  I can't wait to see what you make!  This month, for March Madness, you just might win a prize!!!  Thanks so much to the DT at H2H for having me along for the ride!  :)