Showing posts with label CCR. Show all posts

Thursday, February 13, 2014

A Valentine's Day Coffee Gift Card Holder with Art Philosophy

I have said it before, and I'll say it again...I am a lazy crafter!  If it takes too many steps, I'm out before I started.  SO why in the world did I not use a simple tutorial for this project???

Oh, no.  I just HAD to make a CCR file using the Close to My Heart Cricut Art Philosophy Cartridge!  Yep.  I was determined to do it after seeing so many cute coffee cups.  I KNEW I could design one of my own, and I did!  The best part is that I can cut every single part from my Cricut for my workshops!  AHA!  There is the lazy factor!  ;)

Here is my final product, and you better believe it took a bit of java to get me here, lol...


I simply welded and altered shapes from the Art Philosophy Cartridge to make each part of this card, cut them out, and assembled!  The scallop behind the sentiment is a punch that CTMH used to carry, but I sure could make it on the Cricut if I wanted to do it that way.

I used the brand new Paper Fundamentals Basic Assortment from CTMH for the cute heart pattern sleeve and am linking this creation up to the Heart 2 Heart Hearts Galore Challenge this month.  The sentiment is one of many included in the Holiday Tags My Acrylix.  A retired glitter button, some contraband baker's twine, and a Flamingo Dot round out the embellishments.  That's it!


You can attach a gift card to the insert with a couple of glue dots.


I wrote a little instruction on the back just in case...


You can decorate the back of your card with another sleeve if you like, but I wanted to have plenty of room to write a little message.  :)

This Paper Fundamentals Paper is FANTASTIC!  There is a clear resist pattern on one side and the same pattern in white on the other.  Two of each of the neutral color palate for a total of 20 sheets in each pack.  I will be making this one from the Idea Book for SURE!!!  Who's IN???


Are you ready for some GREAT news?  Anyone who places an order on my website is eligible to receive the CCR file for these Coffee Gift Card Holders!  Just place an order and let me know you want me to email it to you!  It is THAT easy!  I did all the hard work for us, lol!  Shop now at www.mimimyselfandi.ctmh.com! 

There is also one more way to get the CCR file from me--this will be one of the cards available to make at my Creative Cards Workshop on Feb. 28th at 7 pm.  All attendees will be able to have the file absolutely free!  There are several themes available for the card since it will be past Valentine's Day.  Here is a shot of the stamp set so you can preview some of your choices...


Remember!  Did you read my newsletter?  When you place an order at my workshop, you get a discount on the workshop now!  I will have all the details up on my Workshop tab shortly!  :)


Monday, October 14, 2013

Heart 2 Heart Shaped Card Challenge!

Here we go!  It is already time for the next Heart 2 Heart Challenge for October.  This month, we want you to show us your amazing shaped card creations!  No squares or rectangles, but something else, something different for a change!

What better thing to celebrate with a fun shaped card than an October birthday!?  My youngest just turned 10 last week, so I put on my thinking cap and went to work.  I decided on a party hat design with her favorite color from the Babycakes Paper Packet!


There is quite a bit going on here, so I will hit the high points, lol.  My favorite parts are the Striped Slate Twist Ties and the free printable download of a chevron flag/banner!  You can get them free on my Close to My Heart website until the end of October right HERE!  I just printed them out on white CS, cut it out, and folded it around this stick pin from the For Always Assortment.  Easy as cake!  ;) 


I added a glittered up #10 from the Glamor Glitter Alphabet that I easily trimmed the middle out of to fit the flag.  ;)

The pom-pom atop the hat is made by cutting two of the little burst shape from the Artiste Cartridge, one in Lagoon and one in Pear.  Then I layered over top those with pieces of twine tied in the middle.  It is topped off with another piece from the For Always Assortment.


The wonderful sentiment is stamped with my clear acrylic Joyful Birthday stamp.  I just can't get enough of this font!


Some Lagoon Houndstooth Washi, Aqua Dots, and Black Sequins dot the corners, and a strip of green glitter paper is all it took to ground the bottom of the hat.

I lined the inside with two smaller White Daisy CS triangles than I used to make the card in the Cricut Craft Room.


Have you played in CCR yet?  It is amazing what you can do in there!  You can make a shaped card, for instance!  I chose the pennant banner shape on the Cricut Art Philosophy Cartridge to start and sized it to fit in a standard size A2 envelope.


Then I copied that triangle, and flipped it using the little clicky below...


After lining it up the triangles, just slightly overlap them so that you can choose to WELD them together!  SO easy! 


Now that you know how to make a shaped card--it's YOUR turn!  Link your creation up with us to play along over at the H2H Challenge Blog!  :)


Saturday, August 31, 2013

How to Hide Cuts in Cricut Craft Room

Hi everyone!  I finally edited a little video that I had taken showing you how to hide cuts in the Cricut Craft Room that I always talk about.  I also show you how to search for images and save your cut file for later use!  I apologize for my techie issues...I didn't have enough storage to upload the HD version, and this one is far from perfect.  I don't have the time to figure it out right now, so unfortunately this is as good as it gets right now.  Hope it is still helpful.  Enjoy!  If you are on your phone and can't see it go HERE!  ;)


Monday, July 22, 2013

At H2H There's Water, Water Everywhere!

Hello again!  Welcome back for another week at Heart 2 Heart Challenges with Team Sunset!  This week's challenge at Heart 2 Heart is Water, Water Everywhere.  Chose a way to make your project include something to do with water.  Well, I really don't know anything that says water better than washing your hands! 

This challenge turned out to be great motivation for me to do a project re-do.  I had found this sign on Pinterest, and made one of my own a while back that you can see here.  It is almost painful to go back that far in my blogging days, lol!  If you look, you will see that my link doesn't even work!  Oy vey!  Here is my original inspiration for this saying.

And here is my re-do!


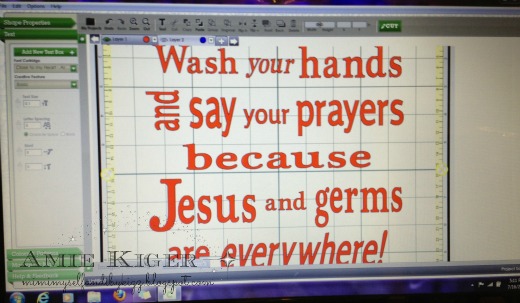
I think we have some improvements upon last time, no?  ;)  Let's get into the details!  I started by going into Cricut Craft Room to play around with the fonts on the Cricut Art Philosophy and Artiste Cartridges.  You can do all sorts of things to alter your images and cuts, so if you want to play with word art, this is the place to be!   It is totally free to use the Craft Room, you just have to own the cartridges to cut the things you design with them.  This is what it looked like on my screen...


See how I was able to resize the letters and even tilt some of them?  You do that by clicking and dragging your cursor over the words to group them.  Then you can move them anywhere or edit them as a whole word.  After I finished getting it all laid out just right (red), I copy pasted each portion to another tab (blue) so it would be spaced easily to fit all my papers on one cutting mat.  Huge time saver there, and I didn't have to cut out the entire thing for each color paper I wanted to use!  Did I mention how much I love this program?


I didn't want it to cut the letters just yet, though, so I switched out my blade housing for the Cricut black marker.  This would be the base for attaching my lettering.  Could you imagine lining up all those letters freehand?  Yikes!  I did a test run on scrap paper before actually writing it on this pattern from Close to My Heart's Surf's Up Paper Packet.


Then I laid out all the paper on my cutting mat according to which color paper I wanted each word to be and ran the cutting mat through just once!  The outline of the marker gave the perfect pop to the patterns I used and even allowed me to offset some of the letters for a great effect.  I love the dark grey glitter paper! 


I popped up some of the letters with foam tape.  See the long arrows stamped on each side of the phrase?  I used Crystal Blue Ink and a brand new Autumn stamp set called One Way Borders to add those...pointing down for hands under the water, and pointing up for prayers on the way!  ;)


Finally, the blinging could begin!  This great wave was cut right on my Cricut E2 since the NEW Artbooking Cartridge is not available in CCR yet.  Have you pre-ordered yours yet???   I also added glittery buttons and clear buttons as bubbles, and some Small Sparkle Flourishes and these great new Twist Ties (available August 1st) as some splash!


I used my paper piercing tool to give them a twist like this!  


I added a cluster of splash to the top corner too...those are blue sparkles in the buttons.  They won't be back in the next Idea Book, so get them by the end of July before they run out!


I hope you are inspired to come play along with us at Heart 2 Heart Challenges!  We would LOVE to see what you make!  Here is a quick link to the rules.

You have until the end of the month for all of the July challenges, so go get your craft on and show us YOUR sparkle!  :)