Showing posts with label Rosewood Mini-Medley Accents. Show all posts

Saturday, May 10, 2014

More Stitched Flowers for Mother's Day!

What can I say...I just could not stop myself!  Once I started cranking out these gorgeous flowers, the ideas came fast.  Here are two more Mother's Day creations I have to show you!


I used my FAVORITE paper packet for this one...Ariana!  That beautiful floral print was BEGGING me to make these flowers with it. 

I used two different My Acrylix stamp sets:  Holiday Tags for the sentiment, and Perfect Fit Mom for the little accent around the flowers...


I had some gorgeous Teresa Collins sequins and Rosewood Accents to add for the flower centers.  Can you see the amazing, deep color of the glitter paper I used?  This is a dark brown/bronze and it plays sooooo nicely with Ariana! 


One mom down, and one to go!   I used more elements from the Rosewood Accents Mini-Medley Collection...


Perfect Fit Mom again, too...


 Loving that stitched label die for these sentiments!  Thanks, Emma!  :)


I am linking this up with the MCT Designer's Challenge, so go check it out!

Happy Mother's Day to all the moms out there!!!  BIG HUGS to you all!  :)


Wednesday, April 30, 2014

Close to My Heart Designed Decor Display Tray with Ivy Lane

*A Side Note*  Are any of you who subscribe via email getting notifications from my blog?  Would you please let me know.  Thanks.  I think there is a glitch with Blogger.  OK, on with today's post! 

I have been putting this off for a bit now, but only delaying the inevitable.  I can't change the date of graduation just by not posting my project pics, lol.  Sigh.

My Display Tray turned out really different than I originally intended, but I love that it did!  Sometimes you just have to be flexible with a project, even if you think you have it all planned out.  I thought I would put one picture for each year of school since there were 12 slots.  I did not take into account that fact that my daughter would nix some of those pics, lol!  I did allow her to have a say in the final product, including the Ivy Lane theme, and here it is!  (Lots of pics...sorry!)


Our Designed Decor Display Tray is SO versatile for cherishing and documenting your precious memories.  I used both retired and current products to create each of the different boxes.  This one features the Ivy Lane Complements and a flower from the retired Frosted Assortment.  I love when older products combine well with new ones!


A girl needs glitter!  Well, this girl does anyway...so I was sure to use the Pink Glitter Paper to back this picture along with the retired Glamour Glitter Alphabet.  The pic is popped up with our foam tape which is hard to see with all that sparkle!  ;)


I adore this little tag I created with one of the Complements stickers and retired Cherish the Day My Acrylix stamp set.  I used some retired Color Ready Seam Binding Ribbon and Bitty Sparkles to glam this one up...


Banners are just beautiful ways to display a name, and this one turned out JUST right.  The flowers are from the retired Bitty Buds Assortment...I know, I know, I wish they were still available too!  The pennants are cut with the Art Philosophy Cartridge.  There is still time to get this amazing staple Cricut Cartridge FREE!  Click HERE for all the details...


It ended up being SUPER-easy to add the banner to the Tray with these clothes pins that I attached using my trusty, must-have-on-hand-at-all-times, Liquid Glass...


The overall feel of this frame is very elegant, so I used flowers from the Ivy Lane Assortment and the retired Frosted Assortment, AND was sure to add a very romantic Sparkles Flourish to this box...


Vellum, anyone?  One of my new favorite things is vellum!  I stamped this image from School Years with White Daisy Pigment Ink and zapped it with a heating tool to dry.  You always have  to be careful about placing adhesives on your vellum because it will show through.  One of my favorite methods for dealing with this is embellishing right over it!  I used the Rosewood Mini-Medley A here to do just that.  This picture was a true 4 x 6 which fit perfectly when chopped right down the middle due to the pose. 


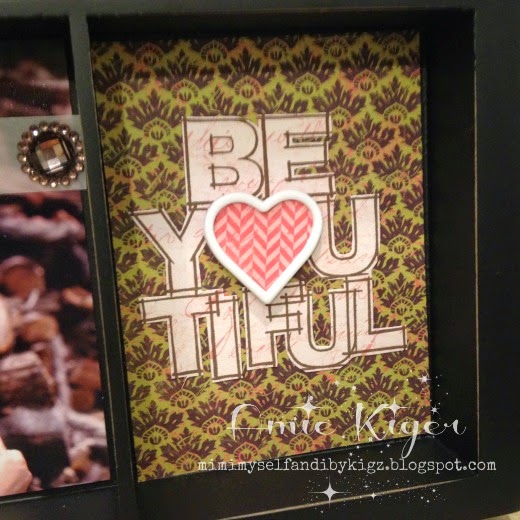
And now my favorite Embellishment!  Ever since I got my hands on these White Marquee Enamel Shapes, I have loved the look of backing them with patterned papers.  I did that here to replace the "O" in this clever play on the word, "BEAUTIFUL" that I stamped with the Framework Alphabet.  My daughter is by no means afraid to be herself, and I am very grateful for that blessing.  This sums her up in one word perfectly.  


There you go!  This has been my ultimate labor of love project!  I just need you all to help me out with ONE little detail!  I cannot for the life of me decide what to do about the middle two boxes behind the banner.  Should I leave it black or add these green papers?  I don't like being so indecisive, and I really love it both ways, but what do YOU guys think!?  Please, please leave me a comment to let me know your thoughts!   :)  I will chose a winner at random from all the comments to send a little thank you gift to at the end of the week, ok?  Ready, set, go! 


ALSO!  Speaking of vellum...I wanted to show you a sneak peak of something you will see on tomorrow's Damask Divas Blog Hop project!  I have been waiting forever to share!  Are you as excited as I am?  :)


AND last but not least at all, today is THE LAST day to purchase the new consultant kit and receive your choice of Cricut Collection absolutely FREE!  No strings attached, I promise!  :)

Click HERE to see more or sign up for the kit! 


AND it is the LAST DAY to get your hands on the AWESOME stamp of the month on my website!


Can you handle one more?  AND it is the FINAL day to make any purchase and be entered to win the Mother's Day My Acrylix!!!  SHOP HERE on my website today for these deals!


Thursday, October 31, 2013

Damask Divas Huntington Blog Hop!

Welcome to the Damask Divas Huntington Blog hop!


If you arrived from Hillary's Blog, then you are on the right path.  If you would like to start at the beginning of our hop, just head on over to the Damask Divas Blog for the entire line-up!  The blog hop starts on November 1st, so don't worry if some of the links aren't up yet!

I wanted to use Huntington for a home decor piece since the colors would be just wonderful for Thanksgiving, or even Christmas.  I think the gorgeous wall cone that that I came up with would work well for both!


This came out even better than I had hoped!  I didn't want it to be too busy, so I limited my embellishments to keep it clean and simple. The cone and the poinsettia are both cuts found on the Close to My Heart Cricut Artiste Cartridge.  The cone is cut from one of the B&T papers from Huntington at the largest possible size on a 12 x 12 mat.  The beautiful accent paper is cut at the same setting on relative dial size using the shift key so they will be sized perfectly to go together.

This poinsettia is cut on the Barn Red CS and inked in the same color along all the edges.  I layered the cuts ranging in size from 1.75 to 2.25 inches.  A beautiful sparkle from the Rosewood Mini Medley Accents Collection adds just the right amount of bling.


I took an old bunch of faux flowers that were actually white and pink and colored them with my Barn Red Alcohol Ink Marker.  I love that I was able to match them to my papers without going out and spending any money on new greenery!  :)


I hung it by attaching the new Jute Ribbon with a brad from the Mini Medley Accents Antique Gold Collection on each side.  They were SO easy to slip through the weave of the jute!  The final touch was trimming the top with some Bronze Shimmer Trim.  You simply MUST have this amazing color of our Shimmer Trim!  It coordinates so beautifully with the Huntington Papers.


You can even hang this from a doorknob!


That's it for me on this hop!  Your next stop will be Jamie's Blog, so hop on over and see what amazing ideas she has for you today!  Thanks for popping in!  :)

Don't forget to check out this month's NEW November Stamp of the Month, Illuminate!  Just $5 with a $50 purchase!


Friday, September 27, 2013

Double-Dare for Color Dare 62!

It is Friday!  I have been waiting ever so patiently for this day to come so that I could share this card with you guys!  Maybe not patiently, but definitely waiting, right?

This week at the Color My Heart Color Dare Challenge, we want to double-dare you to use TWO greens from Close to My Heart--Sweet Leaf and Olive.  You are welcome to add your choice of neutrals.  I was making glittered up cards for a challenge, when I realized I could add a little bit of Sweet Leaf to this one for the Challenge and it would be LOVELY!


The wonderful Autumn feel of the Huntington Papers were putty in my hands as I trimmed them and inked up the edges with Cashmere Ink. (I think Cashmere should be spelled "caxhmere" btw...because that is how I keep spelling it, lol!)


I created the flower with the Brown and Tan Glitter Papers and the Just For You My Acrylix which has always been one of my favorites.  I simply stamped the images on the BACKside of the glitter paper and trimmed them out.  Be careful when you try this as the ink dries very slowly for some reason on the backing material.  Can you say, "inkyfingers?"  ;)

The leaves and sentiment are stamped in Olive and Caxhmere, respectively, using images from the Happy Autumn My Acrylix stamps.  ;)


Rosewood Mini Medley Accents add some great texture and strength to the feel of the card.  Below, I used a zip strip from the Huntington Paper Packet--don't forget about these awesome 1/2 inch strips of paper that come on the patterns!


The inside of the card got the Bronze Shimmer Trim treatment...as well as a cut from the Artbooking Cartridge that mimics the pattern in the Huntington papers nicely. 


I am SOOOOO ready for Autumn now!  ;)

How about you?  Show us your creations with these two shades of green (or similar) by linking up with us over at the Color My Heart Color Dare!  We can't wait to see what you make!  :)


Saturday, September 7, 2013

My Favorite CTMH Stamp Set -- Just For You

Hi everyone!  I am checking in to show you the 3 x 3 card I made yesterday for the Card-A-Day Challenge with Mandy Leahy.  I cannot believe it is already day 6! 

I used my favorite stamp set from Close to My Heart called Just For You and the Huntington Paper Packet


This gorgeous little piece of bling in the center of the flower is found in the Rosewood Mini-Medley Accents.  I just love the dash of beauty it adds!


I lined the inside of the card with White Daisy CS since the double sided Huntington paper would not show writing very well.  A lovely little 3 x 3 Kraft envelope will match nicely don't you think?  :)


Sunday, July 14, 2013

Masking Meets Mojo 301

Hi everyone!  I have been playing with some new CTMH supplies this week and giving a few sneak peeks at the Autum/Winter products from Close to My Heart.  Are you ready to see some more?  Super!  :)

Today I am linking up to the Masking July Challenge at Heart 2 Heart Challenges and the Mojo Monday 301 sketch.  I used the brand spanking new C1559 Always Grateful My Acrylix set that will be available starting August 1st on my website


Here is the Mojo sketch (which I turned on it's side.)

I usually follow a sketch pretty much to the "T."  I must have been in an ornery mood yesterday though, because I translated the two parallel rectangles in a bit of a different layout because, quite frankly,  I just didn't want them staggered. That is the beauty of a sketch, though, and Mojo Monday always has fantastic sketches!  :)

I used the Love Doily My Acrylix for the beautiful Ruby colored rounded shape.  See that button bling?  It is from the soon to be released Rosewood Mini-Medley Accents from CTMH.  I adore the hint of rose in the metals and bling in this set!  


This sentiment box that I matted with our super-sparkly Black Glitter Paper is where my masking technique comes into play.  The words "always thankful" don't look like this without a bit of manipulating.  Let me show you how I did it.  


First, I stamped this image from the Buzz and Bumble Scrapbook WOTG (retired) onto White Daisy CS.


Next, I carefully cut out the "YOU are my HAPPY" sentiment.


I placed that cut-out sentiment on the CS I want to use for my card, lined up the words from the image, and stamped it right on top.  You can only do this with clear acrylic stamps and that is one reason why I LOVE Close to My Heart's!


It didn't come out totally clean since the words were so close to the skinny lines, so I decided to try it a second way.


For this second masking technique, I placed the paper ONTO the stamp itself before inking.


Then I inked it all up carefully, removed the CS mask, and stamped again.  This time it was a clearer image, and I had just a tiny dot of black to fill in.  :)

Finally, I used the "always grateful" sentiment to go in the middle of that image.  Here it is on the carrier sheet. 


You can see it is all in one line on the actual stamp.  I wanted it to fill the space on the image I had already stamped, so I used another masking technique.  This one is super easy.  I simply inked up one word at a time to stamp.  You must be careful to remove all the ink from the stamp in between for this method.  ;)

Sometimes, you can even accidentally try masking like I did with this foam square backing!  LOL!!!  This happens to me all the time when I don't clean up in between projects! 


Have you ever tried masking?  Why not give it a shot?  There are a lot of examples of great masking techniques over at H2H right now, so have a look and give it a try!  You have all month to link your project up with us over at Heart 2 Heart Challenges.  You could win Top Chick for participating!  :)