Showing posts with label Piercing Tool. Show all posts

Monday, July 6, 2015

Makeover Monday!

I hope my peeps from the USA had a fabulous 4th over the weekend!

I have been a bit occupied the past few days with a family trip, a luxury which I quickly learned to cherish after my oldest left for her first year of college.  These days are going by fast while she is home, and I want to enjoy each little chance our family has to hang out together.  Here is a peek at us all rocking out to old Disney movie soundtracks in the van on the way home from TN...


It was GREAT!!!

Alright, back to a layout that I showed you a sneak bit of in May...because I finished it!  :)

That little heart splatter stamp is found on the Documenting Memories My Acrylix.

I used a layout in the last Close to My Heart Idea Book as the inspiration for my makeover...

You might have noticed this picture on the CTMH website in the Specialty Papers category, too!

I will hit some of the product highlights for you...

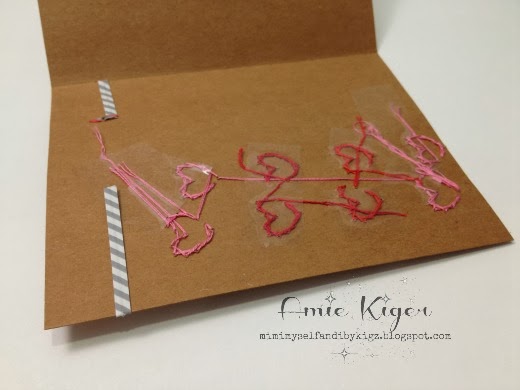
I used the Paper Fundamentals Basic Assortment for the bold background of the layout.  Enamel Dots, Sequins, and some stitching using the Stitch Guide and Piercing Tool round out this cluster.


I cut the letters from the Cricut Artiste Cartridge on my Explore from Lagoon, Topiary, White Daisy, Smoothie, and Honey CS.


The next two pics show all the different washi tapes I was able to coordinate into the layout...


I hope you use your copy of the Close to My Heart Idea Book to transform the amazing ideas into YOUR creations too!  :)

Some of these products I used are retiring in August and running out of stock quickly if you are interested in a makeover of your own!  You can check them out using the links up above.

If you also happen to fill your cart with just $25 in stamps, remember to add a FREE Stamp of the Month OR a $5 Hostess Only My Acrylix stamp set this month!  :)


Friday, March 20, 2015

Guest Blogger Alert!

Hello everyone!!!  Remember when I said I was excited to share a few things with you guys?  Well, I can finally share another one!  My amazingly talented friend, Becca, over at Expressions is going to be making some guest appearances on my blog as my own little DT!!!  You are going to SWOON over her creations, starting with this unexpected little number right here...enjoy her post, and be sure to leave her a little blog love!  :)

I'm excited to be starting some design team duties with my friend, Amie Kiger, over on her blog at Mimi, Myself, and I.  We "met" when we were both on the design team over at Color My Heart.  For my first card, I wanted to put a different spin on both a stamp set and paper pack.


Here's the supply list (with links for your shopping convenience):

I wanted to show you a picture of the stamp set so you could see how I created the "Oh, snap."

I stamped "snap" in Smoothie then very carefully inked just the "Oh," from the sentiment in Black and stamped it on top of the "snap."  I used the micro-tip scissors to cut out the "snap" leaving a border.

When you combine the custom sentiment with the weave paper from Seaside, and add the Smoothie color, the entire card has a completely different feel than what either the stamp set or paper indicates.  But that's my point.  Versatility is only a "hey...what would happen if" away!

Until next time,
Becca --

OK, it's Amie again!  :)

Don't you just ADORE what she did with that stitch guide???  I am really going to have to play with mine soon!

Now is a FANTASTIC time to pick up any of these products--especially those glittery puffy stickers that will not be available on my website after March.  Yikes!  Shop my March Madness Mystery Hostess link, and you could be chosen as the Hostess with the Mostest who gets to choose $25 or more worth of CTMH goodies FREE!  Join by April 7th to qualify to win!  Get more details on MY POST HERE.


Saturday, January 17, 2015

Damask Divas Valentine's Day Blog Hop!


 You are correct!  It is NOT Valentine's Day....YET!  So that means you have plenty of time to soak in some inspiration from our Blog Hop, order up some fantastic products, and get your own projects made in time for February 14th!  :)

This hop is brought to you by the Damask Divas Team led by the amazing Mandy Leahy!  It goes in a big circle, so all you have to do is read each Divas' post, find the name of the next crafty blogger and click on the link to take you there!  If you happen to get lost along the way, just head on over to the Damask Divas Blog for the entire line-up.  No easy button required!  Ready or not, here we go!

My project involved finding a way to send my friends a little gifty that I had made for them at Sticky9.  I wanted to hide the photo magnet in a little pocket card...and wow, did it EVER work out!


I used the fabulous NEW Heartstrings Paper Packet from Close to My Heart, along with Red Shimmer Trim, Red Enamel Hearts, Forever in My Heart My Acrylix, Pixie Extra Thick Twine, Whisper and Cranberry Exclusive Inks, Indian Corn Blue CS, 3-D Foam Tape, Base and Bling Free Thinker Charms, Stitch Guide, Piercing and Embossing Tool, and Scallop Border Punch.  (Pause for a breath, lol.)

Here is how the Cardstock pulls out of the pocket with the magnet inside...


I used our Foam Tape to pop the pocket up just the right amount to fit.  This view shows how you can just tape the messy ends of the twine to the back of the CS after using the Stitch Guide and a needle to thread it through.


Here is another way to make one!


I added some rose images from the Heartstrings Workshop on the GO Cardmaking Kit My Acrylix, along with some Base and Bling to match!  The leafy part of the stamped image is also colored over with the Leaf Green ShinHan Touch Twin Alcohol Marker


I just used my piercing tool to poke a hole in the CS.  Then I used my tiny little pliers for opening and closing the jump ring on the rose.  It was super-easy.  :)


Well, I sure hope you enjoyed my project today!  The amazing Jennifer Dykstra is up next on the hop, so click on over to see what she has to share!  :)

Don't forget to pick up these limited time offers this month as well!

Year Noted for National Papercrafting Month

Stamp of the Month


Saturday, February 15, 2014

Freshly Made with the Close to My Heart Stitch Guide

Have you ever said you would NEVER do something...but then really want to???  Yeah, that happened to me when I saw the Close to My Heart Stitch Guide in the new Spring and Summer 2014 Idea Book.  I said I would never use it.  I don't sew.  I don't WANT to sew.  I CAN'T sew!  And so on.....until I paged through the book and saw THIS...


I HAD to make it!  There are not enough words in my vocabulary to describe how much I adore this page, SO I HAD to get that stitch guide, lol!  I haven't created the page yet, but I did use the guide to make this card with sketch 123 from Freshly Made Sketches...


It was so easy to use the Stitch Guide that I simply had to tell you about it!  Here is a picture of what it looks like.  See all the half-shapes?  They only added half of the shape so that they could fit as many things on it as they could.  You just flip the guide over and line up those center holes to poke the other half!  It worked brilliantly!


Now, if you want to use the Stitch Guide, I HIGHLY suggest the Piercing Tool as well, and let me tell you why.  I have heard from other consultants that other brand piercers do not fit the holes in the guide very well, and I don't want you to get this amazing tool home only to find that you cannot use it!  I used this piercing tool pictured below that we sell at Close to My Heart, and it fit perfectly.

So, here is the way it looks on the back of the paper after you poke all the holes for one side of the shape, and then flip it over to pierce the other half of the shape.  It is really easy to line up everything with the grid on the stitch guide.

I cut a length of embroidery floss, and taped the end to my Kraft Cardstock.  I'm linking up with the Simon Says Stamp Wednesday Challenge, Get Krafty for this one, too! 


Then I sewed all the hearts by hand.  It took some time, but the result is so cute and dimensional for a technique that is really easy to do!  


You will notice quickly that the back side is not so perrrty.  ;)  No problem!  I just cut a 4.25 x 5.5 inch piece of Kraft CS to attach right over the mess!  Presto-change-O!


This sentiment is a combination of two stamps from the Lollydoodle Cardmaking Kit.


My FAVORITE part of this whole card is the little bow embellishment I put together with the Slate Striped Twist Ties.  I used a retired Tulip brad to hold it together, and added a little Pink Glitter Gem.


That's it!  Hope you have a fantastic weekend, and see you back here on Monday to see my new bling!!!  :)