Showing posts with label Non-Stick Micro Tip Scissors. Show all posts

Saturday, August 1, 2015

Damask Divas Zoe Blog Hop!


Welcome to my blog and the Damask Divas Zoe Blog Hop!  If you came from Jamie's blog, then you are in the right place.  If not, you can check out the rest of the amazing blog line-up over at the Damask Divas Blog HERE.

There is something SO refreshing about a NEW Idea Book FULL of new, well, IDEAS! Of course, the NEW PRODUCTS are just icing on the cake, and ZOE is an icing I couldn't wait to take a taste of!  ;)

For my project, I made a card for my latest Hostess with the Mostess to thank her for opening her house for me to share our fabulous Close to My Heart products.  I even found a clever way to use the new Zoe Complements that allows her to use them AGAIN on a project!  Take a look!


See those stars and the striped horizontal strip behind the sentiment?  They are actually stickers included in the new Zoe Complements!

The sentiment and frame are images from the August 2015 Stamp of the Month--Framed!


I trimmed them out with my Non-stick Micro-Tip Scissors with a border so I could leave them on the backing and attach them to the card.  Now my hostess is free to use them on one of HER creations!  :)

The border is printed right on the carrier sheet, so super easy to trim out!

See the faceted cut on the round accent from the Zoe Assortment?


Here is a complete list of products I used...

Value Pack White Daisy 4.25 x 5.5 Cards with Envelopes
White Enamel Stars
Black and Grey Glitter Paper
Zoe Paper Packet NEW!
Zoe Assortment NEW!
Zoe Compliments NEW!
Canary Exclusive Inks Stamp Pad
Slate Exclusive Inks Stamp Pad
August 2015 Stamp of the Month--Framed NEW!
Cricut Artistry Collection NEW!
Cricut Artistry Collection DIGITAL!  NEW!!!

You made it to the end of the hop!  You can start at the beginning with Mandy's Blog HERE.  I hope we really got your juices flowing with these amazing new products!  Remember, you can find the entire line up of Divas participating over at the Damask Divas Blog!


Here are the page numbers to find these cuts and the size to set the height on your Cricut or in DS and CCR!


Wednesday, February 25, 2015

Washi Wednesday Meets #jrlcreativechallenge

I am so excited to share this washi project today...It has been on my brain's backburner FOREVER, but I finally got motivated and actually made it with the latest #jrlcreativechallenge -- getting creative with WASHI!

Washi is a super thin tape, so it doesn't add much bulk to your paper.  That means it will ALSO run through your Cricut machine stuck to CS!  :)

My first step was to design my cuts in Cricut Design Space so I could see exactly where on my paper to put the washi tape.  I used the following images from the Close to My Heart Artfully Sent Cartridge: the Celebrate Card (M10113C) sized at a 5 inch height, Pocket Card (M100F7D) sized at a 6 inch height, and Envelope #11 (MEF85D) sized at an 8.65 inch height.


After you save your design, click the GO button to view your mats.  This will show you exactly where to place your washi on a piece of CS.  In this case, I decided to go all out and washi the whole 9 x 12 CS!  :)


Here's a quick tip--go slowly when unrolling washi!  It is super-thin, so likes to come off before you are fully ready for it to rip sometimes.  Luckily, it is also easy to piece back together--bet you can't tell very easily where I had to!  ;)

I used my Non-Stick Micro Tip Scissors to trim the washi.
Next, place your CS on the cricut mat and cut away!

Another use for washi!  Holds your CS to your mat!  ;)


I decided to use just the letters for my first project.  I placed them roughly in the same places as they were on the cutting mat to align the washi lines...the black CS really made the colors POP!


A few silver sequins as embellishments, and I was done!  :)


Be sure to come back tomorrow to see what I did with the rest of the washi cuts!  :)

Here is a list of all the CTMH washi I used...

Honey Triangles
Silver Geometric
Ruby Chevron
Topiary Striped
Lagoon Hearts (cut in half lengthwise)
Sunset Chevron (cut in half lengthwise)


Stamp of the Month--last week to get yours!

Only a few more days for BOGO 50% OFF! 

Monday, October 21, 2013

Artbooking's Sweet and Lovely Lace Stamp and a Fry Box? Oh, Yes!

Hi everyone!  Team Sunset is back with a new October challenge for you from Heart 2 Heart Challenges.  It is time to grab your LACY Close to My Heart supplies and get crafty, because we are LACING it up this week!  :)

My first instinct was honestly to cringe for this one, lol.  I am not that much of a lace girl.  Bling and sparkle, definitely, but lace, not so much!  Anyway, I did think of the beautiful new stamp on the Artbooking Collection's Sweet and Lovely My Acrylix Stamp Set...


I had recently hopped through my awesome teammate's Damask Divas Sparkle and Shine Blog Hop, and thanks to Jamie, my Kraft paper was calling out my name!  How could I deny these two the chance to get together?  ;)  I cut a Fry Box out of the Kraft paper from the Cricut Art Philosophy Cartridge...and the rest is history!


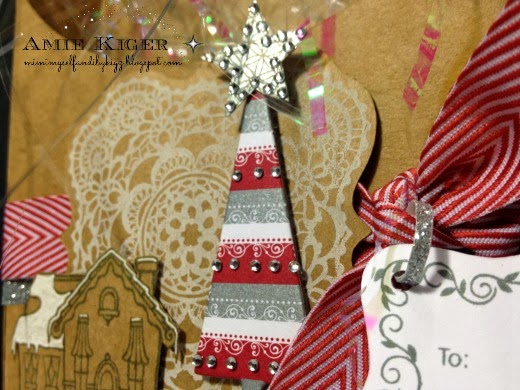
Wow, do I love the look of the White Daisy Pigment Ink stamped on that Kraft CS!  I thought the lace would made a lovely little backdrop for a wintery Christmas scene. 

This adorable little snow-covered house is from the new Close to My Heart Christmas Village My Acrylix.   I LOVE it!  I stamped the image in Slate Ink and used my white gel pen to color in the snow.


The Sparkle and Shine Complements Dimensional Elements are a new FAVE of mine!  They are super for adding to both cards AND layouts AND as you see here--just about everything else!!!  I added some Bitty Sparkles to the tree too.  You can never have enough sparkle!  ;)

That star on the tree is sporting another of my new favorite products--the Sparkle Holiday Shapes!  Aren't they fantastic!!!?  They add an outline of bling to several different shapes that coordinate with the Art Philosophy Cartridge cuts! 


I also used the new Sparkle and Shine Washi tape in metallic silver on the star before I added the bling.  Here is how I did it...then I just cut it out with my Non-Stick Micro-Tip Scissors.  What did I ever do without these?  Oh yeah...gum up my other scissors!   ;)

The washi is silver metallic--not white!  That is the shine you see!

This tag is White Daisy CS cut into this fave shape of mine using the Art Philosophy Cartridge.  I attached it to the Ruby Chevron Ribbon with a skinny little strip of Silver Shimmer Trim looped through.  


I used Slate Exclusive Ink to stamp the wonderful tag image found on the Scandinavian Wishes October Stamp of the Month.  If you have your eye on this great set, don't wait!  It is only available this month and coordinates with the Art Philosophy Cricut Collection!


DON'T forget to check out my new Reward Clubs that are forming NOW!  You have the chance to win one of Close to My Heart's Cricut Collections JUST by joining!  Read all about it HERE.


I hope you have a chance to play along with us this month over at Heart 2 Heart!  All the challenges can be played throughout the month, so you still have plenty of time to link up!  For a full list of the rules to play by, click HERE.  I love to see all of your beautiful inspiration! 

I am also linking this up to the Simon Says Stamp Wednesday Challenge for Christmas Themed projects!