Wednesday, July 31, 2013

Using Close to My Heart's NEW Artbooking Cartridge in a Stampless Layout

Wow, I guess that was a looooong title for this post!  This simple, yet tasteful layout sure didn't take that long though!  I used this quick layout at my Idea Book Preview Workshop, and everyone loved it!


(Sorry for the glare--I was pressed for time, so just had to take it in the page protector.) 

Anyhow, let me walk you through how I made this one with my CTMH products--it won't take long!  This layout is on page 72 of the Artbooking handbook.  I cut the overlay in Chocolate CS at a RELATIVE dial size of 11 on my E2.  Then I used the leaf cut-outs from that to trace on the back of my glitter paper and hand-cut them to add some popped-up leaves to the page.


I then changed the dial size to 10 to cut the photo mat in Colonial White and the word "grateful" in Outdoor Denim.  You do NOT have to change the dial size at all when cutting the pieces for your layout if you would like to make the page as pictured in the handbook.  My creative nature forces me to not conform, however, lol, so I make things more difficult on myself all the time.  Sheesh!


I found the sweet parenthesis on page 81 and set the REAL dial size to 4 to cut it on New England Ivy CS.  I let the ladies at my workshop use the Keyboard Kraft Alphabet stickers to add their own personal touch.


Some of the ladies found ways to add their own unique style to the page and made it their own!  One of my friends decided to wait to add the leaves because she wanted to put pics of her kids in the negative spaces of the leaves!  How brilliant is that?!  I love when my customers knock it out of the park!  :)

SO, did you notice what is missing from this page?  In a previous post I asked this question and nobody ever answered correctly, lol!  INK!  There is absolutely NO STAMPING on this layout!  You could absolutely add some awesome touches if you want, but it isn't necessary with the Artbooking Cartridge at all!  The cardstock can stand entirely on its own very nicely.  Did I ever mention how much I am loving this new CTMH Cricut cartridge?  I did!  TODAY is your last chance to PRE-order this fantastic new collection and be one of the first to get you hands on it!  Click here to see what you might win if you do!  :D

Tuesday, July 30, 2013

Boy Friendly Gift Card Holder with a Hint of Ombre?

I love making frilly, sparkly, girlie paper projects!  Making one that is fit for a king is another story.  For my workshop I wrapped up on Friday, I made a great any-gender gift card holder using the new Artbooking Collection from Close to My Heart.  Go HERE to learn more about this fantastic new Cricut Collection and see all the amazing cuts it has, or keep reading to see the gift card holder!  ;)


This adorable torn sheet of notebook paper is a cut from the brand new Artbooking Cartridge!  Isn't it just darling?  I have been wanting a cut like this!   It even comes with the paper lines to stamp on yourself!  The sentiment, "FOR YOU," is from the My Acrylix stamp set For Every Occasion.  This versatile set is disappearing after July, so get it now if you want it!  It has sentiments for all occasions!

I used several hues of blue for this project in an attempt at an ombre technique so that I could link up with Heart 2 Heart Challenges for their July Ombre challenge.  I used the graduating shades of blue from Close to My Heart:  Sky, Crystal Blue, Indian Corn, Pacifica, and Outdoor Denim.  I have my eyes on another technique to try this out as well, so we will see how it goes. Not sure if this one qualifies or if the shades need to be all lined up...hmmmmm, ombre is so mysterious!  ;)


Two of the arrow stamps I used are from the Cricut Artbooking Collection My Acrylix sets, My Life and Take Note that are available to the public on August 1st on my website.  Take a sneak peek!


The third one, with the polka dots, is from the Close to My Heart Wheel of Life My Acrylix.


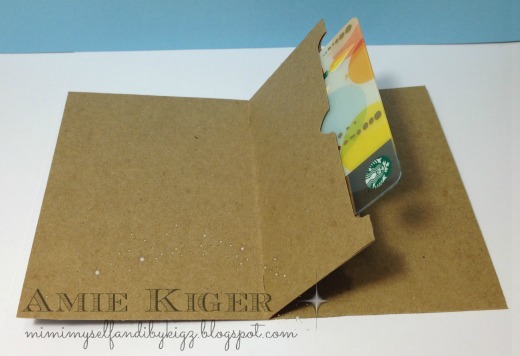
Here is a look at the inside of the gift card holder....it is cut from the Cricut Artiste Cartridge on Kraft paper.  I DID alter it a bit though...it usually looks like this...


I just chopped off all the sides to square it off!  ;)  Looks a bit more manly that way....


This great little pocket for your gift card is all cut out for you to easily assemble.


Super-cute, right?  I left it all plain inside because we all know the guy you give it to won't even pay attention to who it is from when he sees the gift card, right?  ;)

Want to get your hands on that Close to My Heart Artbooking Collection as soon as possible?  How would you like free shipping as well?  You can do BOTH, plus get the August Stamp of the Month absolutely free by pre-ordering RIGHT HERE!  I will put all the orders in right away on August 1st AND your name will be entered into a drawing for $25 worth of CTMH papers, inks, blocks, and more--just from ME! 

Monday, July 29, 2013

Late Night Crafting Craziness!

I am a bit worried about my ability to ever correct my sleeping pattern at this point.  After our family vacation out to WA state, I never really got back into the CST groove, lol.  The upside to this apparent change in my bedtime has been all the late night crafting I have managed!  Can't very well vacuum when the rest of the house is sleeping soundly, no?

SOoooooo I have stumbled upon still more new challenges to try out, the first of which practically had my name on it...Addicted to CAS Code Word: GLITTER!!! 

 
Can you even believe it!?  I did the happy dance in my craft room, then got down to work.  I could not believe that I hadn't played with one of the new Close to My Heart Autumn/Winter products:  Bronze Shimmer Trim!!!  For.  Real.
It was time to correct that little oversight...


For this clean card, I opened up my new Babycakes Scrapbook Kit.  The patterns in this packet are super-versatile, so don't be deterred by the baby theme card, lol.  I LOVE the way the Lagoon CS looks with them.  These little reverse scalloped edges were the negative scraps from some Cricut cuts I made from the stunning new ARTBOOKING Cartridge.  You will definitely want to check out that link after you read this post!

I also used this sketch over at another new blog for me to play along with, Freshly Made Sketches.


This adorable sentiment is included in the D size stamp set in the brand new Babycakes Scrapbooking Workshop on the Go and found in Close to My Heart's Autumn/Winter Idea Book that goes live August 1st on my website.  (Um, run-on sentence anyone?)  There is a design around it on the actual stamp, but I trimmed it off to use only the words.  The Bronze Shimmer Trim is actually included with this kit as well!  See how beautifully it picks up the light?


Would you believe these little bling things come with the kit too?  Yep!  The Babycakes Assortment is full of cute little blingy circles and enamels.


Well, the inside of this card deserved some bling too, don't you think?  After all, it IS a glitter challenge!  


I believe I just successfully created a boy baby card with bling!  Yeah, BABY(cakes)!  ;)


Friday, July 26, 2013

Great Storage Solutions from Close to My Heart

Hello again all my crafty friends!  I found this great, short video clip that shows just how much you can fit in one of Close to My Heart's relatively new Large Organizer.  Now, I don't know about you, but I never really thought I would be getting my organizing products from CTMH--just my papers, stamps, inks, etc.  Fortunately, I picked one of these up to give it a try, and now I don't know where I used to keep these supplies!  It is especially handy if you travel to crops or get crafty with friends.  We have three sizes of these containers now, and they nest together for even more organization.  The Large Organizer provides an easy way to keep all your supplies together, grab, and go!  Enjoy!


Wednesday, July 24, 2013

New Challenges and New Beginnings

Have you ever been in that place in your heart where you know it is time to make a change?  This card is for you, my friends.  This sentiment from Verve Stamps is a quote from Anias Nin, and it always brings many feelings to the surface for me.  I have been in this place before, and I am sure I will be again.  Uncertainty.  Enthusiasm.  Risk.  Motivation.  Motive.  Which emotion does it reveal to you?


I stamped the sentiment in Colonial White Pigment Ink from Close to My Heart.  Then I sprinkled it generously with clear embossing powder and introduced it to my heating tool.  ;)  Pigment Inks are great for stamping on darker papers, and stay wet much longer than dye based inks.  This is why they are ideal for heat embossing.


These stitched hexagon dies from MCT started it all!  Well, that is, after I discovered CAS(E) this Sketch!: CAS(E) this Sketch #37.  See?


This was my chance to use my brand new hexie dies!  Then I wanted to pop one out in the middle of the card...then I wanted to add a butterfly since it is the Dynamic Duos Dessert Option this week using Black and Coral (aka Smoothie from CTMH.)


 But butterflies don't go with honeycomb, that would be bees!  Hmmmm...oooooo what about making a caterpillar with the hexies like I did on the layout HERE!  THEN I can add a butterfly!  The sentiment was chosen next in my creative process.  Can you see the evolution of this design now?  My brain is a tiring place to be sometimes!  ;)


I love the pop of these antennae from the black paper.  I attached them with a dab of liquid glass.  Absolutely unexpected and different, but necessary and welcome.  All the awesome waxy flax is also going away with the current Idea Book from Close to My Heart.  Change.


And so here it is, the butterfly.  I stamped her in Smoothie Ink with one of the D1535 Bugs and Hugs My Acrylix stamps.  The beautiful change that is within you waiting for you to let go and just do it.  Sorry, guys, but I am a child of the Nike generation, lol.  Motivational for some, downright scary for others.  Which is it for you today?


I pray that you embrace that butterfly within you that is just waiting to come out! 

Cool Summer Card

Hi Everyone!  I have more new dies to play with still, so here is another fun card I made the other day.  I used my paper scraps, so no clue about where the PP came from, sorry!  I adore the color combo, though! 


The blue button, twine, ribbon, shimmer trim, and solid cardstock are all from Close to My Heart.  The adorable Ice Cream Die is MCT, and the scalloped border punch is from MS.  My ice cream scoop's adorable face is a Peachy Keen stamp. This sentiment from My Pink Stamper fit perfectly!


I adore the drips of ice cream!  :)


I tucked this shimmer trim behind the border punch to peek through with some sparkle..it adds dimension AND shine!  ;)


A strip of matching pattern paper finishes up the inside of my card.


Super-busy summer days are here, so gotta get back to my fam!  :)

Monday, July 22, 2013

At H2H There's Water, Water Everywhere!

Hello again!  Welcome back for another week at Heart 2 Heart Challenges with Team Sunset!  This week's challenge at Heart 2 Heart is Water, Water Everywhere.  Chose a way to make your project include something to do with water.  Well, I really don't know anything that says water better than washing your hands! 

This challenge turned out to be great motivation for me to do a project re-do.  I had found this sign on Pinterest, and made one of my own a while back that you can see here.  It is almost painful to go back that far in my blogging days, lol!  If you look, you will see that my link doesn't even work!  Oy vey!  Here is my original inspiration for this saying.

And here is my re-do!


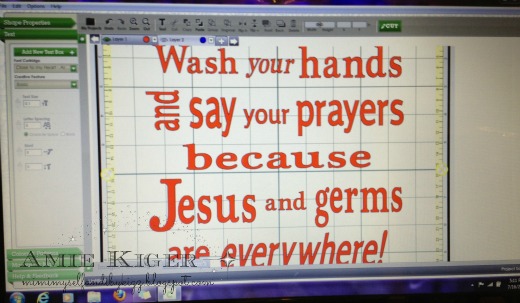
I think we have some improvements upon last time, no?  ;)  Let's get into the details!  I started by going into Cricut Craft Room to play around with the fonts on the Cricut Art Philosophy and Artiste Cartridges.  You can do all sorts of things to alter your images and cuts, so if you want to play with word art, this is the place to be!   It is totally free to use the Craft Room, you just have to own the cartridges to cut the things you design with them.  This is what it looked like on my screen...


See how I was able to resize the letters and even tilt some of them?  You do that by clicking and dragging your cursor over the words to group them.  Then you can move them anywhere or edit them as a whole word.  After I finished getting it all laid out just right (red), I copy pasted each portion to another tab (blue) so it would be spaced easily to fit all my papers on one cutting mat.  Huge time saver there, and I didn't have to cut out the entire thing for each color paper I wanted to use!  Did I mention how much I love this program?


I didn't want it to cut the letters just yet, though, so I switched out my blade housing for the Cricut black marker.  This would be the base for attaching my lettering.  Could you imagine lining up all those letters freehand?  Yikes!  I did a test run on scrap paper before actually writing it on this pattern from Close to My Heart's Surf's Up Paper Packet.


Then I laid out all the paper on my cutting mat according to which color paper I wanted each word to be and ran the cutting mat through just once!  The outline of the marker gave the perfect pop to the patterns I used and even allowed me to offset some of the letters for a great effect.  I love the dark grey glitter paper


I popped up some of the letters with foam tape.  See the long arrows stamped on each side of the phrase?  I used Crystal Blue Ink and a brand new Autumn stamp set called One Way Borders to add those...pointing down for hands under the water, and pointing up for prayers on the way!  ;)


Finally, the blinging could begin!  This great wave was cut right on my Cricut E2 since the NEW Artbooking Cartridge is not available in CCR yet.  Have you pre-ordered yours yet???   I also added glittery buttons and clear buttons as bubbles, and some Small Sparkle Flourishes and these great new Twist Ties (available August 1st) as some splash!


I used my paper piercing tool to give them a twist like this!  


I added a cluster of splash to the top corner too...those are blue sparkles in the buttons.  They won't be back in the next Idea Book, so get them by the end of July before they run out!


I hope you are inspired to come play along with us at Heart 2 Heart Challenges!  We would LOVE to see what you make!  Here is a quick link to the rules.

You have until the end of the month for all of the July challenges, so go get your craft on and show us YOUR sparkle!  :)

Saturday, July 20, 2013

Impromptu Workshop with the Kids Part Two!

Hi everyone!  I showed you the cards my kids made the other week HERE.  Now for one of the few I was able to squeak out while I was helping them!  ;)


I used one of my Verve stamps for this sentiment--Psalm 46:1.  It is stamped in CTMH Chocolate Ink Onto White Daisy CS matted in Desert Sand and Chocolate CS.  I distressed the edges of this unknown PP for the background in Chocolate Ink as well.


Close to My Heart Color Ready Seam Binding Ribbon is so easy to work with--you can use it as is or ink it up to match anything!  I like to ink it up with my CTMH Alcohol Ink markers to match my CS, but for this one, I left it alone.  I added a green button and some White Hemp.

You can barely see it, but I also used one of my new MFT doily dies behind the bow. 


I know just who to send this one to!  :)  I bet you know someone that could use a little bit of sparkle in their day too...why not make them a card?

Friday, July 19, 2013

Color Dare #52 Has a Date with Artbooking!

I am head over heels in love with this amazing new cartridge!  Artbooking is a scrapbooking girl's dream come true.  I made this layout in no time after simply choosing the colors to make each cut.  And to tell you the truth, I didn't even have to pick those because our Color My Heart Color Dare this week chose them for me!  ;)

The colors this week are Twilight, Olive, and Ruby.  Combine them with any neutrals your heart desires...I chose White Daisy, Black, and Whisper.


Any way you slice it, photographing layouts is a trick--so is editing red colors...so forgive any minor color mishaps here...other than that, isn't this amazing?!?  The overlays you can use to back your pages are truly inspiring!  I cut this one on Black CS for major WOW factor.

Artbooking makes it soooo easy to not only plan out, but also to cut your layout pieces!  I simply set the cut size to 11 inches (relative size) and cut each piece out in the right color CS.  Easy-peasy!   Here is the handbook page for the layout I chose...


For this cluster at the top, I backed the word bubble with CTMH's black glitter paper for some emphasis.  The heart stamp is on the Artbooking Sweet and Lovely My Acrylix set that comes exclusively with our Cricut Artbooking Collection.  You will notice I used this same stamp for the clever little leaves at the bottom of the layout!  ;)

More sneak peeks here as well--black sequins from the Mini-Medley Accents Black and a Ruby glitter button from the Mini-Medley Accents Ruby--both available August 1st on my website!


After seeing this in the Artbooking handbook on page 80, I knew this flower would be one of the first cuts I made!  Isn't it gorgeous how the two cuts intertwine?  LOVE!  More little embellies from the two Mini-Medleys I mentioned above as well!

The journal box is also a stamp on the same Artbooking set as the heart I used up above.


Honestly, I cannot believe I made an entire page with no patterned papers!!!  I suspect my Cardstock is going to get a workout in the days to come!  ;)

SO, now you know what time it is!  Time for you to get YOUR craft on and whip up your own creations using the CTMH colors Twilight, Olive, and Ruby (or similar) with your own neutral choices.  Use ONLY those colors with the neutrals and link up with us over at the Color Dare for your chance to win the coveted Color Dare Diamond badge for your blog!  :)

Check out the amazing creations on these other Design Team members blogs!

Sarah
Caroline
Lela

Don't forget to Pre-order your Cricut Artbooking Collection before the end of July!  Get FREE shipping from me and a FREE August Stamp of the Month, A Chocolate Affair!  :)  Click to Paypal button below to safely Pre-order the Artbooking Collection and I will put your order in first thing on August 1st!  :)